

Enhance your crochet collection with our Free Crochet Jellyfish Amigurumi Pattern, the ideal project for adorable and customizable plush toys.
Whimsical charm meets simplicity with this adorable crochet jellyfish pattern that’s perfect for all skill levels. Whether you’re a beginner looking for a fun project or an experienced crocheter wanting a quick make, this pattern strikes the right balance between ease and creativity. The result is an ultra-cute jellyfish designed to bring a playful touch to any setting. It’s not just about making something beautiful; this creation serves multiple purposes. Use it as a handmade gift for baby showers, a soft and kid-friendly toy, trendy room decor, or even a quirky hanging ornament for plants or windows.
Beautiful Crochet Jellyfish Amigurumi Pattern for Ocean Lovers

What makes this particularly special is how customizable it is—change the size, adjust the tentacle lengths, play with colors, or add fun embellishments like beads. With just a little yarn and some spare time, you’ll have a delightful keepsake that’s lightweight, budget-friendly, and full of character.
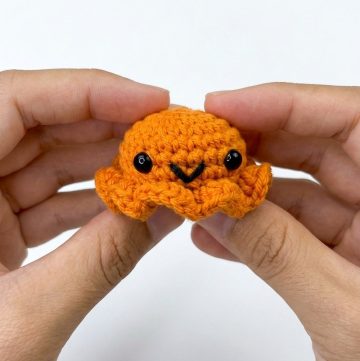
Finished with an optional hanging loop and easy embroidered details like eyes, it reflects your personal style while showcasing your crochet skills. Its curly tentacles and compact design make it an irresistible project for gifting or keeping. Start shaping your own little ocean friend and enjoy how this charming jellyfish brightens your day.

Free Crochet Jellyfish Amigurumi Pattern
A fun and easy crochet project to create a whimsical jellyfish with adorable tentacles. Perfect for home decor, handmade gifts, or as a cute hanging ornament. This pattern is suitable for beginners who want to practice their increasing, decreasing, and twirling techniques.
Special Features
- Level of Difficulty: Beginner-Friendly
- No Complex Stitches: Uses basic single crochet (SC), increases, and decreases.
- Customizable: Modify the tentacle length, use multiple colors, or add embellishments like beads.
- Hanging Loop Option: Includes instructions to add a hanging loop effortlessly.
Materials Needed
- Yarn: Bright red yarn for the main jellyfish body and tentacles (soft DK or worsted weight yarn or desired color).
- Black Yarn: For embroidering the eyes.
- Crochet Hook: Compatible with your selected yarn size (e.g., size 3.5mm to 4mm for worsted).
- Yarn Needle: For sewing and weaving ends.
- Scissors: For cutting yarn.
- Stitch Marker (Optional): To keep track of rounds.
Abbreviations Used
- SC: Single Crochet
- INC: Increase (2 single crochets in one stitch)
- DEC: Decrease (invisible decrease method suggested)
- SL ST: Slip Stitch
Step-by-Step Pattern
Jellyfish Body
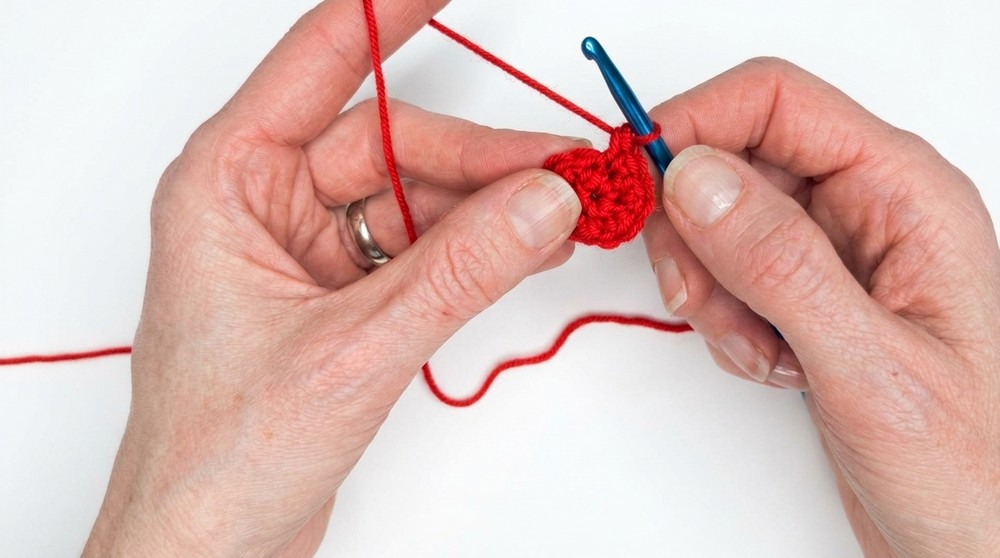
- Start with a Magic Ring:
Leave a long tail for a hanging loop and to use as a stitch marker. Create a magic ring. - Round 1:
Work 6 SC into the magic ring. Pull the tail tight to close the ring. [6 stitches] - Round 2:
Work 2 SC in each stitch (all increases). [12 stitches] - Round 3:
Alternate 1 SC, INC (single crochet in one stitch, 2 single crochets in the next). [18 stitches] - Round 4:
Alternate 1 SC, 1 SC, INC (two single crochets in individual stitches, then an increase). [24 stitches] - Rounds 5-6:
Work 1 SC in each stitch around (no increases). [24 stitches per round] - Round 7:
Alternate 1 SC, 1 SC, DEC (two single crochets followed by a decrease). [18 stitches] - Round 8:
Alternate 1 SC, DEC (single crochet, then a decrease). [12 stitches] - Round 9:
Work 2 SC in each stitch (all increases). [24 stitches] - Finish the Round:
Use the invisible finish for a seamless look: Cut your yarn, pull through, and weave the yarn tail as shown in the transcription.

Tentacles and Oral Arms
- Tentacle Chains (Make 3):
- Create a slip knot and chain 26.
- Alternate 1 SC, INC across the chain to create a loose twirl.
- E.g., First chain: SC, Second chain: INC (2 SC in the same chain), and so on.
- Finish with a SL ST, leaving a long tail for sewing.
- Attaching the Tentacles:
- Turn the jellyfish inside out.
- Using a yarn needle, stitch the tentacles to the center of the jellyfish's underside. Ensure they are securely knotted.
Hanging Loop (Optional)
- Use the long tail from the magic ring. Thread it through the top center of the jellyfish, then back down, forming a loop.
- Secure it in place with a knot and weave in the loose ends.
Facial Features (Eyes):
- Locate Eye Placement:
- Embroider two eyes across row 6, spaced about 8 stitches apart.
- Embroider the Eyes:
- Using black yarn, go over the selected stitch once to create simple, small eyes.

Final Assembly
- Trim the loose ends of the tentacles to your desired length.
- Flip the jellyfish back to the correct side, and your jellyfish is now complete!

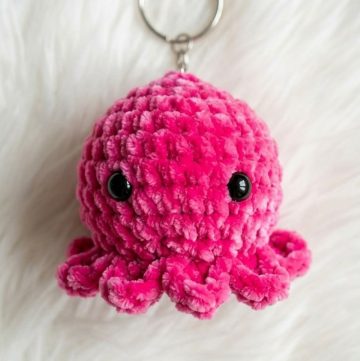
Uses and Ideas
- Adorable keychains or bag charms.
- Kid-friendly toys or ocean-themed decor for their room.
- Cute gifts for baby showers or birthdays.
- Hang them on plants or in windows for a fun, whimsical vibe.
Tutor’s Suggestions
- Use softer yarn for a fluffier effect.
- Experiment with ombre or multi-colored yarn for a fun, gradient style.
- Adjust the tentacle chain lengths to vary the look of your jellyfish.
- Add novelty beads or sparkly thread for extra flair.
Tip
When working the twirl for tentacles, ensure your increases are consistent but not too tight. This will ensure the perfect level of curl without causing the piece to stiffen.
Conclusion
This delightful crochet jellyfish pattern is a simple yet charming project that offers stunning results in little time. Whether you're a beginner or an experienced crochet enthusiast, creating these jellyfish will spark joy and creative satisfaction.
Remarks
With its intricate details and customizable features, this jellyfish amigurumi pattern is perfect for any crochet project. Not only is it easy to follow, but it also provides endless opportunities for personalization, ensuring you'll love the final result every time.


Leave a Reply