

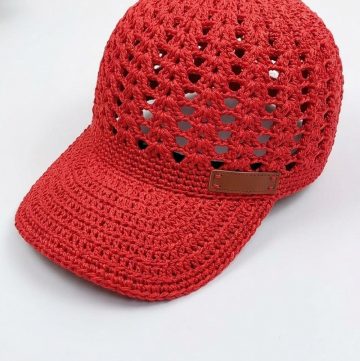
Crown your style with this Crochet Bucket Hat Pattern that offers chic flair, cozy texture, and playful charm for everyday outfits.
Style has always found its way into practical pieces, and few accessories illustrate this balance as gracefully as the crochet bucket hat. Once celebrated as a timeless classic, this hat now takes on fresh charm with the softness of yarn and the intricate texture of handwork. Its round crown and downward brim provide both comfort and shade, making it suitable for sunny days, breezy afternoons, or casual outings in every season. Lightweight yet durable, the hat holds its shape with ease while remaining soft against the skin, ensuring a pleasant wearing experience.
Fresh Crochet Bucket Hat for Light and Carefree Style

Its versatility shines through in how it complements a wide range of wardrobes, from relaxed streetwear to chic seasonal outfits, giving each look a stylish finish. Beyond function, the crochet bucket hat carries a charm that appeals to those who appreciate understated sophistication in everyday accessories. It makes an excellent travel companion, easily folded and tucked into a bag without losing form, always ready to add flair when needed.
Whether gifted to someone special or worn as a personal style statement, it delivers a balance of practicality, comfort, and elegance. This crochet bucket hat embodies timeless appeal, offering warmth, individuality, and effortless fashion in one refined accessory.
Materials Needed
Crochet Materials:
- Yarn: 100% cotton yarn (approximately one and a half skeins). The yarn used in the tutorial is red, but any color can be chosen based on preference.
- Crochet Hook: 4.5 mm for the hat, 4.0 mm for the optional flower.
- Scissors: To trim excess yarn.
- Darning Needle: For sewing in ends and attaching the flower.
- Stitch Marker: To keep track of rows and stitches.
- Measuring Tape: Optional, for checking the hat's diameter and length as you work.

Special Features
- Beginner-Friendly Design:
- The hat is made entirely with single crochet (SC) stitches, which makes it easy for beginners to follow.
- Customizable Size:
- The diameter, height, and brim width can all be adjusted to suit different head sizes (ranging from 21–23 inches in circumference).
- Decorative Options:
- The tutorial includes instructions on how to crochet and attach a simple flower embellishment for added style.
- Functional Brim:
- The brim uses a front-loop-only technique to give the hat its characteristic floppy shape.
- Minimal Materials:
- Only one or two skeins of yarn are needed for the project, with little waste.
Level of Difficulty
Beginner Level:
- This tutorial is ideal for beginner crocheters since it involves only basic techniques such as single crochet (SC), magic ring, chains, and slip stitches.
- The repetitive stitch pattern makes it easier to practice and stay consistent.
Tutor's Suggestions
- Use Stitch Markers:
- Always mark the first stitch of each row to avoid losing your place in the round.
- Check Dimensions as You Go:
- Use a measuring tape to check the diameter and height of the hat to ensure it fits the intended head size.
- Tighter Magic Ring for Cleaner Finish:
- Gradually tighten the center of the magic ring to ensure it closes neatly.
- Front-Loop Technique for Brim:
- Crocheting into the front loops adds flexibility and structure to the brim.
- Customize Brim Width:
- Add or reduce rows when working on the brim to make it narrower or wider, depending on personal style.
- Test Yarn Quantities Ahead:
- The main portion of the hat requires about one skein, and the brim uses some additional yarn, so ensure you have at least 110g of yarn available.
Step-by-Step Instructions
Step 1: Starting with the Magic Ring
- Create a Magic Ring:
- Wrap the yarn around your fingers and secure into a ring shape.
- Chain One & Work Six Single Crochets:
- Chain 1 to secure the magic ring, and crochet 6 single crochets (SC) into the ring.
- Tighten the Magic Ring:
- Pull the tail to close the center, then move the tail to the back of your work.

2: Increasing the Diameter of the Hat
Row 2:
- Work 2 single crochets in each stitch around for a total of 12 stitches (increased from 6).
- Use a stitch marker to note the first stitch of the round.
3:
- Alternate 1 single crochet and 2 single crochets in the next stitch around the row, for a total of 18 stitches.
4:
- Follow the sequence: 1 SC, 1 SC, 2 SC in the next stitch, and repeat around. You should have 24 stitches by the end of this row.
5:
- Use the sequence: 3 SC (in separate stitches), 2 SC in the next stitch around the row, for a total of 30 stitches.

6:
- Use the sequence: 4 SC, 2 SC in the next stitch, for a total of 36 stitches.
Additional Rows for Diameter:
- Keep increasing the diameter by following the same pattern, adding one more single crochet between increases in each row (e.g., 5 SC, 2 SC, then 6 SC, 2 SC, etc.).
- Stop when the top of the hat measures 6.5 inches in diameter (smaller or larger depending on head size).
3: Building the Body of the Hat
- Crochet 1 single crochet into each stitch around without increasing.
- Continue working for 20 rows to create the height of the hat.
- After the first row, the hat will start to shape itself into a downward slope.
- Adjust the number of rows if you want to make the hat shorter or longer.
4: Adding the Brim
- Work 1 single crochet in the front loop only of each stitch.
- Continue working single crochets (in both loops) for a total of 8 rows to form the brim.
- Add extra rows if you want a wider brim.
- Finish by doing slip stitches for the last few stitches to taper the edge, and fasten off.

Optional Step: Add a Flower Embellishment
- Make the Flower Center:
- Chain 5 and slip stitch the ends together to form a ring.
- Add 12 single crochets into the ring and slip stitch to close.
- Add Petals:
- Chain 10, slip stitch into the next stitch, and repeat. Continue until the flower has 11 petals.
- Fasten off with a long tail, sew onto the hat brim using a darning needle.

Uses
- Stylish Accessory:
- Wear as a casual bucket hat for sunny days or as part of a trendy outfit.
- Handmade Gift:
- Makes a thoughtful, handmade present for friends and family.
- Customizable Fashion Piece:
- Add flowers, beads, or buttons to make it unique.
Tip
Ensure Proper Sizing: Regularly check the diameter and height of the hat using a tape measure to make sure it will fit, especially when customizing for different head sizes.
Conclusion
This crochet bucket hat pattern provides a simple and easy way to craft a versatile accessory. With just single crochet stitches and straightforward assembly, this project is perfect for beginners and can be completed with minimal supplies. Adding embellishments, such as the optional flower, allows for creative customization. Whether you’re making this hat for yourself or as a gift, it’s a rewarding and functional project.


Leave a Reply