

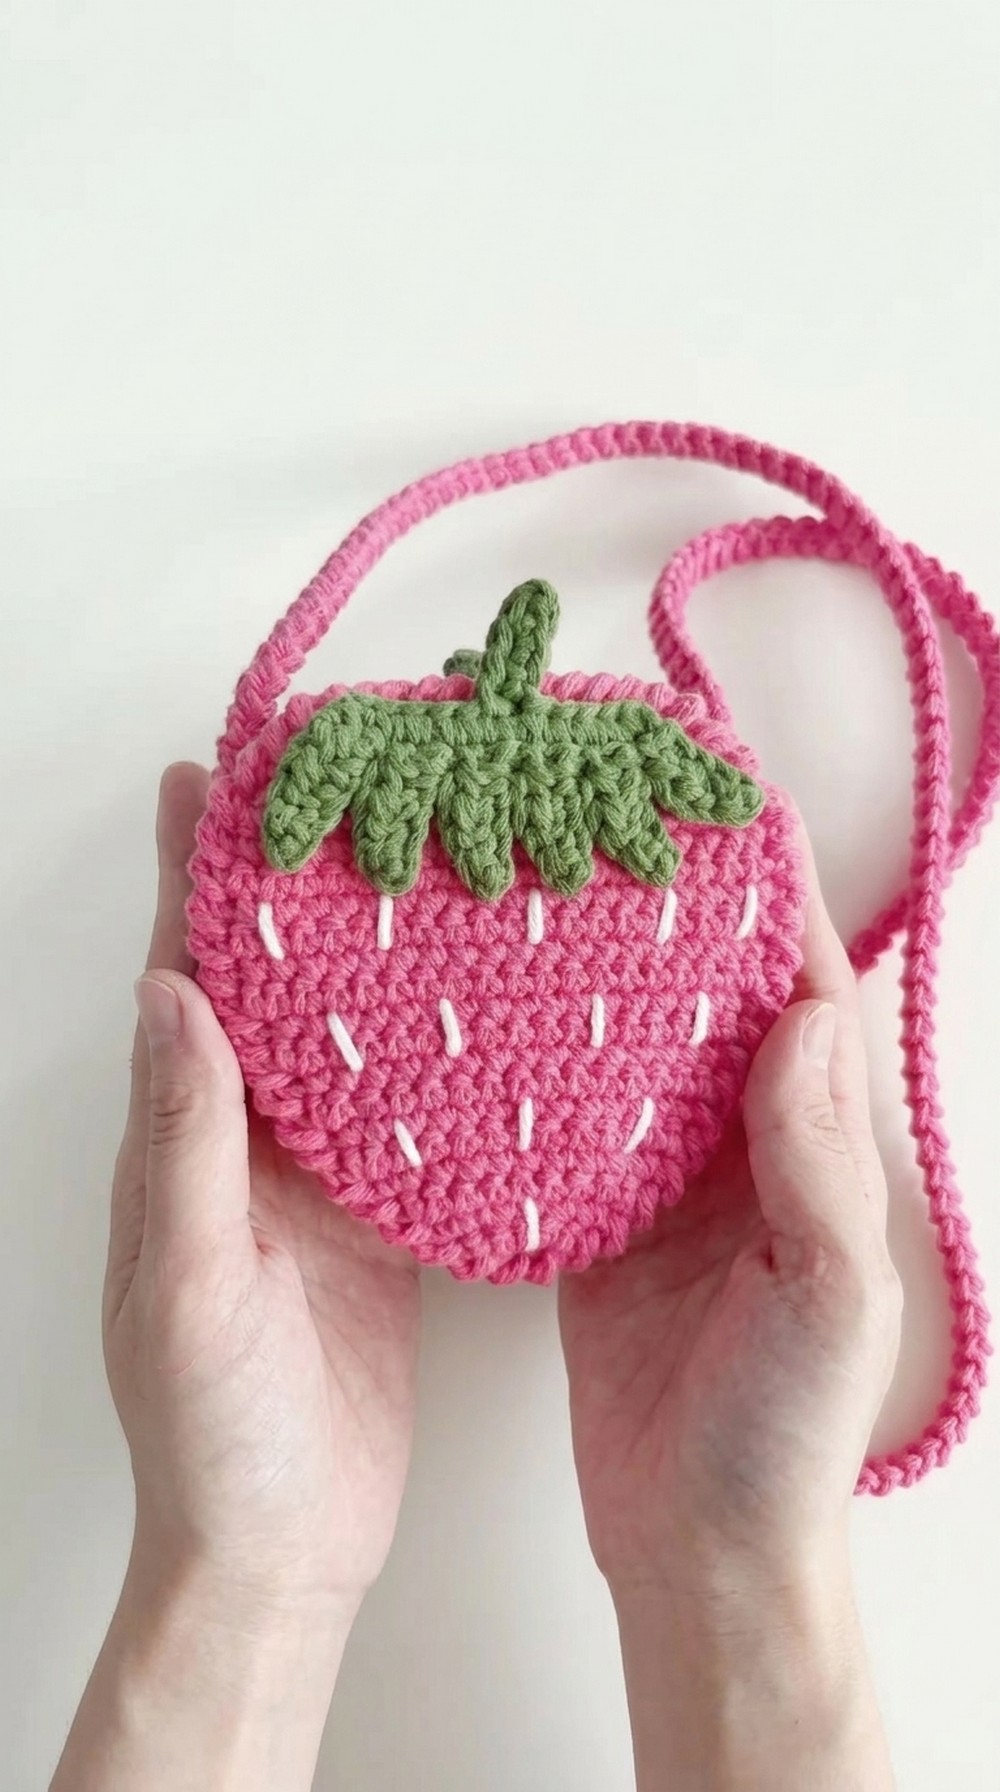
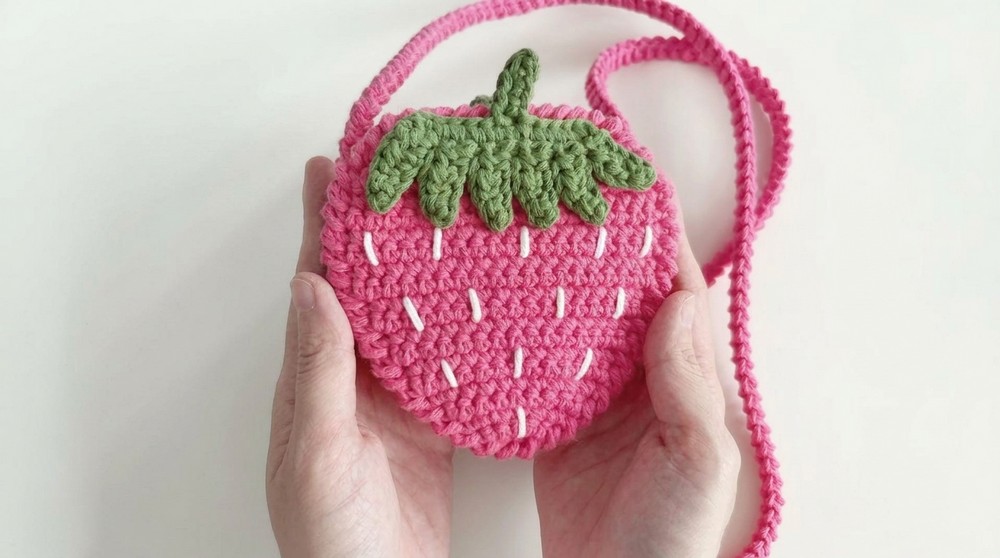
Turn heads effortlessly using this Free Crochet Strawberry Bag Pattern, designed to add charm and functionality to your everyday look.
Who wouldn't adore a bag that’s as sweet as a freshly picked strawberry? This unique accessory offers more than just a whimsical design; it’s a practical, lightweight shoulder bag perfect for carrying small essentials like your phone, wallet, or keys. Its intricate yet easy-to-follow crochet details give it a textured, three-dimensional look that’s sure to catch attention while being surprisingly beginner-friendly.
Beginner-Friendly Crochet Strawberry Bag Pattern Easy & Quick
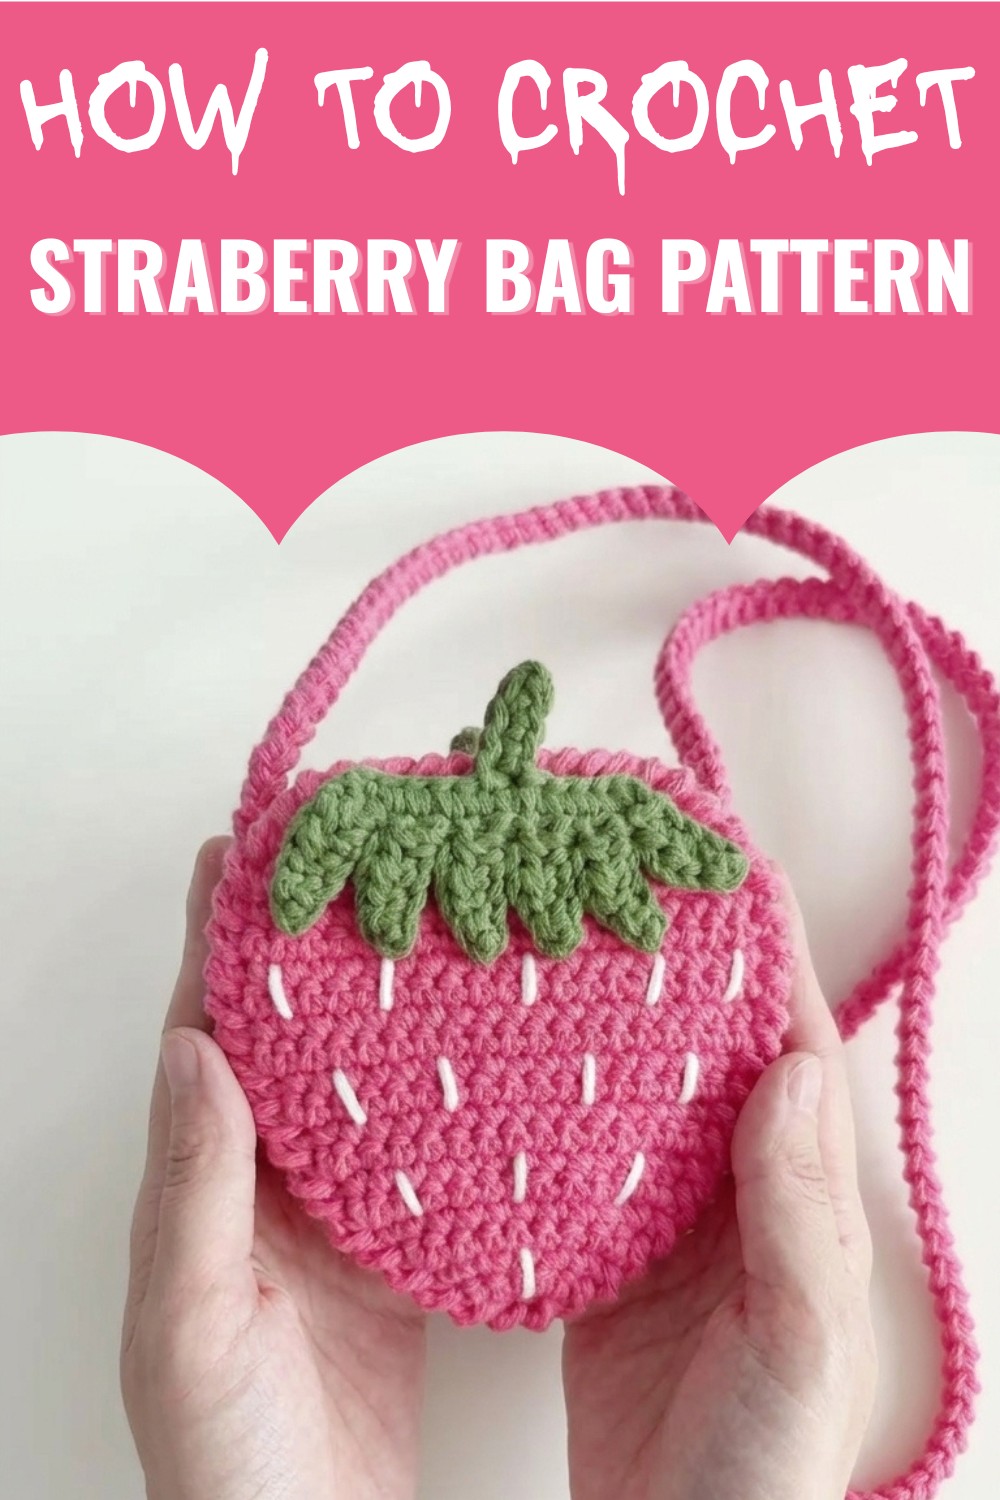
Made using soft cotton yarn, this trendy little bag pattern is perfect for casual outings, summer markets, or even as a handmade gift that shows thought and care. The green leaf accents, combined with the tiny white "seeds," give it a realistic feel, while its manageable size makes it versatile for any occasion. Whether you're looking to accessorize with something playful or make a statement with your crochet skills, this cheerful strawberry bag pattern is the perfect choice!
Not only is it fun to stitch, but it’s a fantastic way to polish your crochet skills with straightforward techniques. Best of all, it offers sustainable style—handmade with heart. So, take your wardrobe to the next level with this sweet, functional, and one-of-a-kind carryall!
Special Features
- Charming Design: The strawberry bag features a three-dimensional shape that mimics a real strawberry, complete with white seeds and green leaves.
- Beginner-Friendly: Simple stitches make it accessible, even for crochet novices.
- Portable Size: Small and lightweight, it's the perfect on-the-go bag for carrying small essentials.
- Versatile Uses: Ideal as a casual shoulder bag, gift, or even a decorative item.
Materials Needed
- Yarn: 2mm hollow cotton yarn in red (for the main body), white (for the seeds), and green (for the leaves).
- Hook: 3.5mm crochet hook.
- Other Tools: Scissors, a needle for sewing, and hot melt glue.
Crochet Pattern
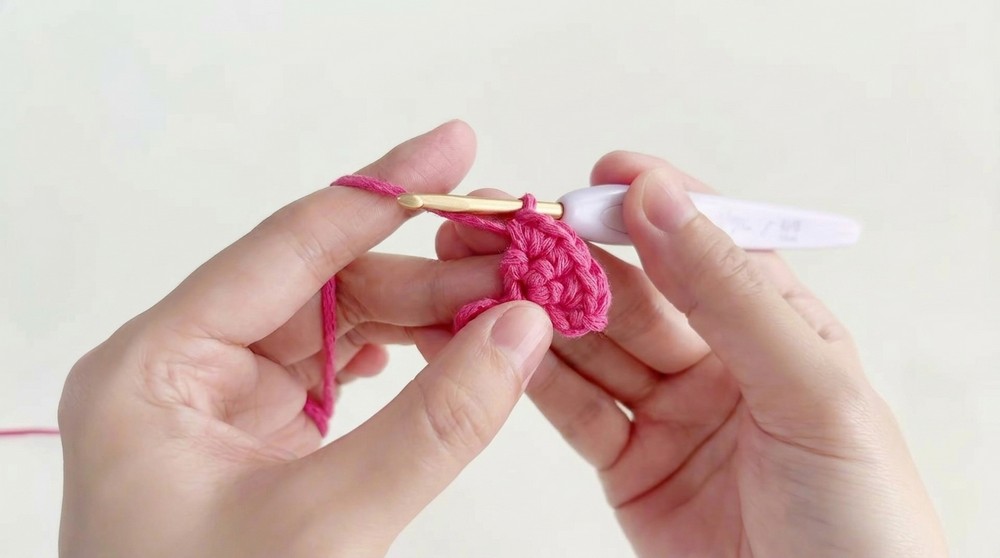
1. The Main Body
- Chain Foundation: Begin by creating a foundation of chain stitches.
- Chain 13 stitches.
- First Row:
- Chain 2 stitches and insert the needle into the first chain stitch.
- Crochet 3 single crochet (SC) stitches.
- Second Row:
- Chain 1 stitch and flip your work.
- Add 1 stitch into the first stitch and crochet 2 SC stitches.
- On the second stitch, add 1 stitch and crochet 2 SC stitches again.
- Continue Increasing:
- From the third row, continue with the same pattern:
- Chain 1 stitch, flip the fabric, add 1 stitch in the first and last stitches, and work SC stitches in between.
- Repeat until the 6th row, increasing up to 13 stitches.
- From the third row, continue with the same pattern:
- Row 7 to Row 12:
- Add 2 stitches every other row until you reach 19 stitches total.
- Row 13 to Row 17:
- Maintain 19 SC stitches per row, without increasing or decreasing.
- Shaping the Top:
- In Row 17, loosen the stitches slightly by working them in pairs, reducing the number. Crochet 15 SC stitches in sequence, then decrease further by two stitches on each side in the next rows.
- From Row 19 to Row 21, continue reducing by 1 stitch on each side, until you have 11 stitches left.
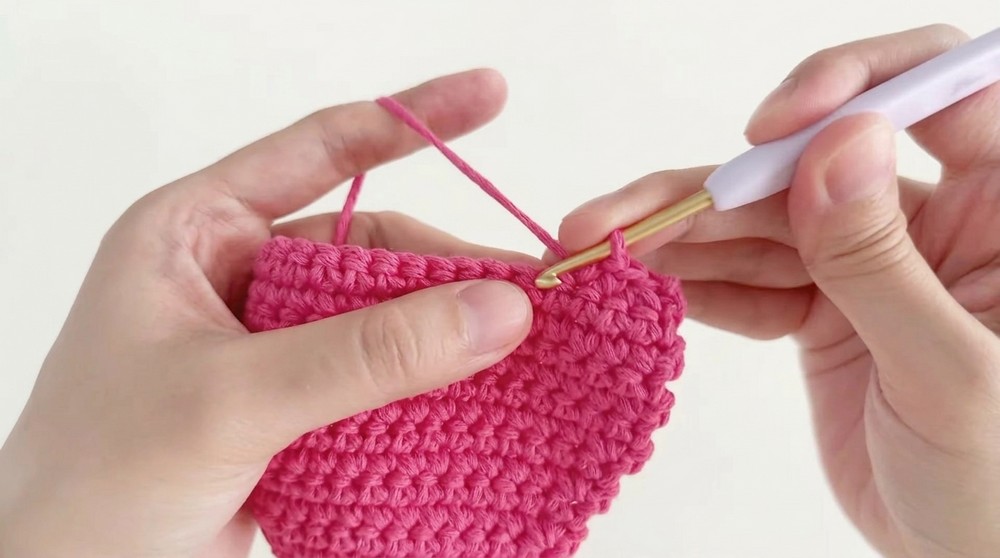
- Edge Finishing:
- At the end of Row 21, work a round of single crochet stitches around the edges for a neat finish.
- To do this: Insert the hook into the last stitch, pull up a loop, wrap the yarn, and pull through both loops. Repeat for the entire edge.
2. Adding the Strawberry Seeds
- Use white yarn to sew small "seed" details onto the main body of the bag. Space them evenly for a realistic and adorable look.
3. Crocheting Two Back Panels
- Repeat all steps above to create a second identical panel for the back of the bag.
4. Creating the Bag Sides (Webbing)
- Begin the Side Strip:
- Chain 5 stitches to start.
- Skip the last stitch and crochet 4 SC stitches back across the chain.
- Continue Rows:
- Flip the fabric, chain 1 stitch, and crochet 4 SC stitches across in each row.
- Repeat for 46 rows, ensuring uniformity in width.
- Attach the Side Strip:
- Sew the side strip to the edges of the front and back panels using a needle to form the body of the bag.
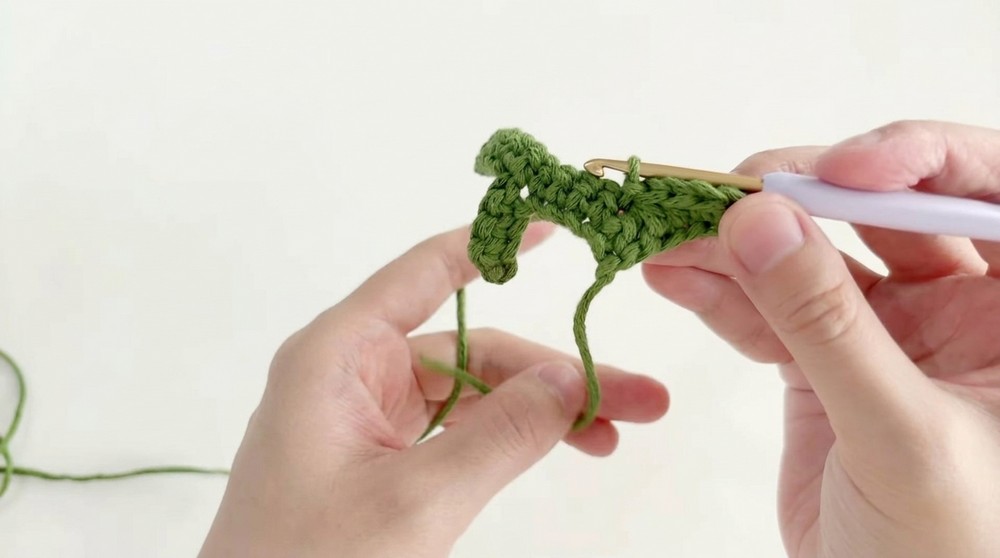
5. Leaf Accent
- Chain Foundation:
- Chain 10 stitches.
- First Leaf:
- Return to the second-to-last stitch and crochet 3 SC stitches.
- Crochet a slip stitch in the next stitch, then chain 6 stitches.
- Return to the second stitch from the last and crochet 5 SC stitches.
- Make a short stitch at the base of the slip stitch, then work 5 more SC stitches across.
- Repeat:
- Repeat this process, creating 6 leaves in total to encircle the top of the bag.
- Attach the Leaves:
- Use hot melt glue to fix the leaf panel to the top edge of the bag.
6. Shoulder Strap
- Using the shrimp braid method, crochet a long shoulder strap and sew it securely to each side of the bag. Adjust the length based on your preference.
Tutor’s Notes
- Difficulty Level: Beginner-friendly; ideal for those comfortable with basic stitches.
- Suggestions: Use a contrasting white or pale-colored yarn for the seeds to make them stand out. Ensure tight and even stitching for a professional look.
- Uses: This bag is perfect as a compact accessory for outings or as a creative, handmade gift.
Final Tip
For added durability, consider lining the bag with a fabric insert. This will make it stronger and prevent smaller items from falling through the stitches.
Conclusion
Your strawberry shoulder bag pattern is now complete! This adorable, handmade accessory is a delightfully unique crochet project that combines aesthetics and functionality. Its vibrant colors and charming pattern will surely make it a conversation starter.

Leave a Reply