

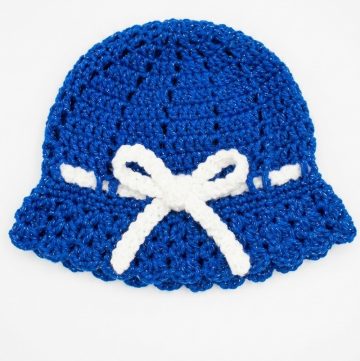
Follow this Free Crochet Bucket Hat Pattern for a stylish, eco-friendly solution to beat the summer heat with a handmade flair.
Effortlessly stylish and practical, this crochet project brings together functionality and charm. A bucket hat made with recycled cotton yarn offers not only a lightweight and breathable accessory but also a sustainable way to elevate your style. This pattern is perfect for sunny outings, casual gatherings, or thoughtful handmade gifts for loved ones. Its beginner-friendly design ensures accessibility while providing opportunities for customization, such as adding a braided decorative band or floral appliqué for a personal touch.
Lightweight Crochet Bucket Hat Pattern for a Breezy & Stylish Look

The structured yet soft weave makes the hat durable and comfortable, ideal for everyday use. Adjustments for different sizes are seamlessly integrated into the pattern, offering versatility for all ages. Plus, the eye-catching texture and customizable brim length allow you to create an accessory that suits your personality and needs. Working with tighter stitches using a smaller hook ensures a snug finish that retains its shape while looking chic.
Whether you're adding daisy accents or choosing bold colors for flair, this project is your chance to create a trendy and functional hat that fits beautifully into modern wardrobes. With reusable materials and straightforward instructions, this crochet bucket hat is a blend of creativity and practical use – perfect for summer days and beyond.

Special Features:
- Level of Difficulty: Beginner to intermediate (requires knowledge of single crochet, double crochet, and magic ring techniques).
- Features: A snug, tight weave, created with a 3mm crochet hook for a structured yet soft finish.
- Customizations: Options to add decorative bands, daisy appliqués, or modify brim size.
- Uses: Ideal as a summer accessory, a thoughtful handmade gift, or even a fashionable addition to any outfit.
Detailed Crochet Bucket Hat Pattern
Materials Needed:
- Yarn: 2 balls of Denim Breeze Recycled Cotton Yarn from Hobie (Red or desired color; approx. 109 yards/100 meters per ball).
- Contrast Yarn: Optional, for the decorative band or daisy.
- Crochet Hook: 3mm hook (smaller than the recommended 4.5mm for a tighter weave).
- Stitch Markers
- Measuring Tape
- Darning Needle
Pattern:
Step 1: Creating the Perfect Circle (Top of the Hat)
- Magic Ring:
Start with a magic ring (or magic circle). - Round 1:
- Work 6 single crochet (SC) into the magic ring.
- Pull the ring snug.
- Round 2:
- Work 2 single crochet in each stitch around.
- Total: 12 SC.
- Round 3:
- Work 1 SC in the first stitch, then 2 SC in the next stitch. Repeat this pattern (1 SC, 2 SC) around.
- Total: 18 SC.
- Round 4:
- Work 1 SC in each of the first 2 stitches, then 2 SC in the next stitch. Repeat (1 SC, 1 SC, 2 SC) around.
- Total: 24 SC.
- Subsequent Rounds:
- Continue increasing using the formula: Add one more single crochet before each increase. Example: For round 5, do 1 SC in each of the first 3 stitches, then 2 SC in the next; for round 6, 4 stitches between increases, and so on.
- Special Tip: Once the shape begins forming a hexagon, rotate your starting stitch position by working an additional 3 SC at the beginning of your rounds for smooth edges.
- Continue working until the circle reaches your desired diameter based on the size chart. For an adult small, aim for a 7-inch (18 cm) diameter. For this project, 16 total rounds were needed to achieve the correct size.

Step 2: Side of the Hat
- Transition Round (Back Post Single Crochet):
- After completing the circle, start the sides with 1 round of back post single crochet.
- Insert your hook from behind the post of each stitch, pull up a loop, and single crochet.
- Rounds 1–8:
- Work 1 SC in each stitch for 8 rounds (or approximately 1.75 inches/4.5 cm).
- Round 9 (First Increase):
- Divide the round into 4 equal sections using stitch markers.
- Work 2 SC in each marked stitch while working 1 SC in the other stitches.
- Rounds 10–11:
- Work 1 SC in each stitch without increases.
- Round 12 (Second Increase):
- Repeat the increasing process, spacing the increases opposite the first increase points.
- Continue working until the sides measure 3 inches or 8 cm.

Step 3: The Brim
- Foundation Round (Band Details):
- Start with 1 round of double crochet (DC).
- Chain 3, then work 1 DC in each stitch around.
- Round 1 (Single Crochet):
- Work 1 SC in each DC stitch from the round below.
- Round 2 (Increase Brim):
- Work 1 SC in the first 2 stitches, then 2 SC in the next stitch. Repeat (1 SC, 1 SC, 2 SC) around.
- Subsequent Rounds:
- Continue working SC rounds, measuring as you go. Add increase rounds as needed by dividing the brim into 4 sections like before.
- Stop when the brim measures 2 inches or 5 cm.
- Final Round (Slip Stitch):
- To finish, work slip stitches (SL ST) into every stitch. This gives a polished and firm edge.

Step 4: Decorative Band
- Create a slip knot and chain 1.
- In the back bump of your chain, insert the hook, yarn over, and pull through two loops to form a braided stitch.
- Repeat this technique until the braid fits around the hat.
- Weave the braid through your double crochet round using a darning needle, ensuring it’s evenly spaced.
- Secure the ends of the braid with a few stitches and attach it lightly to the hat.
Optional Customization: Daisy Appliqué
- To add a playful daisy, follow the linked tutorial included in the original video’s description. Secure the daisy to the hat where desired for a charming design accent.

Conclusion:
Congratulations! You’ve now completed a stylish crochet bucket hat pattern that is not only functional but also trendy! Its lightweight cotton material and handmade details make it a go-to accessory for summer outings, vacations, or gifting.
Tutor's Suggestions:
- Use markers to keep track of your stitches and ensure accurate increases or decreases.
- Choose contrasting colors for the band or appliqués to highlight your design.
- Take frequent measurements to ensure the hat fits perfectly. Adjust as needed.
Final Tip:
Always weave in your ends securely, especially the starting magic ring, to prevent your stitches from unraveling over time. Proper finishing gives your project a professional look.
Complete Remarks:
This crochet bucket hat is as fun to make as it is stylish to wear. Its customizable features allow room for your creativity, and its beginner-friendly nature ensures anyone can bring it to life. Whether for leisure, decoration, or gifting, this pattern provides beauty and functionality harmoniously.

Leave a Reply