

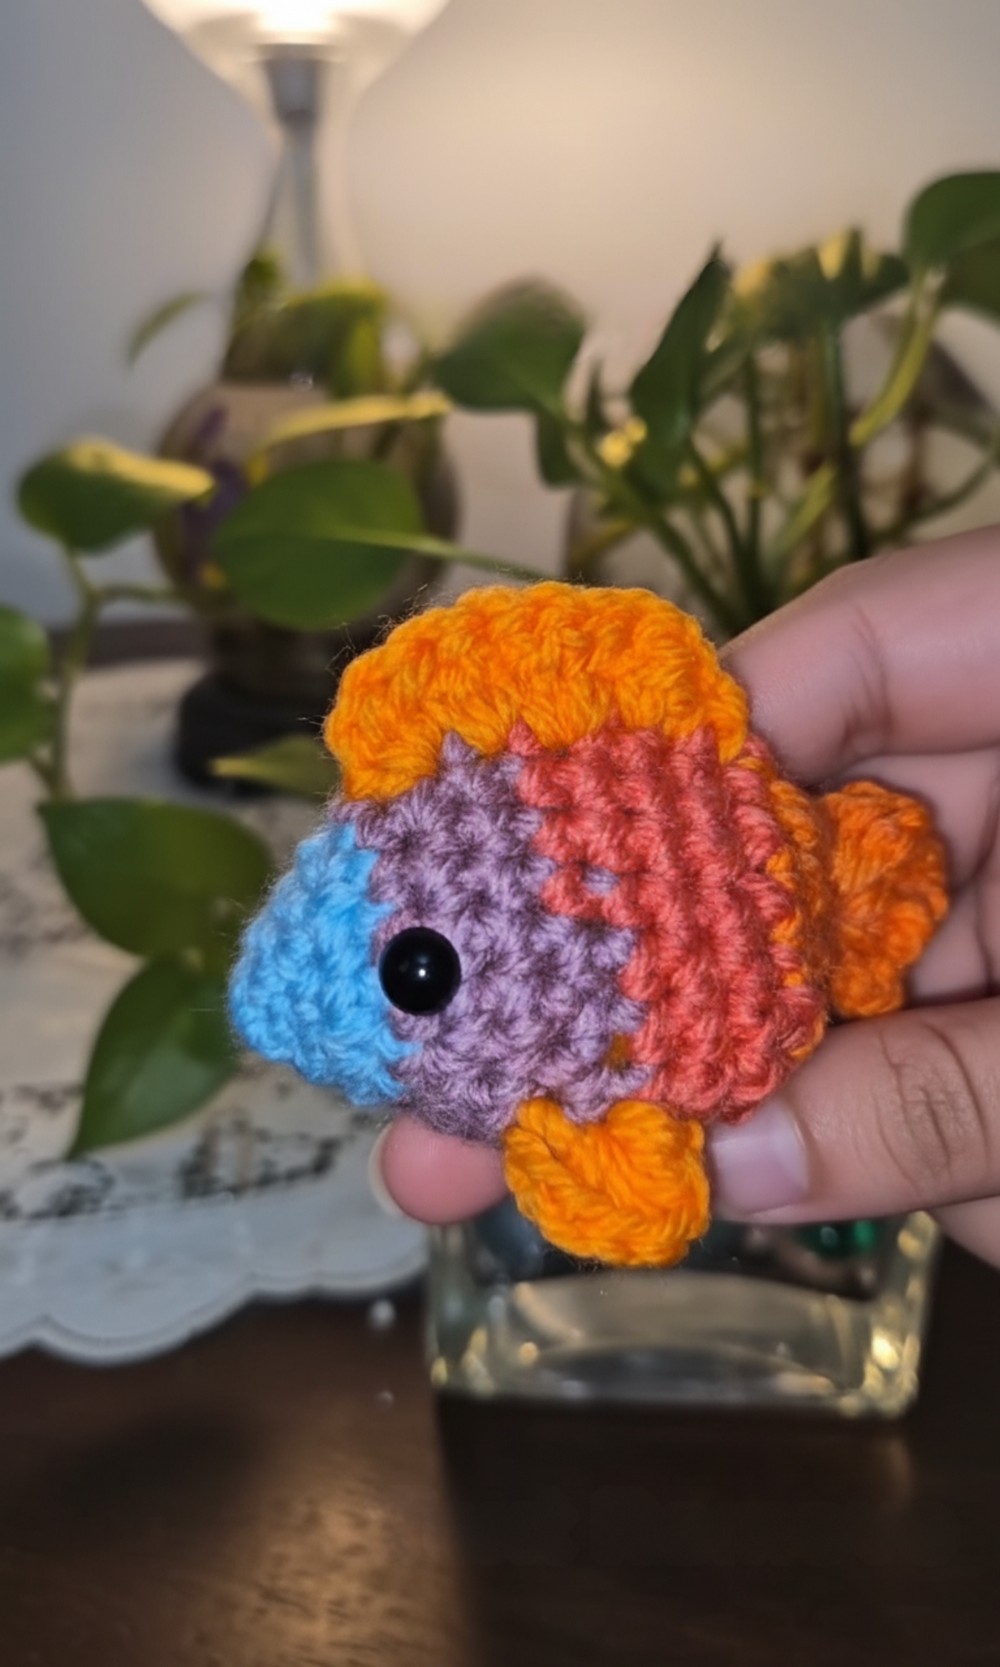
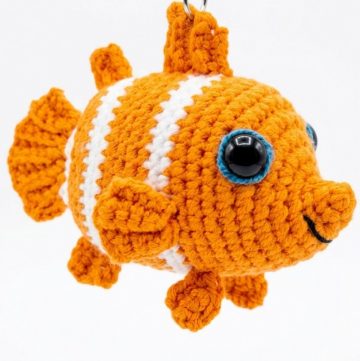
Stitch a refined companion with this free crochet fish amigurumi pattern, perfect for adding subtle elegance to your handmade decor.
Have some leftover yarn? Turn it into a cute little crochet fish that’s quick, fun, and easy to make! This adorable fish amigurumi pattern is perfect for beginners learning basic amigurumi techniques, like the magic ring, increasing, and decreasing stitches. Even experienced crocheters will enjoy it as a relaxing, small project.This pattern isn’t just fun to crochet—it’s super versatile too! Use it as a keychain, a small gift, a kids’ toy, or even a charming decoration for your home.
Adorable Crochet Fish Amigurumi Pattern for Gifts & Decorations
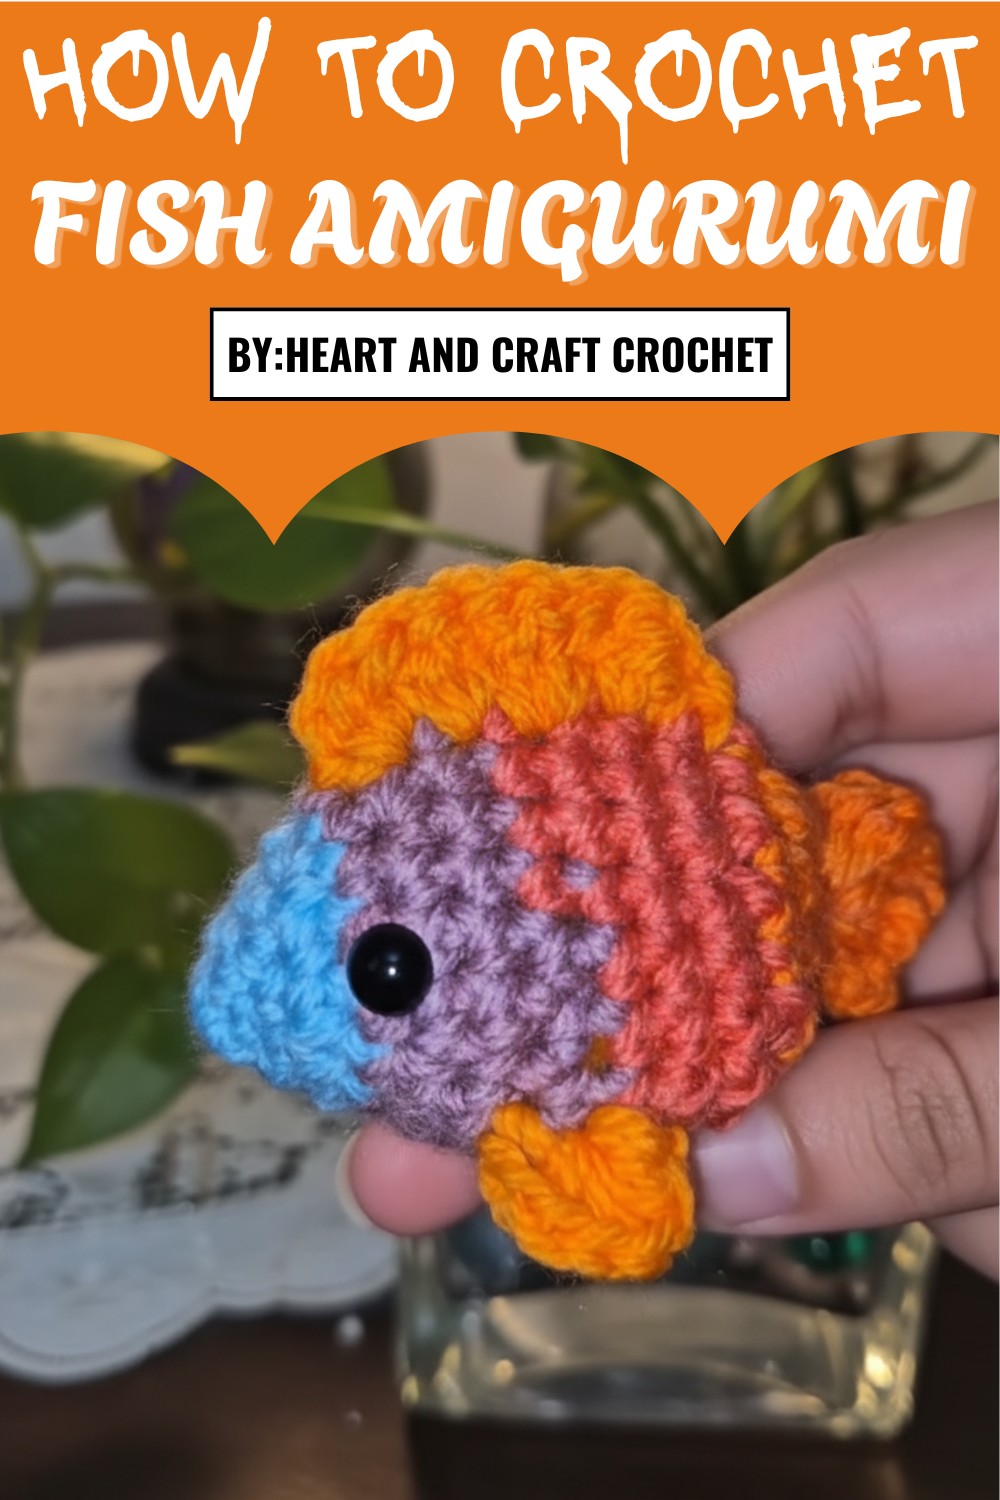
You can customize it with different colors or yarn types, making each one unique and personal. Plus, it’s a great way to use up yarn scraps, so nothing goes to waste. It’s small enough to finish in no time, but still satisfying and creative. Whether you’re crocheting for a market, gifts for loved ones, or just trying to unwind, this crochet fish pattern is a perfect fit. Grab your crochet hook and start stitching—you’ll have an adorable fish to show off before you know it!
Pattern Details:
- Skill Level: Beginner
- Finished Size: Depends on yarn and hook size
- Special Features: Works with scrap yarn, quick project
- Suggested Use: Keychain décor, toy for children, or market craft
- Tutor's Advice: Use leftovers or variegated yarn for unique effects.
Materials Needed:
- Scrap yarn in any color (any weight works, but medium [worsted] weight is shown in the example)
- 3mm crochet hook (adjust hook size depending on the yarn weight)
- Small safety eyes (2 pieces)
- Scissors
- Stitch marker (or a safety pin with a bead if unavailable)
- Yarn needle
- Polyfill stuffing
Abbreviations (US Terminology):
- ch: Chain
- sc: Single Crochet
- inc: Increase (2 sc in the same stitch)
- dec: Decrease (single crochet two stitches together)
- hdc: Half Double Crochet
- dc: Double Crochet
- sl st: Slip Stitch
- MR: Magic Ring
Crochet Fish Amigurumi Pattern
Step 1: Create the Body
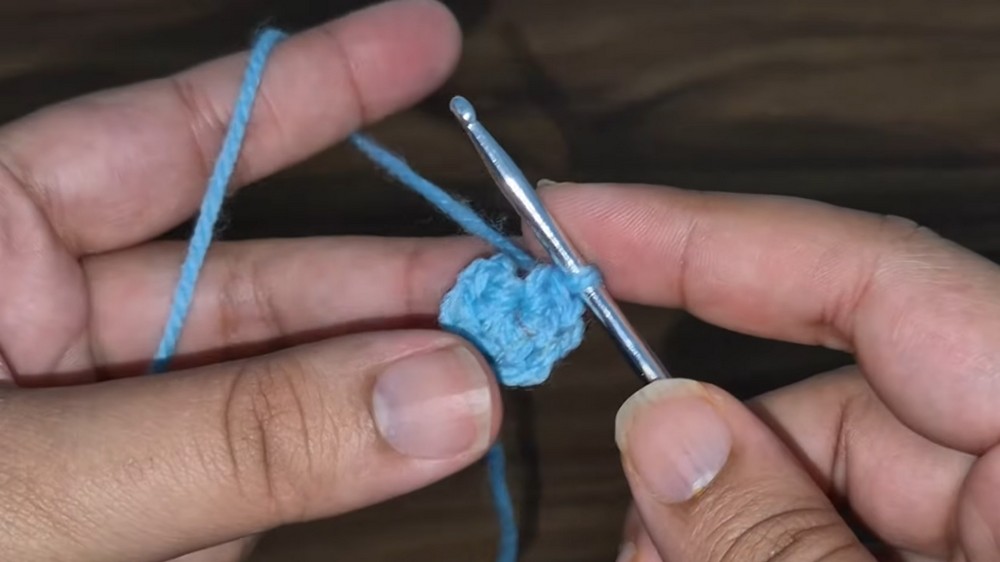
- Start with a Magic Ring:
- Wrap the yarn around two fingers to form an X at the back.
- Insert the hook through the bottom loop, yarn over, and twist to pull up a loop.
- Begin the first round in the magic ring.
- Row 1: Place 6 sc into the Magic Ring. Pull the tail to close the ring tightly.
(Stitch count: 6) - Row 2:
- 1 sc in the next stitch, inc (2 sc in the same stitch) – repeat around.
(Stitch count: 9)
- 1 sc in the next stitch, inc (2 sc in the same stitch) – repeat around.
- Row 3:
- 1 sc in each of the next 2 stitches, inc – repeat around.
(Stitch count: 12)
- 1 sc in each of the next 2 stitches, inc – repeat around.
- Row 4:
- 1 sc in the next stitch, inc – repeat around.
(Stitch count: 18)
- 1 sc in the next stitch, inc – repeat around.
- Row 5: 1 sc in each stitch around.
(Stitch count: 18) - Row 6:
- 2 sc, inc – repeat around.
(Stitch count: 24)
- 2 sc, inc – repeat around.
- Row 7–11: 1 sc in each stitch around.
(Stitch count: 24)
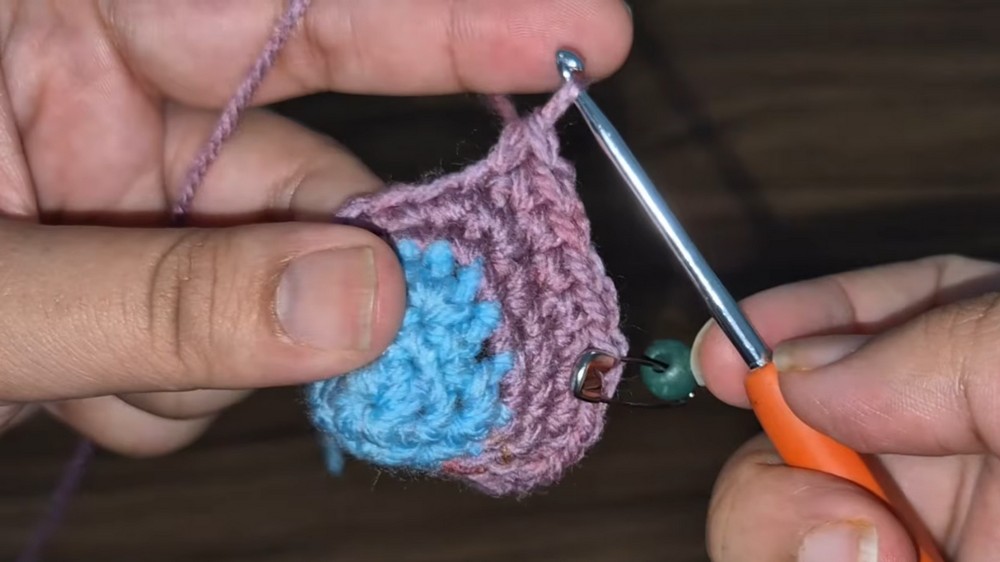
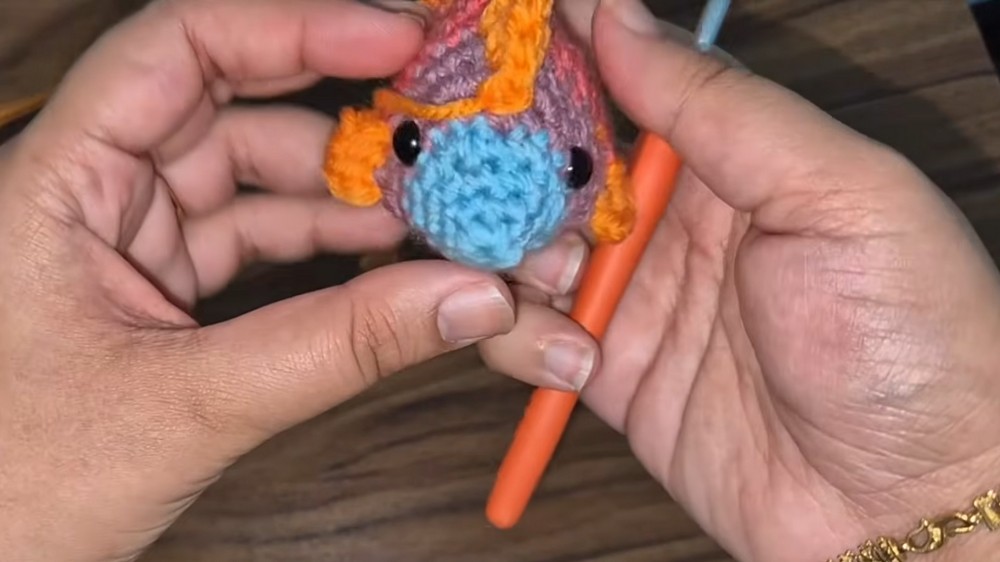
2: Add Safety Eyes
- Fold the fish body in half.
- Position the eyes between Rows 5 and 6, making sure they are evenly spaced on either side.
- Attach the safety eyes securely.
3: Shape the Body with Decreases
- Row 12:
- 2 sc, dec – repeat around.
(Stitch count: 18)
- 2 sc, dec – repeat around.
- Row 13:
- 1 sc, dec – repeat around.
(Stitch count: 12)
- 1 sc, dec – repeat around.
- Add polyfill stuffing to the body. Ensure the stuffing is firm but not overstuffed to maintain its shape.
- Row 14:
- 6 decreases (dec all the way around).
- (Stitch count: 6)
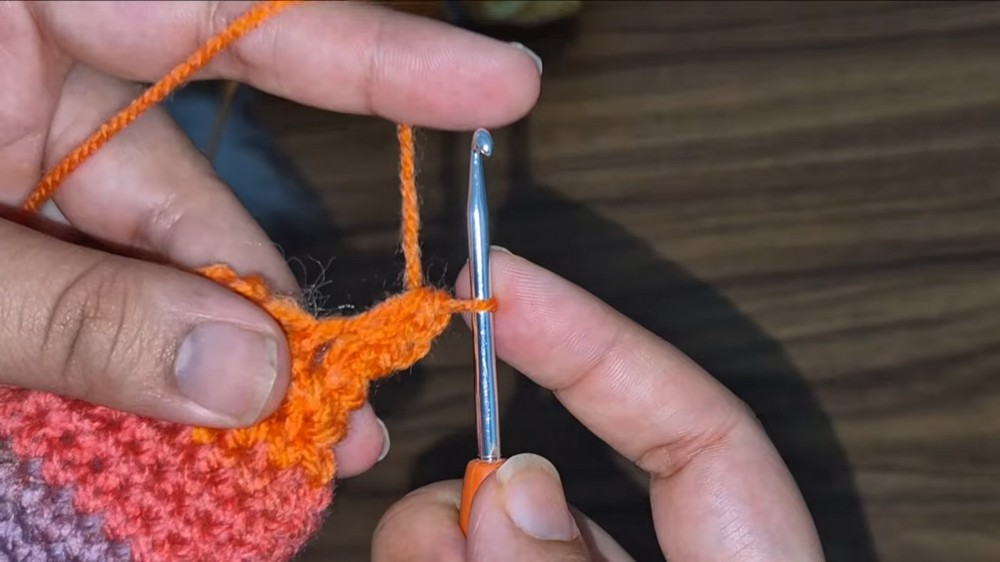
4: Create the Tail Fin
- Fold the last row (6 stitches) in half to form the tail.
- Working across the folded stitches:
- Insert hook into the first 2 stitches and sc.
- Into the same stitch, work:
- 1 sc, 1 hdc, 3 dc, 1 hdc, 1 sc.
- Slip stitch into the next 2 stitches.
- Into the next group of 2 stitches, repeat:
- 1 sc, 1 hdc, 3 dc, 1 hdc, 1 sc.
- Secure the tail with a slip stitch in the next available stitch.
- Fasten off and use the yarn needle to weave in the ends.
5: Create the Side Fins
- Work 2 rows behind the eyes and approximately 2 stitches below.
- Fin Instructions:
- Attach yarn to the starting point, and ch 1.
- Into the next stitch, work 5 hdc.
- Secure with a sl st into the following stitch.
- Fasten off and weave in the ends.
- Repeat these steps on the opposite side for the second fin.
Step 6: Add the Top Fin
- Fold the fish in half to identify the top middle stitches.
- Attach the yarn and work the following pattern:
- Into the first stitch: 1 sc
- Into the next: 2 hdc
- Into the next: 2 dc
- Into the next: 3 dc
- Into the next: 2 hdc
- Into the next: 1 sc
- Secure with a sl st.
- Fasten off and use your needle to weave in all loose ends.
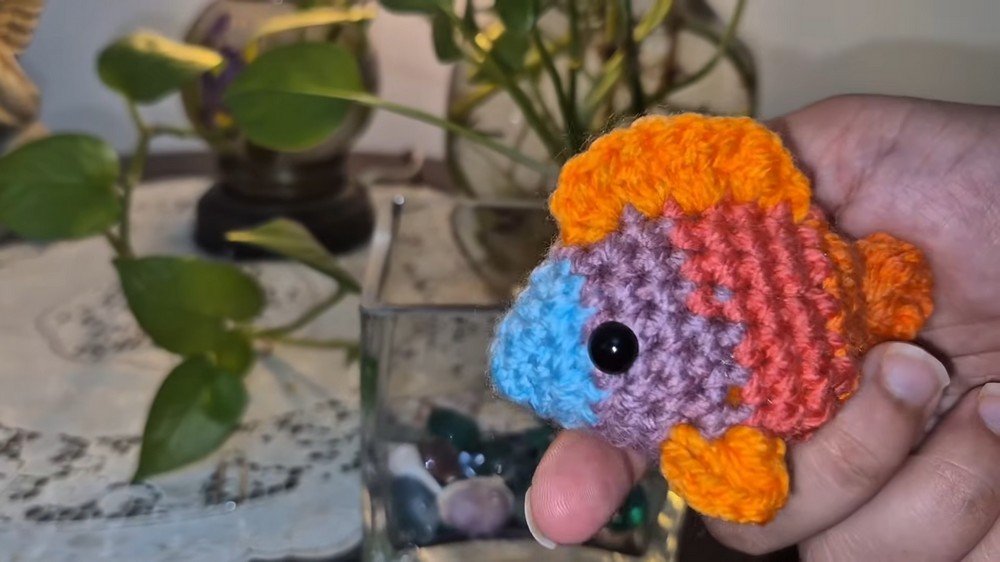
Special Features
- Quick & Beginner-Friendly: Perfect for learning basic amigurumi techniques.
- Customizable: Use any color or yarn type for unique designs.
- Economical: A great project for utilizing yarn scraps.
- Multipurpose: Ideal as keychains, small gifts, or market products.
Conclusion:
Congratulations on completing your crochet fish amigurumi! This quick and satisfying project is an excellent way to hone your crochet skills while creating something adorable. These little fish are perfect for crochet fairs, gifts, or just for fun.
Tip of the Project:
To add extra flair, try using a metallic or glitter yarn for a sparkling fish. You can also embroider a small smile or sew on decorative accents like beads on the fins for additional character.
Leave a Reply