

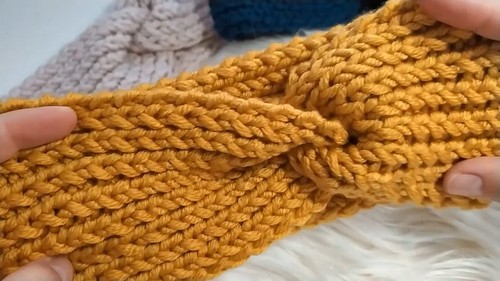
This Knit Twist Headband is simply wonderful! It's such a stylish and cozy accessory, perfect for keeping your ears warm on chilly days. The twist in the middle adds a lovely touch, making it look chic and fashionable. Plus, the knitting instructions are straightforward, making it a fun project even for beginners. This headband not only serves as a functional piece to ward off the cold but also as a charming addition to any winter outfit.
Knit Twist Headband

Materials Needed
- Yarn (suggested: Everyday Big from Himalaya or similar)
- Knitting needles (suggested: size 6, bamboo recommended for beginners)
- Tapestry needle or hook for finishing
Pattern
Cast On:
- Leave a long tail of about 75 cm for casting on.
- Use the long tail cast-on method to cast on 19 stitches.

Row 1 (Right Side):
- Start with a knit stitch, then a purl stitch, and repeat this pattern across the row until the last stitch.
- Slip the last stitch purlwise with the yarn in front to create a neat edge.
Row 2 (Wrong Side):
Start with a purl stitch, then a knit stitch, and continue alternating across the row ending with a slipped stitch as done previously.

Repeat R1 and R2:
- Continue these two rows, starting each right-side row with a knit stitch and each wrong-side row with a purl stitch, slipping the last stitch of every row.
- Continue until the piece measures approximately 50 cm or the desired length to fit around your head, remembering it will be joined in a twist, thus needing a bit extra for a comfortable fit.
Casting Off:
- Follow the pattern of the row you are on (knit or purl) but after knitting two stitches, pass the first stitch over the second stitch and off the needle.
- Continue this process across the row.
- Cut the yarn, leaving a tail for sewing, and pull through the last stitch to secure.

Finishing:
- Place the cast on edge over the cast off edge, right sides together, aligning the edges to form a twist.
- Using the tapestry needle or hook, sew across all four layers of the edges securely.
- Turn the headband right side out to hide the seam.
Final Steps:
- Weave in any remaining loose ends neatly.
- Adjust the twist to ensure it sits nicely when worn.
Notes:
- You can adjust the width of your headband by casting on more or fewer stitches (in multiples of 2 for the knit-purl pattern).
- Choose a soft, stretchy yarn for comfort and a good fit.
- This headband is an excellent project for beginners due to its simple stitches and quick completion time.
Happy knitting! Feel free to modify colors or yarn types to personalize your headband.


Leave a Reply