

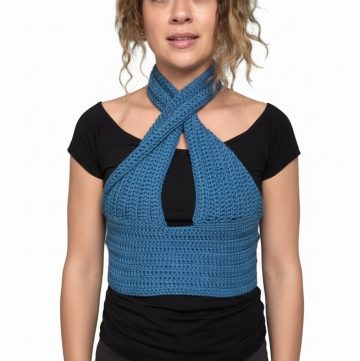
Looking to add a unique piece to your wardrobe? This Crochet Easy Spiderweb Top tutorial is perfect for those who enjoy crocheting and want to make a stylish statement. The pattern is straightforward and fun to follow. By using just a few basic materials, you can crochet a beautiful top that’s ideal for any casual outing this season.
Crochet Spiderweb Top

Materials Needed:
- Yarn
- Crochet hook
- Scissors
- Yarn needle
Pattern Instructions For Spider Web Base:

Start the Center Ring:
- Create a slip knot.
- Chain 4 and slip stitch into the first chain to form a ring.
Row 1:
- Chain 3 (counts as the first double crochet).
- Double crochet 11 more times into the ring.
- Slip stitch into the third chain of the initial chain 3 to complete the ring (12 double crochet total).
After Row 2:
- Chain 5 (first 3 count as double crochet, next 2 are a chain space).
- Double crochet into the next stitch, then chain 2.
- Repeat double crochet and chain 2 in each stitch around.
- Slip stitch into the third chain at the start of the row to join.
Row 3:
- Chain 7 (3 count as double crochet, 4 are chain space).
- Double crochet on the next double crochet, chain 4.
- Repeat around; slip stitch into the top of the beginning chain.
Increasing Rows:
- Continue increasing the number of chains by 2 each row to expand the spiderweb.
- Stop according to your size — Extra Small or B cup stops earlier than Medium.
Transforming into a Triangle:

Triangle Formation:
- Chain 5, then triple crochet into the same stitch (first corner).
- Chain the number of chains you used in your previous web row divided by two.
- Create a 'V stitch' (double crochet, chain 1, double crochet) in the next stitch.
- Repeat around until 3 'V stitches' at strategic points are formed to start making a triangular shape.
Completing Triangle Edges:
- Continue with chains and 'V stitches' followed by triple crochet corners.
- Adjust stitch count as needed for other sizes.
Joining and Finishing Edges:

Join the Triangles:
- Craft a second triangle identical to the first.
- Lay them symmetrically and single crochet along the side of one triangle, connect at the corner, and continue along the other triangle.
Scalloped Edges:
- Once around the perimeter of one bra cup, create a scalloped edge by half double crocheting multiple times into one stitch, skip a stitch, slip stitch into the next.
Building the Torso:

Torso Formation:
- Chain 10 from the last point of the bra cup.
- Turn your work, and continue single crocheting along the bottom edge.
- Introduce a basic mesh pattern for extra length.
- Alternate mesh rows with half-double crochet rows as desired.
Straps & Lacing:

Straps:
- Double up the yarn and chain 80 (or required length).
- Tie off and attach to the top corners of the bra cups.
Lacing at the Back:
- Chain 250-300 (dependent on size and fit required).
- Lace through the back of the bralette to secure.


Leave a Reply