

The Knit Vest Pattern is simply delightful to work with! The instructions are clear and easy to follow, making the knitting process a breeze, even for beginners. I love the unique texture this stitch technique creates; it gives the vest a cozy, handmade charm that's both stylish and comfortable. The flexibility to choose the size and type of yarn means the possibilities are endless. Knitters of any skill level can create a personalized garment that's sure to impress. What a wonderful pattern for anyone looking to add a touch of warmth and elegance to their wardrobe!
Knit Vest Pattern

This pattern demonstrates a unique knitting stitch technique that creates a stretchy and expanding texture, suitable for a variety of projects, including vests, shawls, or baby knits. A medium-thickness yarn and 3.5mm (US size 4) knitting needles are recommended for this pattern. An alternative version is mentioned using thicker yarn and size 4mm needles for a different effect. The pattern doesn't specify exact stitch counts for different sizes, implying flexibility in the number of stitches you can cast on.
Materials Needed
- Medium thickness yarn (cream colored or color of your choice)
- 3.5mm knitting needles (size 4 US)
- Scissors

Pattern Instructions
Cast On and Setup Rows

- Cast On Stitches: The number of stitches you cast on will depend on the size of the knit you're aiming for. A sample starts with 14 stitches for demonstration.
- Preparation Row: Knit a row of purls to prepare the groundwork of your piece. You can alternatively start with an elastic stitch of your choice.
Pattern Rows
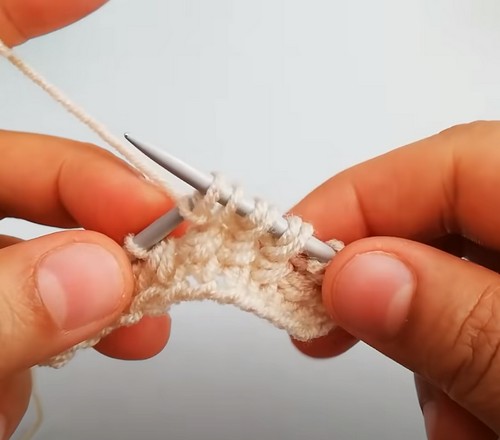
Row 1 (Right Side):
- Start by knitting the edge stitch.
- For the next stitch, remove a loop from the gap behind it without knitting and knit the following stitch.
- Repeat from * to * across, ending with knitting the last stitch.

Row 2 (Wrong Side):
- Start by purling the edge stitch.
- Purl two stitches together across the row.
- This decreases the row back to the original number of stitches.
- Purl the last stitch.
Repeat these two rows to build up the pattern. The texture will start showing as you progress, with stretchy and expanding characteristics. Adjust your stitch count based on how the pattern works up, due to its stretching nature.
Alternate Version
An alternate version is hinted at, made with size 4mm needles and potentially thicker yarn for a looser, more defined texture.
Finishing
- Once your piece has reached the desired length, bind off all stitches.
- Weave in ends neatly.
Notes
- The pattern offers flexibility in terms of the size and the kind of knit (single or double), implying that you can adapt it for various projects.
- A larger piece example is mention, using a number 4 needle, emphasizing that the choice of needles can affect the final look of the pattern.


Leave a Reply