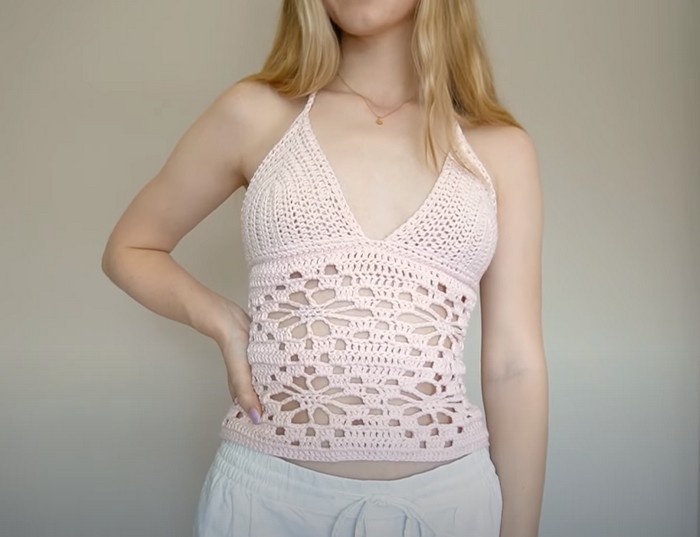
This crochet flower tank top is a special kind of shirt that someone makes by hand using a hook and yarn, kind of like knitting but a bit different. This particular top is made with light shades of pink yarn, which gives it a soft and pretty look. What makes this top really stand out is a band of crochet flowers that runs around the bottom part of the shirt. This floral band adds a fun and lovely touch to the top, making it more interesting and beautiful to look at. This kind of top is perfect for sunny days or when you want to wear something unique and handmade that catches people's eyes.
Crochet Flower Tank Top Tutorial

Materials:
- DK weight yarn (recommended: cream cotton yarn by Loops and Threads in color pastel pink, though labeled as weight 4, treated as DK weight)
- 2.5mm crochet hook
- Scissors
- Darning needle
Cups (Make 2):
- Start with a Slip Knot: Make a slip knot, insert your hook, and tighten.
- Chain: Your initial chain length varies by cup size:
- A cup: Chain 10
- B cup: Chain 12
- C cup: Chain 14
- D cup: Chain 16
- Add 2 chains for each cup size beyond D.
- Half Double Crochet Row: Starting from the third chain from the hook, make a half double crochet (hdc). Continue hdc in every chain across. You’ll end with a number of hdc stitches two less than your starting chain.
- Continue Building the Cup: Chain 1, turn your work. Continue hdc across each stitch. At the end of each row, you'll chain 1 and turn.
- Increasing: To create the cup's curve, you'll start increasing on one side:
- Increase by making 3 hdc in the last stitch of the “increase side” of your work every other row.
- Continue working hdc in each stitch across for non-increase rows.
Repeat increasing and non-increasing rows to shape the cup. Refer to the number of rows recommended for your cup size.
Joining the Cups:
- Once both cups are completed, join them at the bottom with single crochets. Chain a few (adjust based on your size preference) between them to create a gap, then continue single crocheting along the bottom edge of the second cup.
Bottom Part (Flower Pattern):
- Foundation Row: Start with foundation double crochets (dc) until you reach your desired width that wraps around your back comfortably. Remember, the total number of dc must be a multiple of 24 to accommodate the flower pattern.
- Pattern Establishment: Begin establishing the flower pattern by making clusters of dc separated by chain spaces. Utilize chaining and skipping stitches to create spacing and holes as per the flower pattern design.
- Flower Pattern Repetition: Continue following the established pattern, creating multiple rows to form the flower designs across the width of the garment. Adjust the number of repetitions based on the desired length and fit of the bottom part.
Final Assembly:
- Attach the Bottom to the Cups: Once the bottom part is completed, attach it to the bottom edge of the joined cups using slip stitches or single crochets. Ensure even alignment and proper fit.
- Straps: Create straps by chaining to your desired length, then working single crochets back along the chains for added strength. Attach straps at the corners of the cups for neck ties and at the sides of the bottom part for back ties.
Finishing Touches:
- Weave in all ends.
- Optionally, block your top for a cleaner finish.
This pattern provides a basic outline. Feel free to adjust sizes, stitch counts, and decorations according to your preference. Happy crocheting!


Leave a Reply