

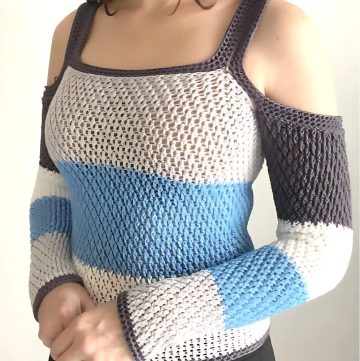
Picture yourself enjoying the sunny days ahead with a lightweight, Crocheted Summer Mesh Vest. Perfect for adding a touch of style to any outfit without the warmth, this crochet project is a fun way to make your own fashionable piece. With straightforward steps, you'll turn simple yarn into a chic vest. It's a perfect match for beach days, breezy evenings, or layering over your favorite summer dresses and tees.

How To Crochet Summer Mesh Vest
Materials:
- Medium weight yarn in two shades (gray and black, in this case)
- 100% Acrylic or cotton yarn if preferred
- 4mm crochet hook
- Scissors
- Measuring tape
- Darning needle
- At least two stitch markers (four recommended)

Measurements Needed:
- Chest measurement divided by two for back and front panels
- Full length of the vest
- Shoulder to shoulder measurement
Starting Chain:
- For a small size: Chain 51
- For a medium size: Chain 61
- For a large size: Chain 71
- For an extra-large size: Chain 81

Pattern Overview:
Foundation Row:
- Starting with a slip knot, follow based on your size to create the foundation chain.
- Insert hook into the first chain, yarn over, pull up a loop, yarn over, and pull through two loops (single crochet).
- Continue single crochets across the chain. Ensure the stitch count matches the foundation chain count.
Creating the Mesh Pattern:
Row 2:
- Chain 4 (counts as a double crochet and chain space), skip next stitch, double crochet in next stitch, chain 1; repeat from to end.
Row 3
- Chain 1 (turning chain), single crochet in each double crochet and chain space from previous row; repeat from across, ensuring the stitch count matches the foundation row.
- Alternate between the pattern of Row 2 (Mesh Row) and Row 3 (Single Crochet Row) until the piece measures 12 inches from the start.

Color Change and Armhole Creation:
- After 12 inches, change color (from gray to black in this tutorial) and work 2 more inches in pattern.

Begin armhole:
- reduce on both sides at the beginning and end of the rows to reach desired shoulder to shoulder measurement minus 2 inches for edging.
Neckline for Front Panel:
- For the front panel only, after reaching the last 6 rows, create a curve for the neckline by marking and counting 4 gaps on either side from the center.
- Reduce in the middle to create the neckline curve, following the same pattern reduction but focusing on the center front.

Finishing Touches:
Shoulders and Side Seaming:
- Lay the front and back panels right sides together. Seam shoulders and sides leaving proper openings for armholes.
Edging
- Work single crochet rounds around armholes and neckline for a neat finish. Use gray for two rounds, then black for one round, and back to gray for two rounds.

Ribbing for Bottom Edge:
- Attach yarn at one side; chain 6. Slip stitch in next two stitches on the edge, turn, and work back in single crochets. Continue this ribbing pattern around the bottom edge. Slip stitch the last row to the first and fasten off.

Leave a Reply