

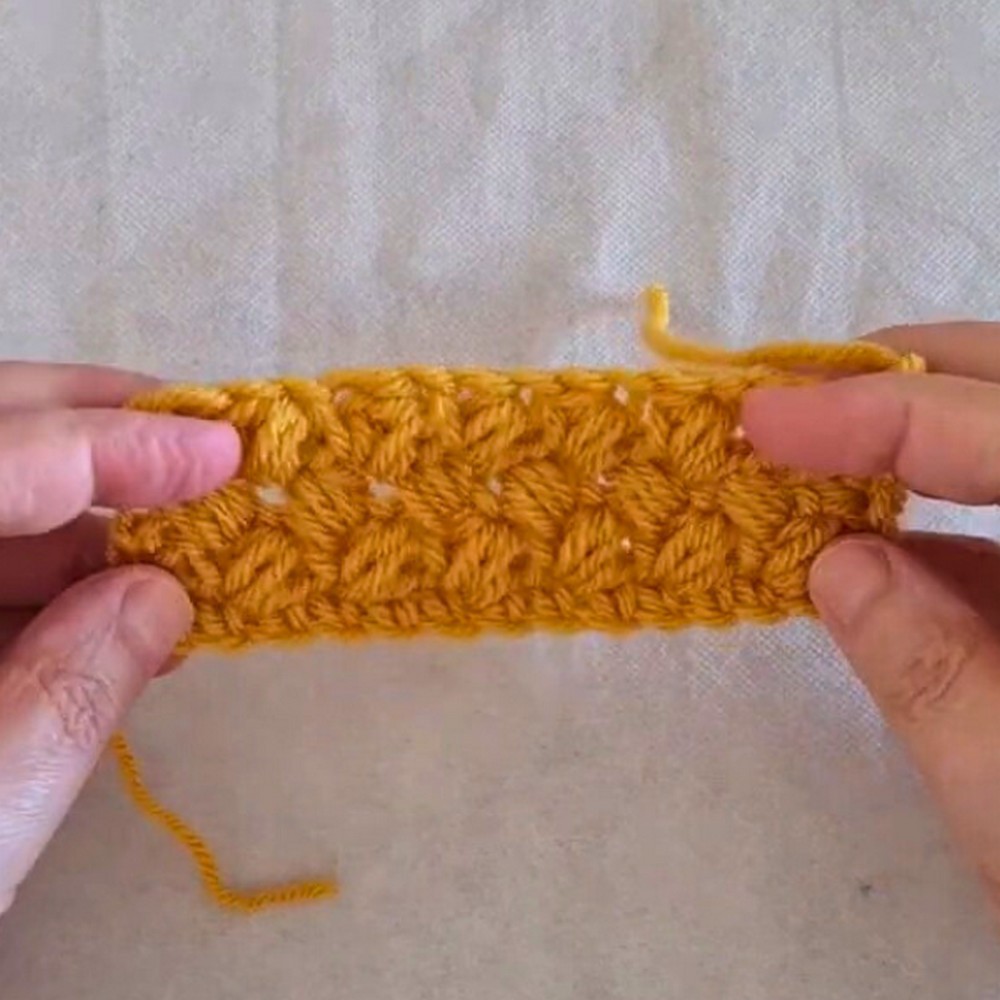
The Crochet Bean Stitch is a fun and cozy way to add texture to your projects. Perfect for blankets, scarves, or even hats, this stitch is like giving your yarn a little hug! It's all about making these cute "beans" that pop out, giving your work a bumpy, playful look. Whether you're new to crochet or have been looping and hooking for years, mastering the Bean Stitch is a delightful way to make your creations stand out.

How To Crochet Bean Stitch
Materials Needed:
- Weight 4 medium-weight yarn (e.g., Signet yarn as used in the video)
- 5mm crochet hook
Instructions:
Foundation Chain:
- Create a foundation chain with an even number of chains to start your project. For this tutorial, an example of 14 chains is used.
Row 1 (Foundation Row):
- Skip the first chain from the hook.
- Create one single crochet stitch in the second chain from the hook and in each chain across.

Row 2 (Setup Row):
- Chain one (this does not count as a stitch).
- Turn your work.
- Insert the hook into the first stitch and work one single crochet.

Begin Pattern Repeat:
- Skip one stitch.
- In the next stitch, start the first Bean Stitch.
- Insert the hook, pull up a loop (there will now be 2 loops on the hook).
- Yarn over, insert the hook into the same stitch, pull up another loop (4 loops on the hook).
- Repeat once more for a total of 6 loops on the hook.
- Yarn over, pull through all six loops.
- Chain one to secure the Bean Stitch.

Continue Pattern Repeat:
- Skip one stitch and in the next, work another Bean Stitch followed by a chain one.
- Continue this pattern (skip one stitch, bean stitch in the next, chain one) across the row.
- End the row with a single crochet in the final stitch.
Subsequent Rows:
- Chain one and turn your work after each row.
- Place a single crochet in the first stitch.
- Work the Bean Stitch in the space (triangle) between the previous Bean Stitches to create a staggered effect.
- Continue the pattern across.
- Finish each row with a single crochet in the last stitch.

Repeat:
- Continue working in the Bean Stitch pattern repeating the last row until you reach the desired length of your project.
Tips:
- Always start and finish the rows with a single crochet.
- Look for the "triangle" between beans to position your stitches.
- The Bean Stitches will naturally criss-cross as you progress, creating texture.

Leave a Reply