

Free Crochet Ruffle Hat Pattern You’ll Want to Try This Weekend

Beyond its beauty, this pattern offers excellent versatility. You can personalize your hat using vibrant colors or soft, muted tones to suit your preferences. With each stitch, the hat builds layers of playful ruffles, offering depth and structure to the design. Beginners and advanced crocheters alike can enjoy this fun challenge, refining their skills in techniques like double crochet and front post stitches.
A practical and stylish option for cold-weather accessories, this ruffle hat pattern turns basic crochet methods into a one-of-a-kind masterpiece. Its comfort, charm, and design make it an ideal addition to your wardrobe or a thoughtful handmade treasure for friends and family.

Materials Needed
- 4.5 mm Crochet Hook
- Lightweight Yarn (Double the strand for fingering weight yarn OR use medium-weight yarn in a single strand—recommended brands include Robin or Winter King)
- Elastic Band (Approximately 17–18 inches unstretched, stretching up to 23 inches)
- Scissors
- Tapestry Needle
- Tape Measure
Pattern Instructions
Base Hat Pattern
Step 1: Magic Ring Foundation
- Create a Magic Ring: Wrap the yarn around your fingers to make a loop and secure it with a simple knot.
- Chain 3: Insert your hook into the center of the ring and chain 3. (Note: This chain does not count as a stitch).
- Work 15 Double Crochets into the Magic Ring:
- Double Crochet Stitch: Yarn over, insert your hook into the ring, pull up a loop, yarn over, pull through 2 loops, yarn over, pull through the last 2 loops.
- Tighten the magic ring by pulling the loose end gently.
- Join Round: Slip stitch into the first double crochet to close the round.
2: Row 2 – Increasing Stitches
- Chain 3: Start the row by chaining 3.
- Work a Front Post Double Crochet and Double Crochet in the Same Stitch:
- Front Post Double Crochet (FPDC): Yarn over, insert the crochet hook around the post of the stitch (from front to back and then front again), pull up a loop, yarn over, pull through 2 loops twice.
- Double Crochet: Work on top of the same stitch.
- Repeat the sequence (FPDC + DC) into every stitch around to double the stitch count.
- Join Round: Slip stitch to the first stitch of the row.
- Round now consists of 30 stitches.

3: Rows 3–4
-
Row 3 Instructions:
- Chain 3.
- FPDC on each FPDC from the previous row. Between each pair of front posts, add 2 double crochets in the space.
- Repeat around.
- Row 3 total: 45 stitches.
- Slip stitch to the first stitch to close.
-
Row 4 Instructions:
- Chain 3.
- Repeat Row 3 instructions (FPDC on each FPDC + 2 DCs between) for this row.
- Row 4 total increases as per spiral.

4: Rows 5–6
- Chain 3.
- FPDC on each FPDC. Increase stitch count by adding 3 double crochets between FPDCs.
- Continue for Row 6 using the same formula.
Step 5: Rows 7 and Beyond
- Chain 3 and mimic Row 6, increasing stitches between FPDC to 4 DCs.
- Work additional rows without increases until the hat measures 6.25 inches in length and approximately 10 inches in width. Adjust to your desired fit.

Adding Ruffles
6: Create Ruffles
- Begin Ruffle Row 1: Chain 3 and add 5 double crochets into each stitch around.
- Ruffle Row 2: Chain 3 and add 3 double crochets into each stitch around.
- Ruffle Row 3: Chain 3 and add 2 double crochets into each stitch around.
Finishing Touches
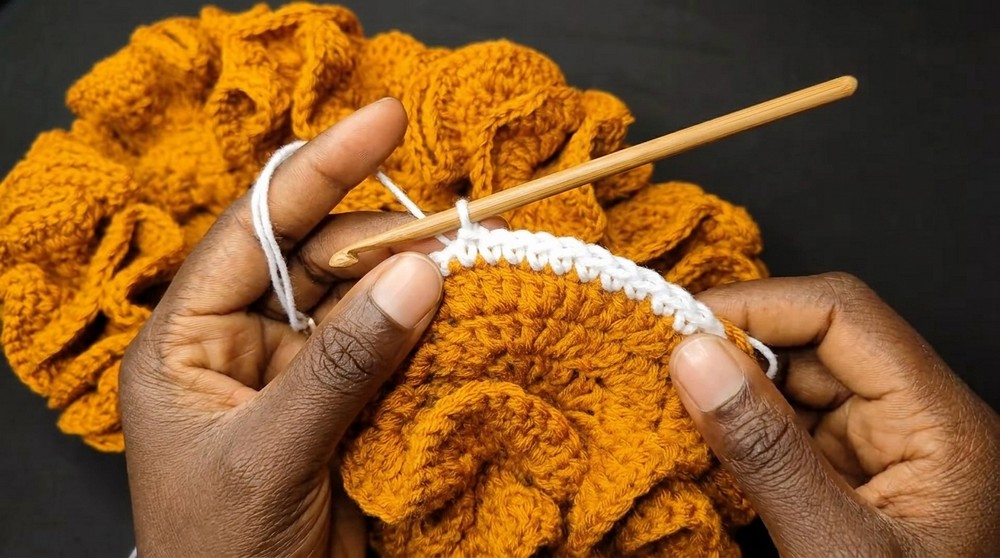
7: Edging
- Switch to a contrasting yarn color (e.g., white).
- Work Slip Stitch + Chain 1 into each stitch around to create a clean, professional edge.
8: Adding the Elastic Band
- Use a matching yarn color and attach the elastic band to the loops from the last row before the ruffles.
- Secure the elastic band by working 2 single crochets in each stitch around, ensuring the band stays inside the stitches.
- Slip stitch to the first stitch, fasten off, and weave in loose ends neatly.

Special Features
- Unique Spiral Effect: Created by FPDC stitches spiraling as the rows progress.
- Textured Ruffles: Layered by adding rows of increasing double crochet clusters.
- Elastic Band Closure: Provides a snug and secure fit, making the hat suitable for all head sizes.
Difficulty Level
This pattern is at an intermediate level. Beginners can tackle this project with patience, especially if comfortable with double crochet and front post double crochet techniques.
Tutor’s Suggestions
- Use vibrant color combinations for ruffles to make the design stand out.
- Ensure elastic bands are not overstretched during attachment for the best fit.
- Lightweight yarn adds flexibility to the spiral texture, while medium-weight yarn creates sturdier ruffles.
Uses
This hat is ideal for:
- Stylish winterwear or cozy outdoor accessories.
- Gifts for friends and family during special occasions.
- Marketable items for crochet fairs or online shops.
Pro Tip
When working ruffles, keep stitches loose and maintain consistent tension to prevent the hat from warping or curling unevenly.
Conclusion
The Crochet Spiral Ruffle Hat is a unique and functional accessory that is sure to turn heads! Its texture, spiral pattern, and colorful ruffles make it a standout piece with practical benefits like adjustable fit. Whether you’re making it for personal use or gifting it, this pattern offers creativity and charm in every stitch.


Leave a Reply