

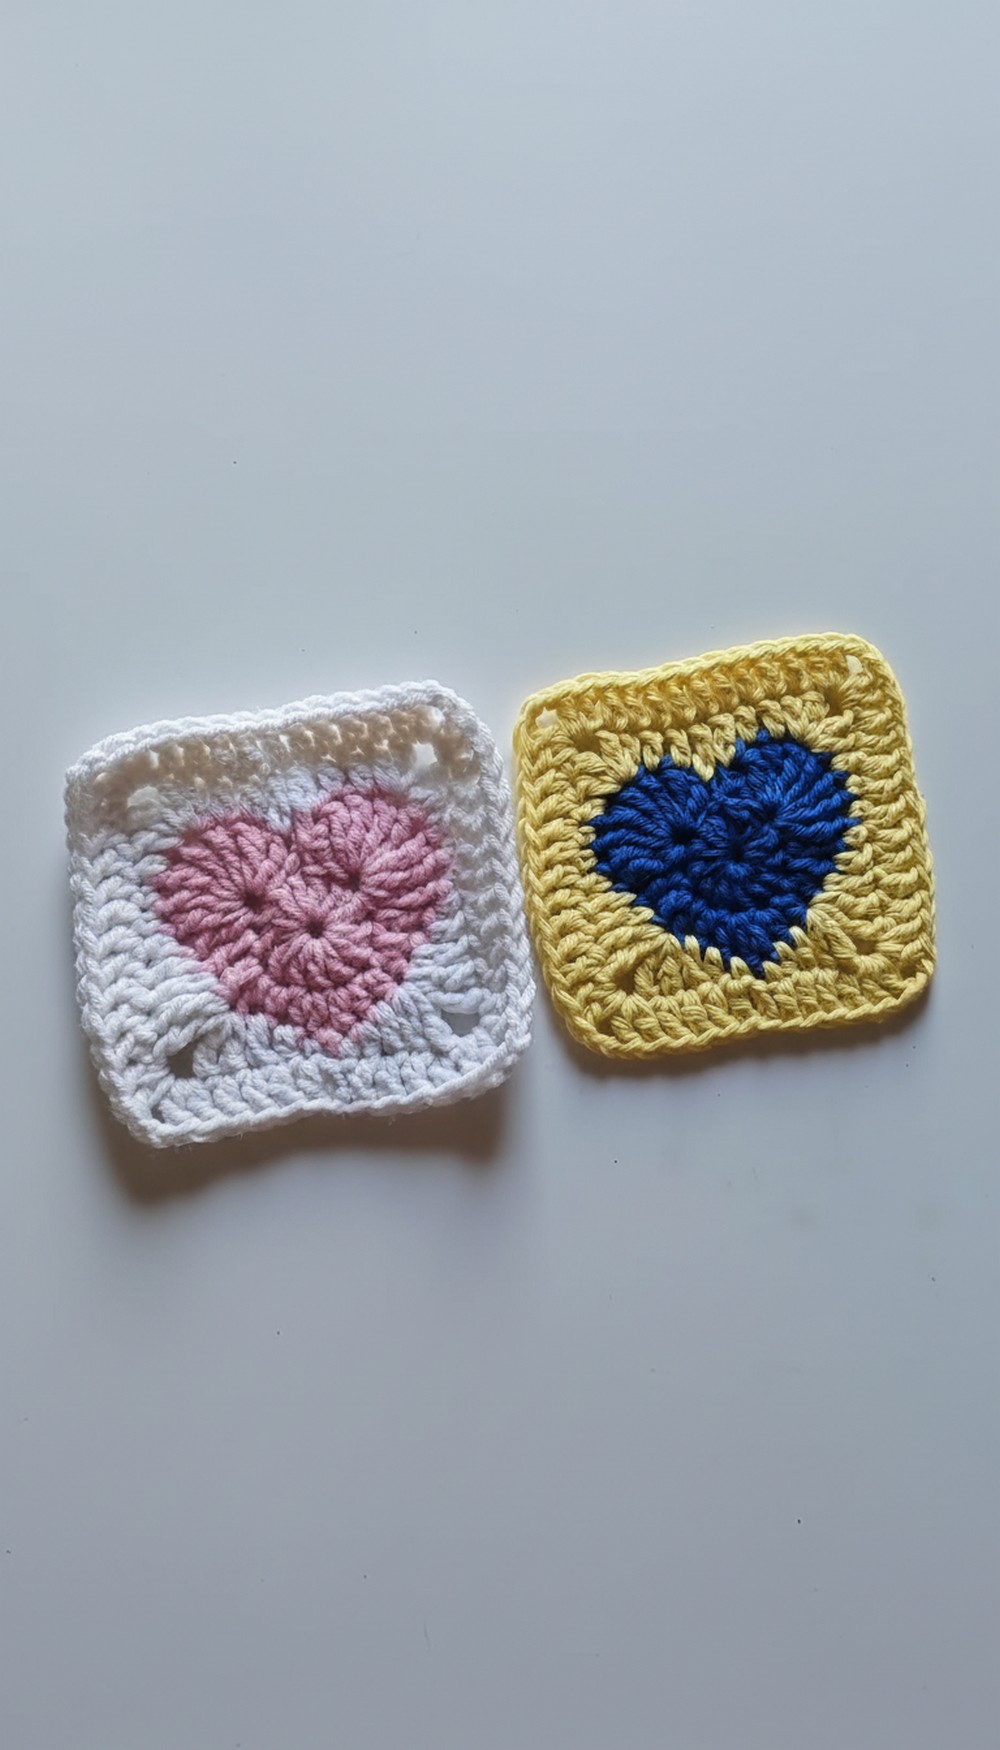
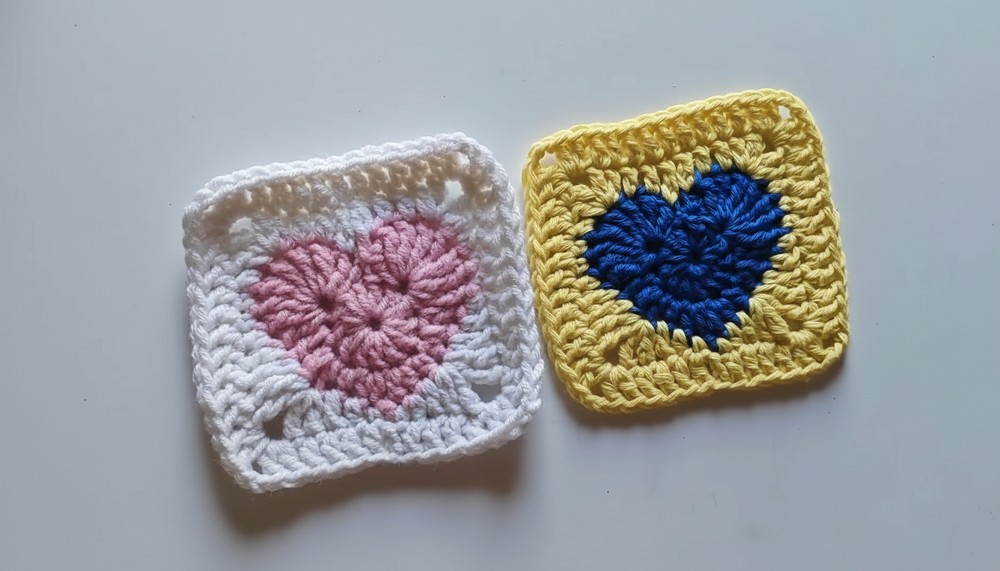
Stylish Crochet Heart Granny Square Pattern to Elevate Your Projects
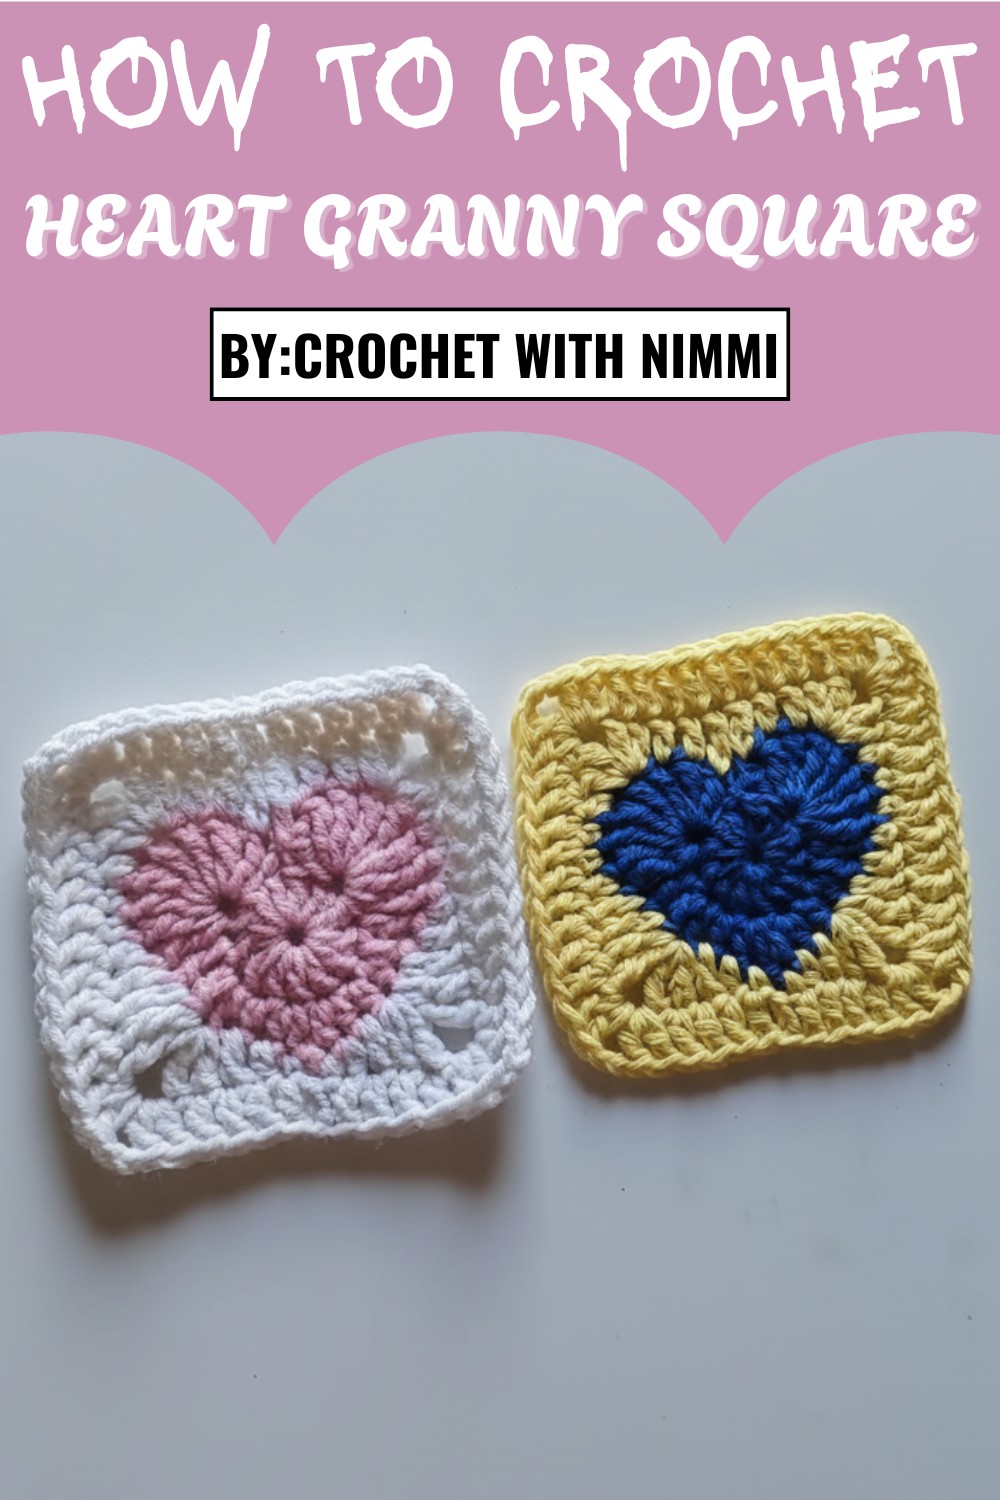
The heart detail can pop in any color combination you choose, making it versatile for all styles and occasions. It’s also a practical way to use leftover yarn, turning scraps into beautiful, meaningful pieces. Each square is a small work of art, carrying the love and care that only handmade items can offer. Whether for gifts or home décor, this pattern is a simple way to crochet something truly special.
Level of Difficulty
- Beginner-Friendly: Since this pattern uses straightforward stitches, even beginners can follow along with patience and attention to detail.
Materials Required
- Yarn: Two colors are recommended (e.g., pink for the heart and white for the border). Use anti-pilling acrylic yarn for clear stitches and durability.
- Crochet Hook: Match your hook size to your yarn weight. Example: Use a 4.5 mm crochet hook for medium-weight yarn.
- Tapestry Needle: For weaving in ends and securing the yarn.
- Scissors: To cut any excess yarn.
- Stitch Marker: Helps identify your starting stitch (especially useful for beginners).
Special Features
- Combines a heart shape with the classic granny square design.
- Perfect for adding personalization and charm to crochet projects.
- Can be customized with various color combinations.
Step-by-Step Instructions
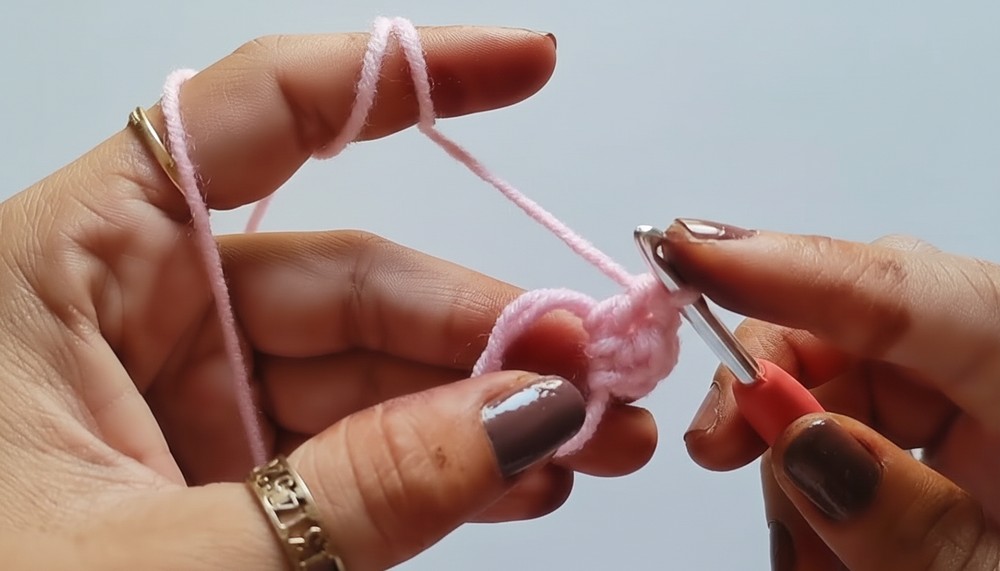
Step 1: Create a Magic Ring and Start the Heart
- Take your first yarn color (e.g., pink), and wrap the tail over your fingers to form a magic ring.
- Hold the tail and working yarn, twist around your fingers, and pull the working yarn through with your crochet hook.
- Secure by twisting the yarn to create a loop.
- Wrap the yarn around your fingers, forming the base of the magic ring, and hold everything in place.
- In the magic ring, make 2 chains.
- These chains do not count as stitches; they serve to lift the next round.
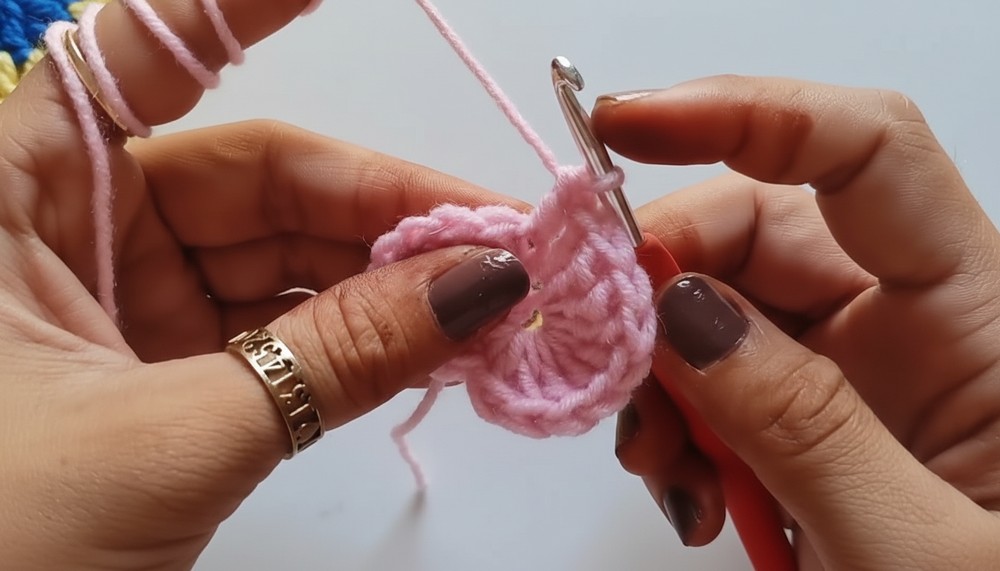
2: Work Double Crochet Stitches in the Magic Ring
- Perform 12 double crochet stitches in the magic ring:
- Double Crochet (DC):
- Yarn Over (YO).
- Insert the hook into the magic ring.
- Pull up a loop (3 loops on the hook).
- Yarn over, pull through the first 2 loops, yarn over again, and pull through the last 2 loops.
- Double Crochet (DC):
- Place a stitch marker on the first double crochet to keep track of the starting stitch.
- Once all 12 double crochet stitches are complete, pull the short tail of the magic ring tightly to close the center.
- End the round by making a slip stitch into the first double crochet.
3: Build the Heart Shape (Round 2)
- Skip the first stitch (where the slip stitch was made).
- Work 8 treble crochets (TR) into the second stitch:
- Treble Crochet (TR):
- YO twice, insert hook into the stitch, pull up a loop (4 loops on the hook).
- Pull through the first 2 loops, the next 2 loops, and the final 2 loops.
- Repeat this 8 times in the same stitch.
- Treble Crochet (TR):
- Move to the next stitch and work as follows:
- 1 double crochet + 1 half double crochet (HDC) in the same stitch.
- In the next stitch: 1 half double crochet only.
- At the tip (bottom point) of the heart:
- Chain 1, add a stitch marker, and turn.
- Work in reverse symmetry for the opposite side:
- HDC + DC in one stitch, HDC in the next, and 8 TR in the following stitch.
- Skip one stitch, and finish with a slip stitch in the next stitch.
- Cut the yarn, pull the tail through, and secure by weaving the ends.
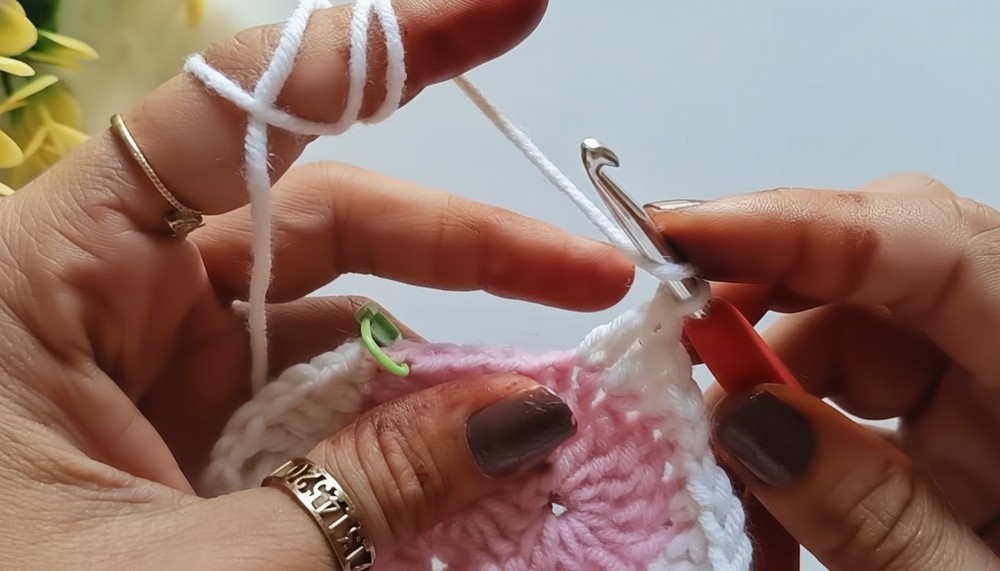
4: Add the Border (Round 3)
- Take the second yarn color (e.g., white), and start with a slip knot.
- Insert the hook into any corner space of the heart and pull up the white yarn.
- Work 1 single crochet (SC) to secure.
- Work along the heart:
- In the spaces between the trebles, and across all stitches, make single crochets.
- At the corners:
- Work [2 double crochets + chain 2 + 2 double crochets] in the same corner section to maintain the square shape.
- Continue this process around the entire square, transitioning seamlessly from the curves of the heart to the square edges.
- Once you complete the round, end with a slip stitch in the first single crochet.

5: Secure the Project
- Cut the yarn, leaving a short tail.
- Use the tapestry needle to weave in any loose ends along the back of the project to hide them neatly.
- Trim the excess yarn after knotting for a clean finish.
Tutor’s Suggestions
- Use contrasting or complementary colors to make the heart pop out against the square.
- Anti-pilling yarn ensures the granny square stays soft and durable over time.
- Beginners should use a stitch marker and count stitches after each round for an accurate result.
Uses
- Blankets: Combine multiple squares for a cozy and themed blanket.
- Cushions: Perfect for creating custom pillow covers.
- Coasters & Placemats: Use as standalone small accessories.
- Gifting: Handmade decor or part of wedding gifts and favors.
Conclusion
The Heart Granny Square combines creativity with practicality, resulting in a unique crochet design that showcases your skills. Whether you’re a beginner or experienced, this pattern gives an opportunity to improve your technique while crocheting a heartfelt project. Use this captivating pattern for gifts, decoration, or simply to expand your crochet repertoire.
Final Tip
To add even more charm, you can edge the completed square with lace or picot stitches for a decorative finish.


Leave a Reply