

Easy Crochet Striped Bucket Hat Pattern for Stylish Summer Looks

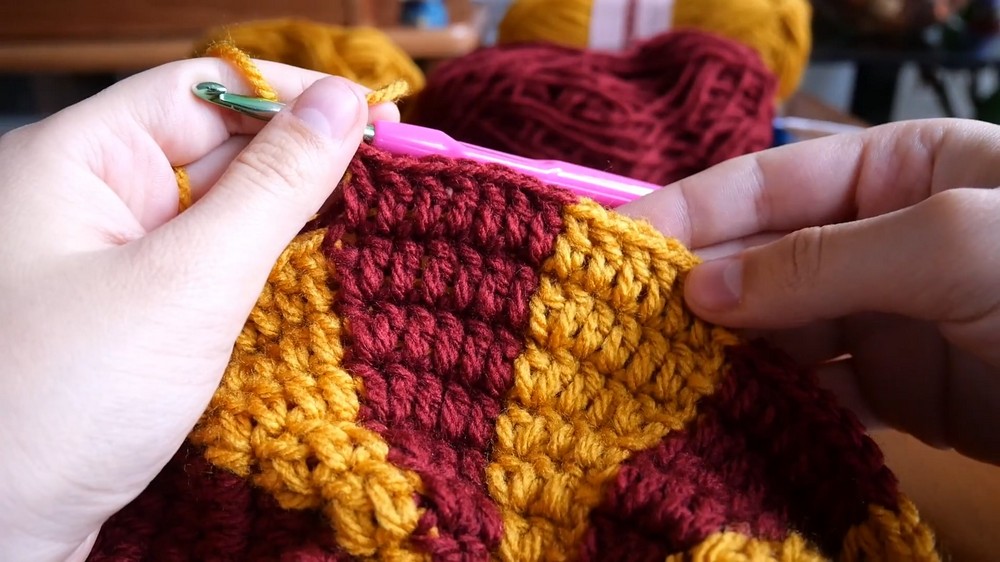
The striped bucket hat pattern stands out for its bold stripes, which can be customized with colors to match your personal style or complement any season. Whether you go for subtle tones or vibrant contrasts, the final result is sure to make a statement. This hat performs double duty as a fashion accessory and a functional sun hat, due to the structured brim and tailored fit.
Its size makes it easy to pack for trips, and its unique handmade charm ensures that no two hats are ever the same. Best of all, the straightforward technique of this free pattern is perfect for both beginners and experienced crocheters. Combining practicality with a fun, creative project, this pattern is an easy way to add handmade flair to your wardrobe while staying stylish and sun-smart!

Pattern Level
Skill Level: Beginner to Intermediate.
Special Features:
- Uses a two-color yarn-changing technique for neat stripes.
- Can be customized for different sizes.
- Uses a magic ring start for a seamless center.
- Includes structured details for a proper bucket hat shape.
- Front loop-only stitches give a professional finishing texture.
Materials Required
- Two colors of yarn (suitable for 4-5 mm crochet hook).
- 4.5 mm crochet hook.
- Scissors.
- Yarn needle for weaving in ends.
Step-by-Step Instructions
1. Materials and Magic Ring Start
- Gather your materials: yarn (color 1 and color 2), a 4.5 mm crochet hook, scissors, and a needle.
- Make a Magic Ring:
- Wrap the yarn around two fingers to form a loop.
- Insert the hook under the loop, grab the working yarn, and pull through.
- Chain 2 to secure the ring.

2. The First Round of Double Crochets
- Inside the magic ring:
- Chain 2 (counts as the first double crochet).
- Make 12 double crochets into the ring, but don’t finish the last stitch in the first color.
- Change to the second color:
- Pull the yarn through the last two loops of the final double crochet to switch colors.
- Tighten the magic ring by pulling the starting yarn tail to close the circle.
3. Joining and Starting a New Round
- Identify the top of the chain-2 at the start of the row. Slip stitch into the second chain to join the round.
- Chain 2 to start the next row.
4. Increasing the Hat
Each row will involve increasing the number of stitches evenly to shape the hat:
Row 2:
- Make 2 double crochets in each stitch around, alternating colors after the second double crochet of each pair. End the row with a slip stitch to join.
R- 3:
- Pattern: 1 double crochet in the first stitch, 2 double crochets in the next (increase).
- Alternate colors as you complete the last loop of the second double crochet in each pair.

R- 4:
- Pattern: 1 double crochet in the first two stitches, 2 double crochets in the next (increase).
- Change colors as before by finishing the last loop of the increase in the next color.
Rows 5-7:
- Continue increasing in this manner:
- Row 5: 1 double crochet in the first 3 stitches, 2 double crochets in the fourth.
- Row 6: 1 double crochet in the first 4 stitches, 2 double crochets in the fifth.
- Row 7: 1 double crochet in the first 5 stitches, 2 double crochets in the sixth.
- After completing Row 7, you should have 7 stitches of each color per section.
5. Straight Rows (No Increases)
Rows 8-13:
- Work 1 double crochet in each stitch, alternating colors every 7 stitches.
- No increases are made in these rows—focus on maintaining the stripe pattern.
- Your hat will now start to take its bucket-like form.
6. Front Loop-Only for Brim
R- 14:
- Switch to front loop-only stitches to create a neat edge for the hat brim:
- Chain 2, then make a double crochet in the front loop of each stitch around.
- Repeat alternating colors after 7 stitches.
Rows 15-16:
- Continue front loop-only stitching. Work 1 double crochet per stitch for the first 6 stitches, then make 2 double crochets in the 7th stitch (increase).
- This will slightly broaden the brim while maintaining the structure of the hat.

7. Final Rows for Brim Expansion
- Repeat the increasing pattern until you end up with 10 stitches per stripe (or adjust for your desired brim width).
- Work two more rows of 1 double crochet in each stitch with no increases to finish the brim.
Finishing the Hat
- At the end of the final row, make a slip stitch into the second chain from the start of the row.
- Chain 1, then cut the yarn, leaving enough tail to weave in the ends.
- Tuck in any loose ends neatly with a yarn needle.
- Measure your hat to ensure it’s approximately 23 cm (9 inches) in height and fits comfortably.

Tutor’s Suggestions
- Tightening Magic Ring: Don’t forget to pull the magic ring tight at the beginning and secure it well to avoid gaps in the center.
- Managing Color Changes: Always finish the last two loops of a double crochet with the next color to create neater stripes.
- Custom Sizing: Adjust the number of rows for the crown or brim to fit your head perfectly.
Uses and Benefits
- This striped bucket hat is perfect for sunny outings, beach days, or simply adding a splash of color to your everyday outfit.
- Lightweight and breathable, it’s a stylish yet practical way to shield yourself from the sun while looking trendy.
Tip!
To get clean stripes and avoid visible color transitions, always carry the unused color along and crochet over it to hide it within stitches. This prevents tangling and gives your hat a professional finish.
Conclusion
This crochet striped bucket hat is the perfect blend of simplicity and elegance. Whether you’re a beginner practicing new techniques or an experienced crocheter looking for a versatile project, this pattern has something for everyone. Fun to make and great to wear, this hat adds a touch of personality to any season.


Leave a Reply