

Crochet Granny Square Pattern for Blankets, Bags, and More

The pattern also provides an excellent opportunity to experiment with yarns and colors—mix bold shades for a modern twist or stick to soft hues for a classic look. Beyond just aesthetics, it’s perfect for reducing leftover yarn and contributing to sustainable crocheting.
Whether you’re looking for a quick handmade gift or planning a larger handmade piece, this versatile pattern offers endless benefits. It’s a small beginning with limitless potential, making it a staple for every crochet library.

Level of Difficulty
Beginner to Confident Beginner
- Uses basic stitches: magic ring, chain, double crochet, slip stitch
- Repetitive structure – once you understand the corner pattern, you can easily continue to enlarge the square
- Good project for learning color changes and working in the round
Special Features
- Multicolored design – each round in a different color for a vibrant, modern granny square
- Expandable pattern – easily add more rounds to make larger squares
- Versatile – join multiple squares for blankets, cardigans, bags, table runners, and more
- Yarn-friendly – great stash-busting pattern for leftover medium-weight yarn
Materials
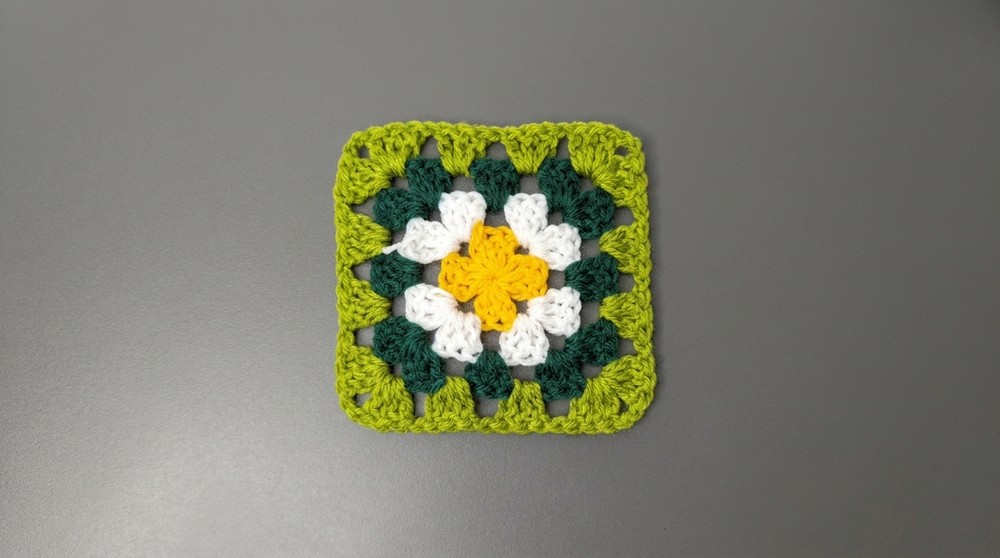
- Yarn: 4 colors of medium-weight (worsted) acrylic yarn
- Color A (center – e.g., yellow)
- Color B (round 2 – e.g., white)
- Color C (round 3 – e.g., dark green)
- Color D (round 4 – e.g., jungle green)
- Hook: 4.5 mm crochet hook
- Darning/Tapestry Needle
- Scissors
Abbreviations (US Terms)
- MR – Magic Ring (Magic Circle)
- ch – chain
- dc – double crochet
- sl st – slip stitch
- sp – space
- st – stitch
Each “cluster” in this pattern is 3 double crochets worked into the same space.
Pattern Instructions
Round 1 – Center (Color A)
- Make a magic ring (MR).
- Ch 3 (counts as first dc).
- Work 2 dc into the MR.
- You now have a cluster of 3 dc (ch-3 + 2 dc).
- Ch 2, then work 3 dc into the MR.
- Repeat:
- Ch 2, 3 dc into the MR
- Until you have 4 clusters of 3 dc total in the ring.
- End with ch 2.
- Gently pull the yarn tail to close the magic ring tightly.
- Sl st into the top of the beginning ch 3 to join the round.
- Ch 1, fasten off Color A, and pull through to secure.

You should now have a small square:
- 4 corners, each separated by ch-2 spaces, and
- 4 clusters of 3 dc.
Round 2 – Second Color (Color B)
- Attach Color B with a slip knot on your hook.
- Choose any corner ch-2 space from Round 1.
- Insert hook into that corner space, pull up a loop, and sl st to join Color B.
- Ch 3 (counts as first dc).
- In the same corner space, work 2 dc (this makes your first cluster of 3 dc).
- Ch 2, then work 3 dc into the same corner space again.
- Each corner = (3 dc, ch 2, 3 dc).
- Ch 1.
- Move to the next corner ch-2 space and work:
- 3 dc, ch 2, 3 dc into that corner.
- Ch 1 and repeat (3 dc, ch 2, 3 dc) in each remaining corner, separated by ch 1 between corners.
- When you reach back to the beginning:
- Ch 1, then sl st into the top of the starting ch 3.
- Ch 1, fasten off Color B, and secure.

At the end of Round 2, you have:
- 4 corners with (3 dc, ch 2, 3 dc)
- Each corner separated by a ch-1 space
Round 3 – Third Color (Color C)
- With Color C, make a slip knot on your hook.
- Join yarn in any corner ch-2 space from Round 2:
- Insert hook, pull up a loop, sl st to join.
- Ch 3 (counts as first dc).
- In the same corner space, work 2 dc.
- Ch 2, then work 3 dc again in the same corner space.
- Corner = (3 dc, ch 2, 3 dc).
- Ch 1.
- In the next ch-1 space (between two corners) work 3 dc only (this is a side cluster, not a corner).
- Ch 1, then in the next corner ch-2 space, work:
- 3 dc, ch 2, 3 dc.
- Continue this pattern around:
- In every corner ch-2 space: (3 dc, ch 2, 3 dc)
- In every side ch-1 space: 3 dc
- Between all clusters: ch 1
- At the end of the round:
- Ch 1, then sl st into the top of the starting ch 3.
- Ch 1, fasten off Color C, and secure.

Now your square has grown:
- Each side has: corner cluster – side cluster – corner cluster.
Round 4 – Fourth Color (Color D)
- With Color D, make a slip knot on your hook.
- Join in any corner ch-2 space from Round 3:
- Insert hook, pull up a loop, sl st to attach.
- Ch 3 (first dc).
- In the same corner space, work 2 dc, then ch 2, then 3 dc again.
- Corner = (3 dc, ch 2, 3 dc).
- Ch 1.
- Work 3 dc in the next ch-1 side space.
- Ch 1, then 3 dc again in the next ch-1 side space.
- So now you have two side clusters between corners.
- Ch 1, then in the next corner ch-2 space work:
- 3 dc, ch 2, 3 dc.
- Repeat this pattern around:
- Corners: (3 dc, ch 2, 3 dc)
- All other spaces (ch-1 spaces): 3 dc
- Always ch 1 between every cluster.
- When you reach the beginning:
- Ch 1, then sl st into the top of the starting ch 3.
- Ch 1, fasten off Color D, and secure.

You now have a 4-round multicolored granny square.
To make it larger, simply repeat Round 4’s logic:
- In each corner: 3 dc, ch 2, 3 dc
- In each side space: 3 dc, with ch 1 between groups
Weaving in the Ends (Tutor’s Method)
The tutor works on the wrong side of the square and:
- Pairs same-color yarn tails (e.g., both yellow ends).
- Ties 3 knots:
- First knot: gently secured (not too tight)
- Second knot: tight
- Third knot: very tight
- Cuts the tails not too close to the knot but not very long either.
- For tails that are not close together, use a darning needle:
- Weave one tail through nearby dc stitches on the wrong side until it reaches the other tail.
- Tie the same 3-knot method, then trim.
You may also choose to weave ends in traditionally without knots if you prefer.
Uses
You can use this multicolored granny square for:
- Blankets and Afghans
- Cardigans, vests, shrugs
- Bags, totes, and pouches
- Cushion covers and home decor
- Table runners, placemats, coasters (smaller squares)
Make multiple squares in the same or different color sets, then join them to form larger projects.
Tutor’s Suggestions
- Work from the right side consistently to keep your square neat.
- Always count your corners each round – there should always be 4 corners with ch-2 spaces.
- Choose contrasting colors for each round to highlight the layered effect.
- Keep your chain-1 spaces between clusters consistent to maintain a clean, square shape.
Tip at the End
For a flatter and more polished granny square, lightly block your squares (steam or pin and mist with water) before joining them. This helps even out the stitches, sharpens the corners, and makes assembling larger projects much easier and neater.
Short Conclusion
This multicolored granny square pattern turns simple stitches into a bold and versatile motif that’s perfect for both beginners and experienced crocheters. Once you understand the easy rhythm of 3 dc clusters, ch-1 spaces, and ch-2 corners, you can expand the square endlessly and play with countless color combinations.


Leave a Reply