

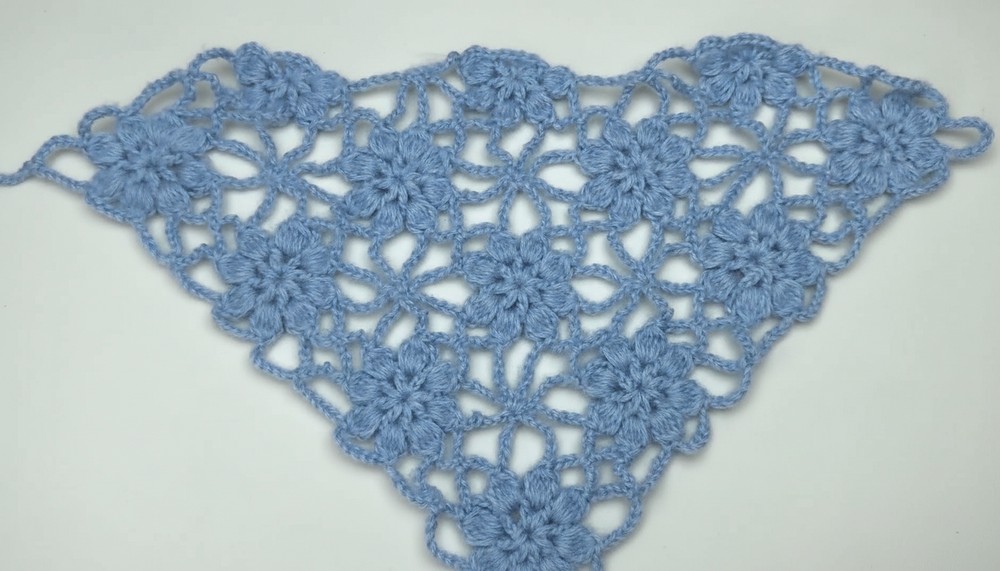
Charming Crochet Flower Bandana Pattern for Any Season’s Outfit

One of its best features is the adaptability—it can be worn as a headscarf, tied around the neck, or styled as a trendy accessory on bags. This pattern uses minimal materials, making it budget-friendly and sustainable. Whether as a thoughtful handmade gift or a personal wardrobe upgrade, the bandana is both eye-catching and functional.
The design enhances your crochet skills by introducing floral components that offer a fun challenge for beginners and intermediate crocheters alike. With its lightweight feel and customizable size, this bandana is perfect for anyone wanting to add a personal touch to their accessory collection. Practical yet playful, it serves as a reliable statement piece that’s easy to wear and even easier to make.

Materials Needed
- Yarn: 4-ply merino, Baby Dreamtime merino, and mohair (single strand or two strands, depending on preference).
Alternatively, you can use lightweight cotton yarn for an airy feel. - Crochet Hook: 3.5mm hook (a slightly larger hook to maintain a lightweight texture).
- Scissors
- Yarn Needle
- Markers (optional, for marking connection points).
Pattern Description and Special Features
- Motifs: Made of floral granny squares joined together as you crochet.
- Motif Count: 10 full square motifs and 3 half-square motifs.
- Lightweight Design: Perfect for summer or spring with a breathable, elegant texture.
- Skill Level: Intermediate (beginner-friendly instructions for connecting motifs and using clusters).
Step-by-Step Pattern
Step 1: Create the First Floral Granny Square
- Start with a Slip Knot:
Make a slip knot (do not count this as a stitch). - Foundation Chain:
Chain 5, then slip stitch into the first chain to form a ring. - Row 1:
- Chain 4 (counts as 1 double crochet + 1 chain).
- Work 1 double crochet, followed by 1 chain into the ring.
- Repeat (1 double crochet + 1 chain) 7 more times.
- After 8 double crochets, slip stitch into the 3rd chain of the starting chain-4 to close the round.
- Row 2:
- Work 3 chains (do not count as a stitch) and prepare to crochet clusters.
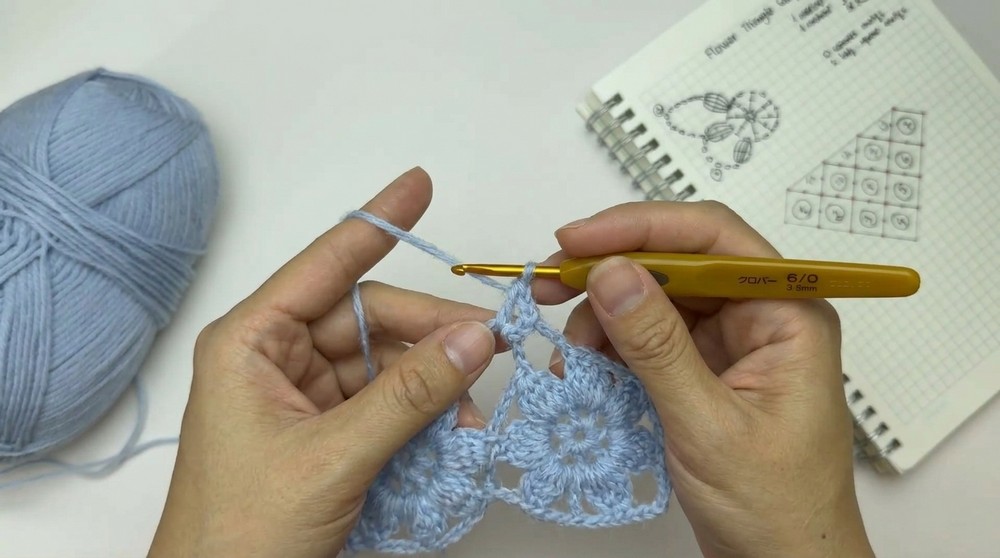
- In each chain space, create a 5 double crochet cluster (unfinished):
- Yarn over, insert the hook into the space, yarn over and pull up a loop, yarn over and pull through 2 loops (leave the last loop on the hook). Repeat this process 5 times.
- Once you have 6 loops on your hook, yarn over and pull through all loops. Lock the cluster with 1 chain (do not count as a stitch).
- After completing the cluster, chain 12.
- Repeat (5 double crochet cluster + chain 12) 3 more times.
- For the shorter sides, chain 6 between clusters instead of 12.
- At the final chain space, slip stitch into the starting cluster to finish the row.
- Cut Yarn and Secure:
Snip your yarn, weave in the tail, and secure it. You’re now ready to move to the next motifs.

2: Joining the Motifs
- Begin the Second Square: Repeat Step 1 to start a second granny square.
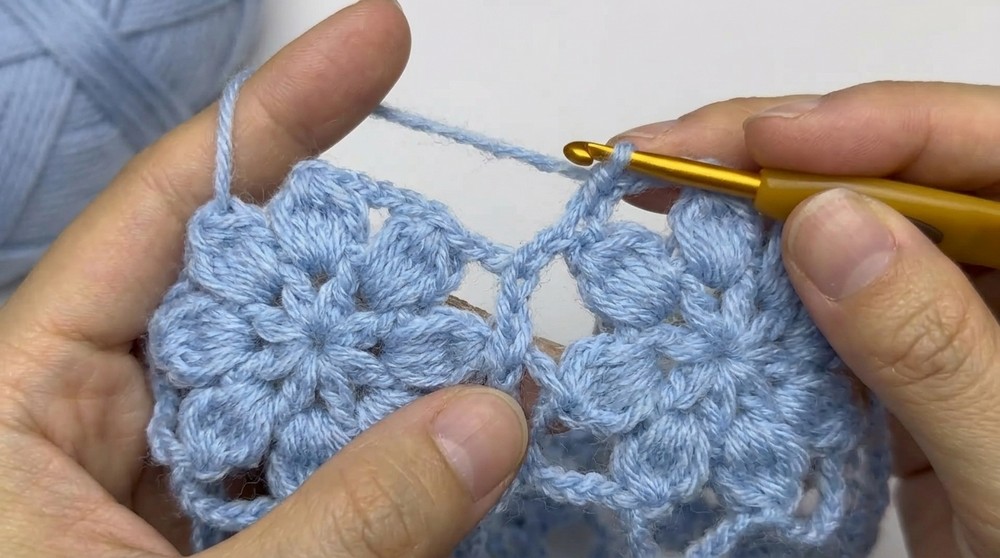
- Connect at Corners and Sides:
- Crochet until you complete the first cluster of Row 2 on the second square.
- Chain 6, then join to the corner of the first square using a single crochet.
- Continue with 6 chains, and return to the second square to complete the row.
- Connect at corners and sides following the 6-chain rule for corners and 3 chains + single crochet for side connections.
- Repeat for All 10 Motifs: Continue attaching squares in this pattern, ensuring corners and sides are joined appropriately. For each row, start with fresh granny squares and attach them accordingly.
3: Creating Half Squares
- Half-Square Formation:
- Follow the granny square pattern until you do the 5 clusters in the third row.
- Skip the fourth side to leave the square as a diagonal triangle.
- Attaching Half Squares:
- Use the same joining methods (6 chains for corner connections, 3 chains for side connections).
- Attach the three half-squares to the edges of the scarf to complete the shape.

4: Adding Final Ties
- Make Ties:
- At both ends of the scarf, start with a slip knot. Attach the yarn at the corner.
- Chain 70-80 depending on your preferred length.
- Cut yarn and secure, weaving in the ends.
- Optional Decorative Edge:
Add a neat finishing touch by working a row of single crochet stitches around the entire edge of the scarf.
Special Features
- Lightweight and airy feel.
- Perfect for layering or accessorizing during warm weather.
- Can be made in a variety of colors for customization.
Tutor’s Suggestions
- Use markers to identify connection points for smooth motif attachment.
- Mix and match colors for a vibrant, floral look.
- Mohair yarn creates a soft, fuzzy texture that enhances the lightweight design.
Difficulty Level
Intermediate – Requires an understanding of granny square construction, working with clusters, and motif joining. Beginners can easily follow the step-by-step instructions with some patience.
Uses
- A stylish scarf for casual or formal outfits.
- A handmade gifting option.
- A great addition to accessory collections for all seasons.
Tip
To ensure even connections, prioritize tension consistency while forming clusters and joining motifs. This keeps the scarf lightweight and perfectly shaped.
Conclusion
Your stunning crochet flower bandana is now complete! This lightweight and airy accessory elevates any outfit, making it a versatile addition to your closet. Whether you're wearing it as a scarf, wrap, or statement piece, its delicate floral pattern and beautiful texture make it one-of-a-kind. With this pattern, you’ve crocheted not just a scarf but an artistic masterpiece woven with your care and creativity.


Leave a Reply