

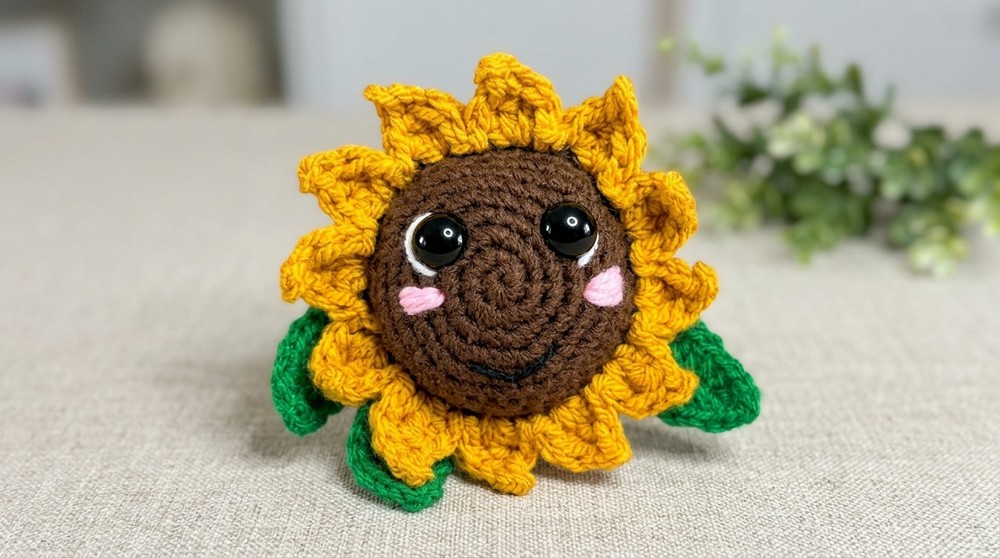
Unique Crochet Sunflower Keychain Pattern That is Both Fun & Useful

This pattern isn’t just beautiful; it’s functional too. It helps you keep track of your keys while doubling as a stylish accessory. Plus, it’s an eco-conscious option since it’s handmade with minimal materials. Whether given as a thoughtful gift or kept as your own favorite accessory, this sunflower keychain pattern is bound to brighten someone’s day.
With an approachable pattern that's easy to follow, enthusiasts of all skill levels can enjoy putting it together. It’s ideal for beginners seeking a smaller project or experienced crocheters wanting a quick and satisfying creation. It’s completely customizable—you can experiment with petal colors or facial expressions to make each piece unique.

Materials You’ll Need
- Yarn: Double-knit yarn in the following colors:
- Brown (for the sunflower center)
- Mustard or yellow (for the petals)
- Green (for the leaves)
- Small amounts of pink, white, and black (for facial embroidery)
- Hook Size: 3.5mm crochet hook
- Other Supplies:
- 12mm safety eyes
- Fiberfill for stuffing
- Keyring attachment (or make your own loop with yarn)
- Stitch marker
- Scissors
- Darning needle (for assembly and embroidery)
Special Features
- Adorable Design: A perfect sunflower face with charming details like blush, a smile, and vibrant petals.
- Multifunctional: Use this as a keychain, bag charm, or gift for loved ones.
- Customizable: Easily adapt colors to your style or theme.
Level of Difficulty
Intermediate – Features rounds, increases, embroidery, and simple shaping. Clear instructions make it accessible for enthusiastic beginners.
Step-by-Step Pattern
Step 1: Creating the Sunflower Center
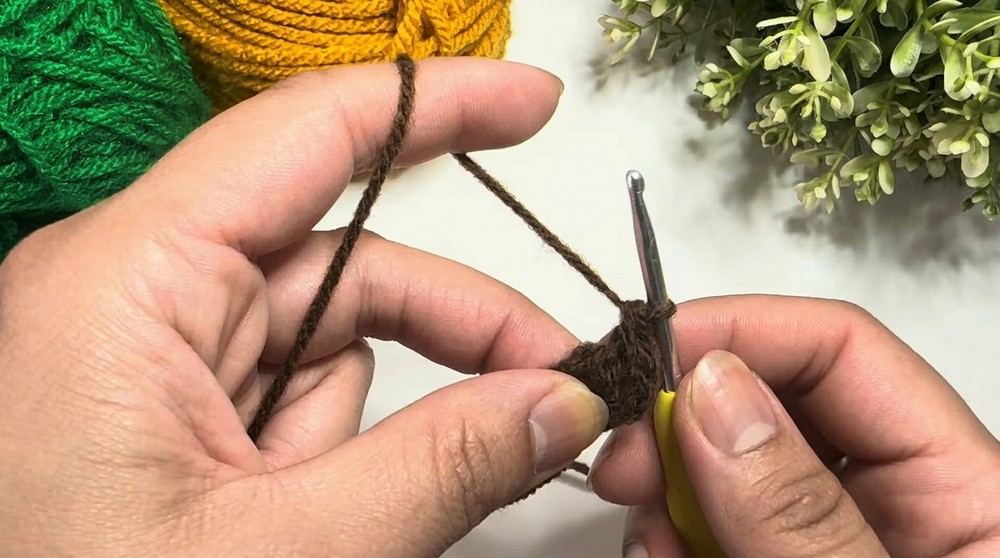
- Start with the Brown Yarn:
- Create a slip knot and chain 2.
- Alternatively, use a magic ring if preferred.
- Round 1:
- Work 6 single crochets (sc) into the second chain from the hook (or into the magic ring).
- Pull the initial yarn tail to close the ring tightly.
- Begin working in a spiral (no slip stitching between rounds).
- Round 2:
- Work an increase in each stitch (2 sc in each stitch).
- Result: 12 stitches at the end of this round.
- Round 3:
- Repeat (1 sc, 1 increase) around.
- Result: 18 stitches.
- Round 4:
- Repeat (2 sc, 1 increase) around.
- Result: 24 stitches.
- Round 5:
- Repeat (3 sc, 1 increase) around.
- Result: 30 stitches.
- Round 6:
- Repeat (4 sc, 1 increase) around.
- Result: 36 stitches.
- Round 7-8:
- Work 1 single crochet in each stitch.
- Result: 36 stitches per round.
- Fasten Off (for First Piece Only):
- Work a slip stitch in the next stitch, cut yarn, and pull through to secure. Make sure to weave in the ends.
- Repeat to Make a Second Identical Piece:
- For the second piece, do not fasten off. Leave yarn attached to join the two pieces.

2: Adding Safety Eyes and Joining Pieces
- Insert Safety Eyes:
- Position the 12mm safety eyes between Rounds 4 and 5, spaced evenly apart.
- Adjust positioning as needed for symmetry. Insert the backing of the safety eyes to secure.
- Join Both Pieces:
- Place the two centers together with the right sides (faces) outward.
- Insert your hook through a stitch on both pieces. Work 36 single crochets around to join the edges.
- Leave an Inch Gap:
- Before closing completely, stuff the center with fiberfill.
- Once properly stuffed, finish the single crochets to close the gap.
- Fasten Off:
- Work a slip stitch in the next stitch, then cut yarn and secure by weaving in the end.
Step 3: Adding the Petals
- Attach Mustard/Yellow Yarn:
- Join the yellow yarn to any stitch along the edge with a slip stitch, chain 1 to secure.
- Work the Petal Pattern:
Each petal is worked across one stitch as follows:- Double crochet (dc) in the first stitch.
- Treble (tr) in the same stitch.
- Picot Stitch: Chain 3, slip stitch into the base of the chain-3.
- Treble (tr) in the same stitch.
- Double crochet (dc) in the same stitch.
- Slip stitch into the next stitch to anchor the petal.
- Repeat for All Petals:
- Work this combination (slip stitch, double crochet, treble, picot, treble, double crochet, slip stitch) around the entire edge.
- Fasten off when complete, secure the yarn, and weave in ends.

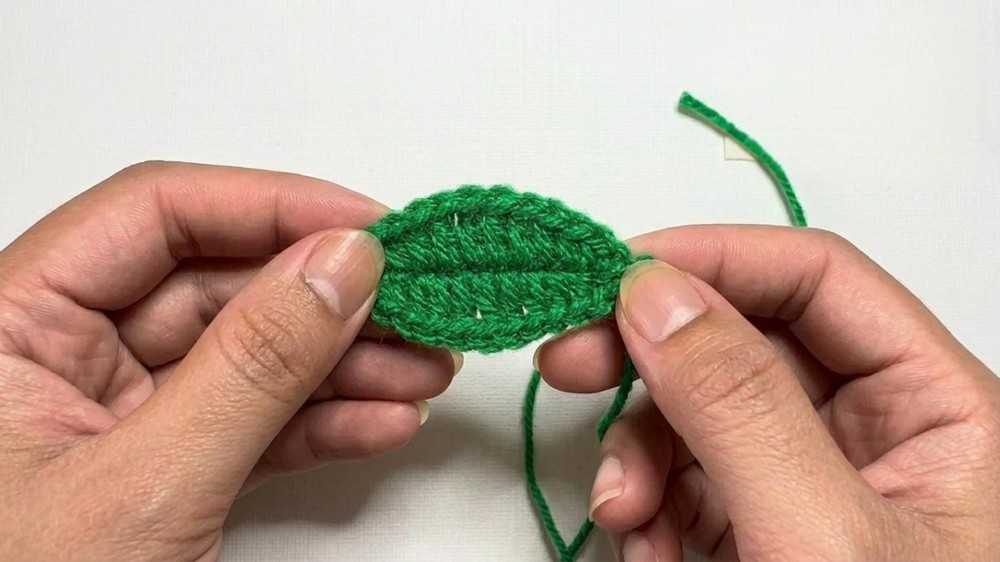
4: Making the Leaves
- With Green Yarn: Chain 12.
- Work Back Along the Chain:
- Skip the first chain, then work:
- 2 single crochets (sc)
- 2 half double crochets (hdc)
- 3 double crochets (dc)
- 2 half double crochets (hdc)
- 2 single crochets (sc)
- Skip the first chain, then work:
- Turn and Mirror:
- Chain 1, work the same pattern down the other side of the chain.
- Fasten off, leaving a long tail for attaching, and weave in loose ends.
- Make 3 Leaves: Repeat this process two more times.
5: Assembly
- Attach Leaves:
- Use either a darning needle or your hook to attach the leaves around the sunflower.
- Secure each with knots and weave the yarn tails back into the body.
- Facial Features:
- Use white yarn to stitch small highlights near the eyes.
- Use pink yarn for blush (stitch approx. 5 strands under each eye).
- Use black yarn to embroider a small smile.
- Attach Keyring:
- Use brown yarn and a darning needle to securely attach the keyring to the top of the sunflower.
Tutor’s Suggestions
- Stitch Markers: Use them to keep track of starting and ending points when working in spirals.
- Customization: Experiment with face expressions (e.g., winking eyes or different blush styles).
- Durability: Reinforce attachments (keyring, petals, leaves) if the piece will be used frequently.
Uses
- Attach this sunflower keychain to keys, backpacks, purses, or gift bags.
- Makes a thoughtful handmade gift for birthdays, party favors, or just-because surprises!
Tip
To ensure durability, add an extra layer of stitching or glue backing behind the safety eyes if the keychain will face heavy usage.
Conclusion
Your crochet sunflower keychain is now complete! This cheerful and customizable project is the perfect way to showcase your creativity while crocheting a practical accessory. Whether used as a keychain, a cute bag charm, or gifted to loved ones, this sunflower pattern is sure to brighten anyone's day.


Leave a Reply