

Crochet Granny Bralette Pattern Perfect for Handmade Fashion

The step-by-step pattern is easy to follow and includes versatile techniques like granny squares, double crochets, and slip stitches, making it a rewarding project for beginners and experienced crocheters alike. You can shape and tailor every detail, ensuring a perfect fit and seamless finish. Beyond its aesthetic charm, this pattern is practical—it’s reusable, eco-friendly, and made to last, offering an earth-conscious alternative to fast fashion.
By taking the time to stitch this timeless piece, you’re not only expanding your crochet skills but also adding value to your wardrobe with a one-of-a-kind standout garment. Stylish, sustainable, and effortlessly chic, this bralette pattern is a must-have for modern crochet lovers.

Materials Needed
- Yarn: Milk cotton yarn in three different colors (or a color of your choice).
- Crochet hook: 3.5 mm hook.
- Scissors.
- Stitch markers (optional).
Special Features
- Beginner-Friendly: The stitches used in this pattern are straightforward (chains, slip stitches, double crochets).
- Step-by-Step Process: Easy and clear instructions, broken down row by row.
- Customizable: Adjust the crop top size by increasing or decreasing chains and rows.
- Versatile: Works for casual wear or layering over dresses and swimwear.
Step-by-Step Instructions
Step 1: Foundation Chain
- Start with milk cotton yarn in your preferred color.
- Create a foundation chain by making 100 chains or adjusting the chain count depending on the desired size.
2: Build the Base
- Row 1:
- Slip stitch (sl st) into the foundation chain to form a loop.
- Chain 2, then make 3 double crochets (dc) into the central stitch.
- Row 2:
- Continue by adding 6 double crochets (dc) evenly distributed along the stitch.
- Skip 2 spaces, then work another 6 double crochets (dc) pattern.
- Row 3:
- Repeat this pattern for the base of the crop top.
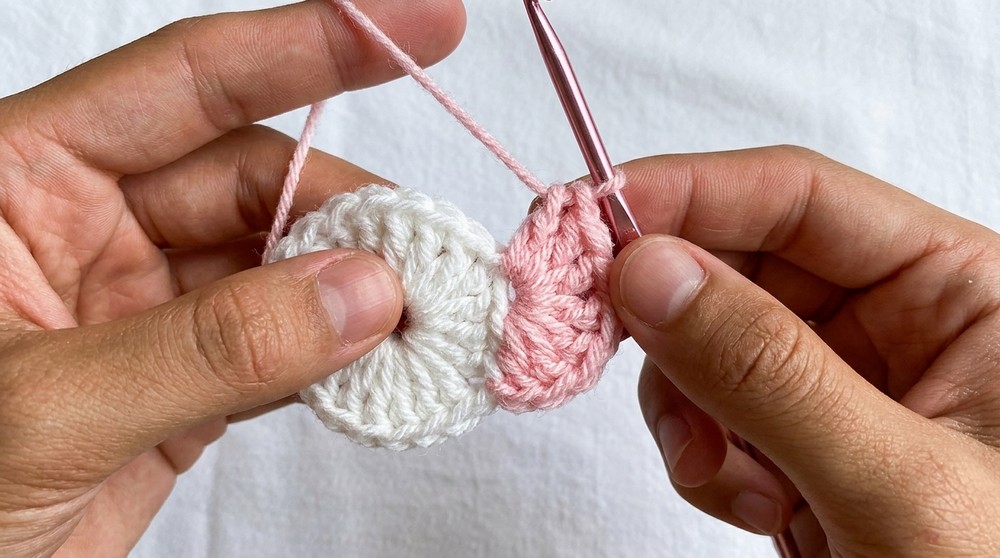
3: Creating the Cups
- Attach a new yarn color by joining it to the base.
- For the first cup:
- Chain 25, then turn your work.
- Use half-double crochets (hdc) and single crochets (sc) to fill each chain space for a sturdy cup base.
- Skip spaces strategically to create depth in the cups, repeating rows with decreases and chains for shape.
- For the second cup, follow the same steps, ensuring symmetry.
4: Edging and Joining
- Switch to the third yarn color for finishing touches.
- Create edging by working single crochets (sc) and slip stitches (sl st) along the borders of the cups and base.
- Join the cups to the base using continuous double crochet patterns, ensuring they fit seamlessly together.

5: Adding Straps
- Create straps by crocheting chains (300 chains) for each strap to fit over the shoulders.
- Attach these straps securely with slip stitches.

Step 6: Final Adjustments
- Add any necessary stitching to the base for reinforcement.
- Expand cup size if needed by repeating rows with extra stitches.

Tutor’s Suggestions
- Sizing: Adjust the chain count or row repetitions based on your measurements.
- Color Coordination: Feel free to mix and match yarn colors for vibrant results.
- Skill Level: Beginners should practice chains and double crochets first to get comfortable.
Uses
- Perfect for summer outings or layering over a swimsuit.
- Can be worn casually with shorts or skirts for stylish combinations.
- Makes a great gift for friends or family.
A Helpful Tip
To enhance durability, block your crop top after finishing. Simply wet the fabric, shape it to desired dimensions, and leave it to dry flat—this will even out stitches and make your work look professional.
Conclusion
Now your beautiful crochet crop top is ready to wear and flaunt! Not only does this project provide a creative outlet, but it also puts you in control of personalizing your style. With simple stitches and endless possibilities for customization, this pattern is a must-try for crochet enthusiasts looking to add something unique to their wardrobe.


Leave a Reply