

If you love adding a personal touch to your home decor, a crochet pillow tutorial could be just the thing for you! Crocheting is a relaxing and enjoyable hobby that allows you to produce beautiful, functional items for your space. This guide will show you how to make a cozy, stylish pillow that can brighten up any room.
Crochet Pillow Tutorial

Whether you're new to crocheting or looking to hone your skills, this pillow project is both fulfilling and fun. So, grab your crochet hook and some yarn, and let's start making your new favorite pillow!
Starting the Base:
- Create a loop by wrapping the yarn around your finger.
- Use a 4.5 millimeter crochet hook, insert it under the first loop.
- Pull the back string through and twist, then pull yarn through again to knot the base.
- Begin creating stitches by going under the loop, grabbing yarn, pulling it back through once, then again, completing one stitch.
- Continue making a total of eight of these stitches.

Forming the Circle:
- After the eight stitches, pull the short end to close the circle.
- Insert the hook into the first set of stitches, grab the yarn from the ball, and pull through twice, ending up with one loop on the hook.
First Row:
- Chain up by wrapping the yarn around the hook once.
- Perform a double crochet stitch by inserting the hook into the first stitch, grabbing yarn, and pulling through.
- Make two double crochet stitches into each stitch around the circle.
- Complete the first row and connect with a slip stitch to the first chain, ensuring the row lies flat.

Correcting Curvature:
- If the yarn is stiff and the base isn't flat, you may need to add an extra double crochet in some stitches to prevent curling.
Second Row:
- Continue with two double crochet stitches in each stitch.
- Add an additional double crochet stitch where necessary to ensure the base lies flat.

Adding Rows:
- For thicker yarn, two rows might suffice, but for thinner yarn, you may need to add a third or fourth row.
- Alternate between one double crochet and two double crochets in each stitch around if needed, depending on the curvature.
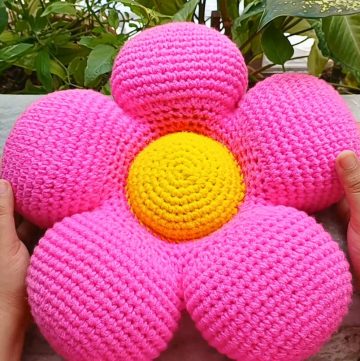
Creating the Bubble Effect:
- Once the base is complete, it's time to start the bubble effect.
- Turn your work so the nice side faces down.
- Chain up one and change direction by working double crochets only into the top chains.
- Continue this pattern around.

Building the Bubble:
- Work two more rows of double crochets, without increases or decreases.
Forming the Bubble:
- For the bubble decrease, double crochet into the first stitch, skip one stitch, and slip stitch into the next.
- Continue this pattern all around, decreasing to create the bubble shape.

Increasing After Decrease:
- Work one double crochet, then two double crochets in the same stitch.
- Repeat this pattern around, alternating between one and two double crochets to increase back to the original number of stitches before the decrease.
Finalizing the Bubble Effect:
- Do three more rows of double crochets.
- Repeat the decrease and increase steps to create more bubbles and shape the pattern.
- Make sure to maintain an even stitch count and apply pressure evenly to ensure a uniform look.
Repeating the Pattern:
- Continue with the bubble pattern, which consists of three rows of double crochets, a decrease row, a row of double crochets on the decreases, an increase row, and three more rows of double crochets.
- Repeat this pattern to achieve the desired length and shape for your project.
Leave a Reply