

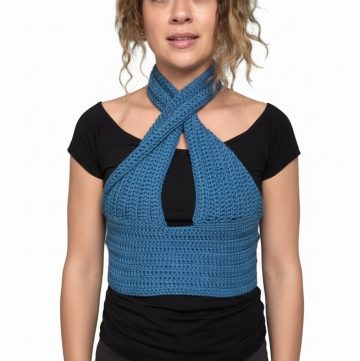
The Crochet Mesh Crop Top is a cool and breezy piece of clothing that's perfect for summertime. It's made using crochet techniques, which gives it a special mesh-like look with tiny holes. The whole top is made in a single color, which makes it simple but stylish. Its design and openwork texture are great for wearing over a swimsuit bra when you're heading to the beach or enjoying a day outside in the warm weather. Its airy feel and ease of matching with other clothes make it a go-to choice for casual, sunny day outfits.
Crochet Mesh Crop Top Pattern

Materials Needed:
- Cotton yarn, 4 ply. For size small, approximately 75 grams.
- Crochet hook, size 3.5 mm.
- Stitch markers, approximately 4.
- Scissors.
Notes Before Starting:
- The video tutorial focuses on making a size small but provides instructions on how to adjust for larger sizes.
- This pattern is beginner-friendly, and detailed explanations are provided for each step.
- The pattern is designed to work up quickly; it can be completed in 1-2 days.
Pattern:
Starting the Front Panel:
- Create a slip knot and chain 85 (84 + 1, based on multiples of 3 plus 1 for turning).
- Chain 2 more as turning chains.
Working the First Row:
- Double crochet (DC) in the 4th chain from the hook.
- Chain 2, skip 2 chains, then DC in the next chain. Repeat across the row to create a mesh effect.
Continuing the Front Panel:
- Repeat the row steps for a total of 17 rows maintaining the mesh pattern.
Creating the Armholes:
- For rows 18 to 21 (4 rows), decrease at the beginning and end of each row to form armholes by chaining 3 (instead of 2) at the start and making an extended decrease at the end.
Building the Neckline and Straps:
- After completing the armhole decreases, continue with the mesh pattern without decreases for 3 rows.
- For the neckline, find the center and mark it. Work decreases at the center for 5 rows while continuing the pattern on the sides.
- After decreasing at the center for neckline shaping, work 8 rows for the strap on one side without decreases.
- Attach yarn on the other side and repeat the strap instructions.
Creating the Back Panel:
- Repeat the same steps for the front panel up to the end of row 24 (before shaping armholes and neckline).
- For the back panel’s upper part, continue the pattern for 8 additional rows without decreases.
- Then, shape the neckline by skipping squares (using markers as guidance) and decreasing as for the front panel, but only work neckline decreases, not straps.
Assembling the Top:
- Use slip stitches to sew the sides from the bottom up to the armholes.
- For the shoulders, slip stitch across or crochet the last row of one shoulder strap together with the corresponding stitches on the back panel. Repeat for the other shoulder.
- Weave in all loose ends for a neat finish.
Final Notes:
- The creator emphasizes that this top is very versatile. With minor adjustments, it can be transformed into a longer top or even a dress.
- The pattern is fully customizable in terms of size and length.
https://youtu.be/AGLjXzDe_Hw?t=2554
Leave a Reply