

Transform your little one's outfit with our Fun Crochet Dinosaur Hat Pattern, bringing a playful prehistoric touch to any wardrobe.
The Crochet Dinosaur Hat Pattern brings playful, prehistoric fun to your crochet projects. This delightful pattern marries comfort and creativity, resulting in an adorable accessory sure to charm both kids and adults. With its detailed instructions, crocheters of all skill levels can enjoy making this unique hat. Select your favorite yarn colors to personalize each creation, blending whimsical design with practicality. Whether it's for a costume, a themed party, or everyday wear, this dinosaur hat will bring joy and smiles. Make this adorable crochet accessory for your little one and get him ready for next holiday adventure!

Uses Of Crochet Dinosaur Hat:
- Baby Gifts: The hat can be a perfect handmade gift for baby showers, birthdays, or any special occasion for infants.
- Photo Props: Ideal for adorable photo shoots, particularly for milestone pictures or themed sessions.
- Costume Parties: Suitable for dressing up babies for Halloween, costume parties, or dinosaur-themed birthdays.
- Winter Accessories: Keeps babies warm during colder months while adding a cute touch to their winter wardrobe.
- Playtime Fun: Adds an element of fun to playtime, sparking imagination and interactive play for young children.
- Baby Outfits: Complements other crocheted dinosaur-themed items like diaper covers, pants, or booties for a complete ensemble.
- Handmade Craft Sales: Great item to sell at craft fairs, online shops, or local markets for those who enjoy creating and selling handmade items.
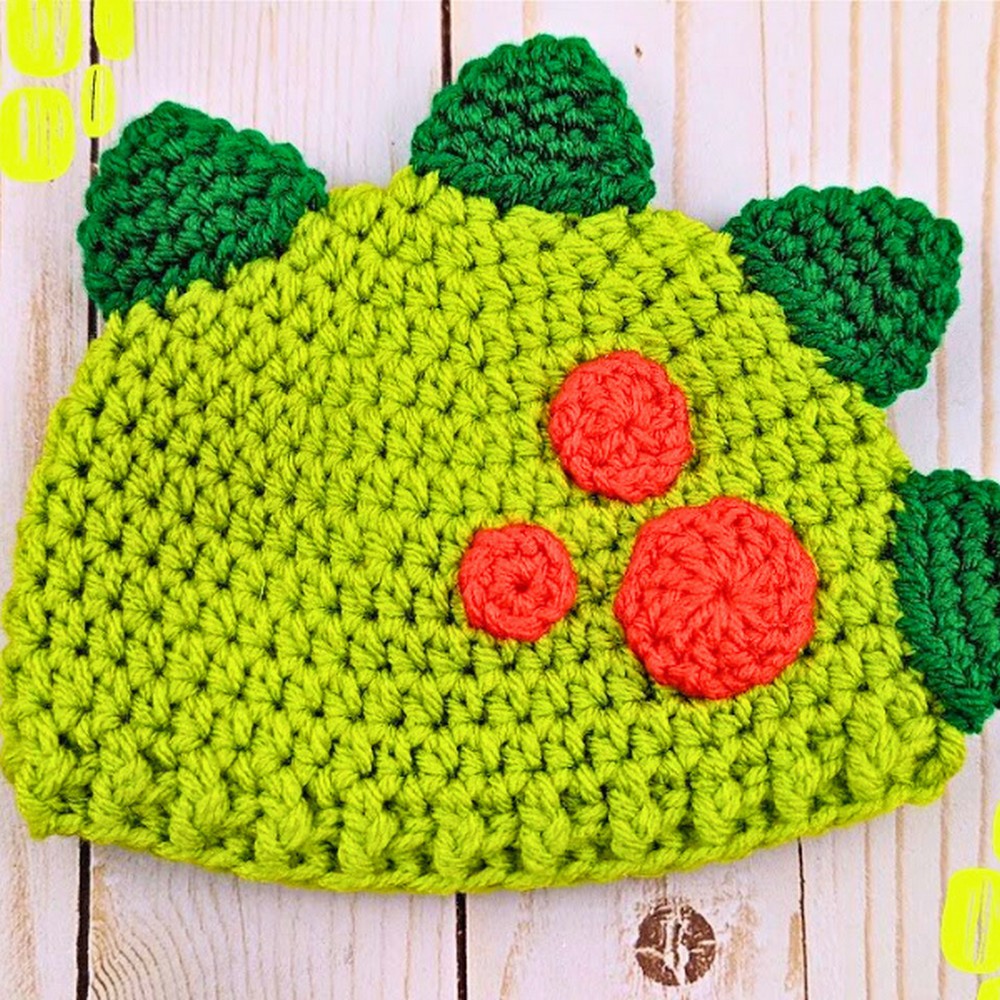
Crochet Dinosaur Hat
Materials Needed:
- Three colors of yarn (suggested: dark green, brighter green, bright orange)
- 5 mm crochet hook
- Scissors
- Yarn needle
- Stitch marker
Hat Construction:
Make the Hat Base:
- First, create the base of the hat. Choose the size you need (the video mentions that there are various sizes available up to 12 months old on the channel) and follow one of the linked tutorials in the video's description to make the hat. This will not be covered in this specific video.
Small Spots:
- Start with a magic ring.
- In the magic ring, make 5 single crochets.
- Pull the short tail to close the opening tightly.
- Slip stitch to the first single crochet made.
- Cut a longer tail (for sewing onto the hat later) and trim any excess short tail.

Medium Spots:
- Begin with a magic ring.
- Work 8 half double crochets into the magic ring.
- Close the ring and slip stitch to the first stitch.
- Cut a longer sewing tail and remove any excess short tail.
Large Spots:
- Create a magic ring and chain 2.
- Make 10 double crochets into the magic ring.
- Close the ring and slip stitch to the first double crochet.
- Trim the end, leaving a tail for sewing.
- You should make at least two of each size for a balanced design on the hat, but feel free to add more for your desired look.
Spikes:
- Use green yarn (or desired color). You need to make four spikes.
- Start with a magic ring.
Round 1:
- 6 single crochets into the ring, pull to close.
Round 2:
- single crochet in the first stitch, then increase in the next stitch. Repeat this pattern (single crochet, increase) for the round to total 9 stitches.
After Round 3:
- Work two single crochets, then an increase in the third stitch. Repeat around to total 12 stitches.
Round 4:
- Three single crochets, then increase in the fourth stitch, repeat around to reach 15 stitches.

Round 5:
- Single crochet in each stitch around, maintaining 15 stitches. This finishes the shape of the spike.
- Slip stitch into the next stitch and cut the yarn, leaving a tail for sewing.
Assembling the Hat:
Sew the Spikes:
- Start at the bottom of the hat and use the yarn tail to sew around the base of each spike, securing it tightly to the hat. Repeat for all spikes, spacing them evenly along the crest of the hat.

Sew the Spots:
- Arrange the spots in a pleasing manner on the hat (suggested: large at the bottom, medium in the middle, small at the top). Sew each spot securely in place using the yarn tails.

Enjoy your fun crochet creation!


Leave a Reply