

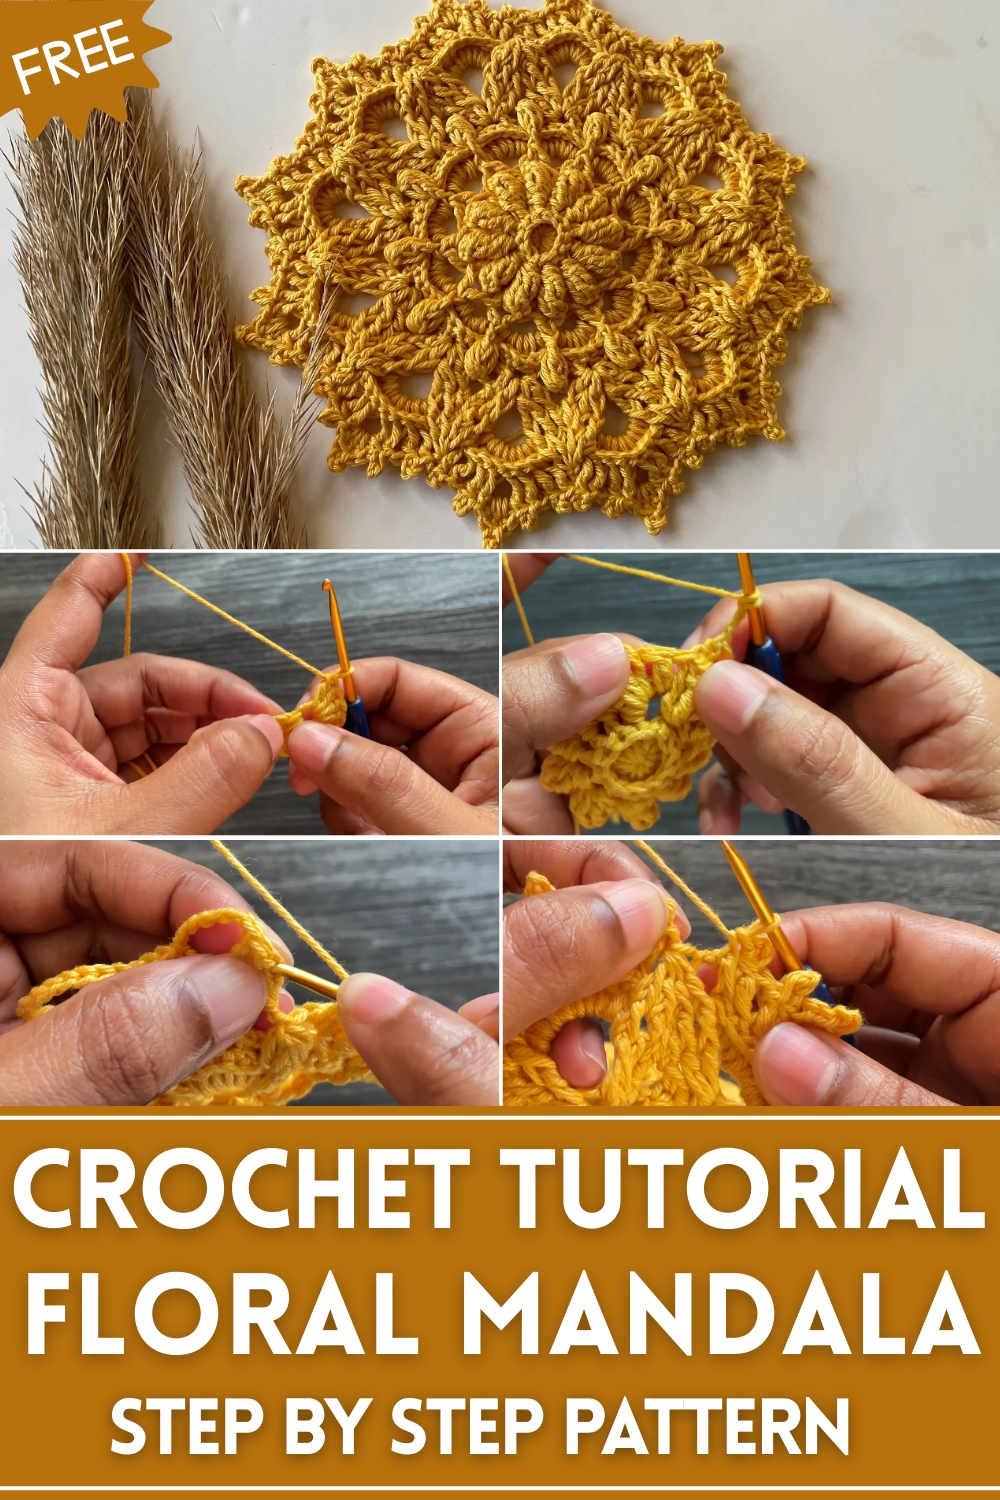
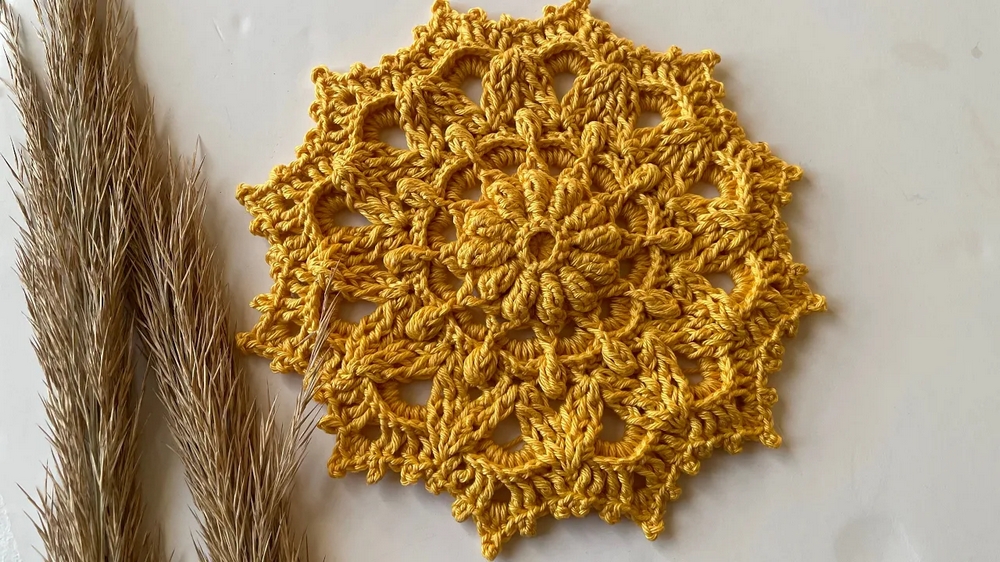
Awaken vibrant charm in your home with the Free Crochet Floral Mandala Pattern, ideal for handmade decor, gifts, and decorative accents that impress.
In many cultures, mandalas have been cherished for their intricate symmetry and calming influence, often serving as focal points for meditation and reflection. The Free Crochet Floral Mandala Pattern brings this timeless beauty into a hands-on, creative form, allowing makers to crochet vibrant, layered floral motifs that radiate charm and tranquility. Perfect for enhancing home decor, these mandalas can be used as wall hangings, table centerpieces, coasters, or even incorporated into blankets and cushions, adding a touch of elegance and handmade warmth to everyday spaces.
Free Crochet Floral Mandala Pattern to Turn Any Corner
The pattern’s step-by-step instructions guide crocheters through loops, petals, and layered stitches, building both skill and confidence while producing a visually stunning piece. Its versatility allows for customization in color combinations and sizes, making each mandala uniquely personal and suited to any aesthetic or seasonal theme. Beyond decoration, working on this pattern provides a meditative rhythm, promoting mindfulness, focus, and relaxation.
Handmade mandalas also make thoughtful gifts, symbolizing care, creativity, and attention to detail. By transforming simple yarn into a harmonious floral arrangement, this crochet mandala merges artistry with purpose, offering both practical functionality and a sense of personal satisfaction in every completed piece, enriching spaces and spirits alike.
Step-by-Step Details
Step 1: Materials Needed
- Yarn: Nature cotton yarn (or any yarn of your choice).
- Crochet hook: 2.5mm hook (adjust hook size for other yarns).
- Scissors
- Tapestry needle: For weaving in ends.
Special Note:
You can use any yarn, but ensure you pair it with an appropriately sized hook to maintain structure.
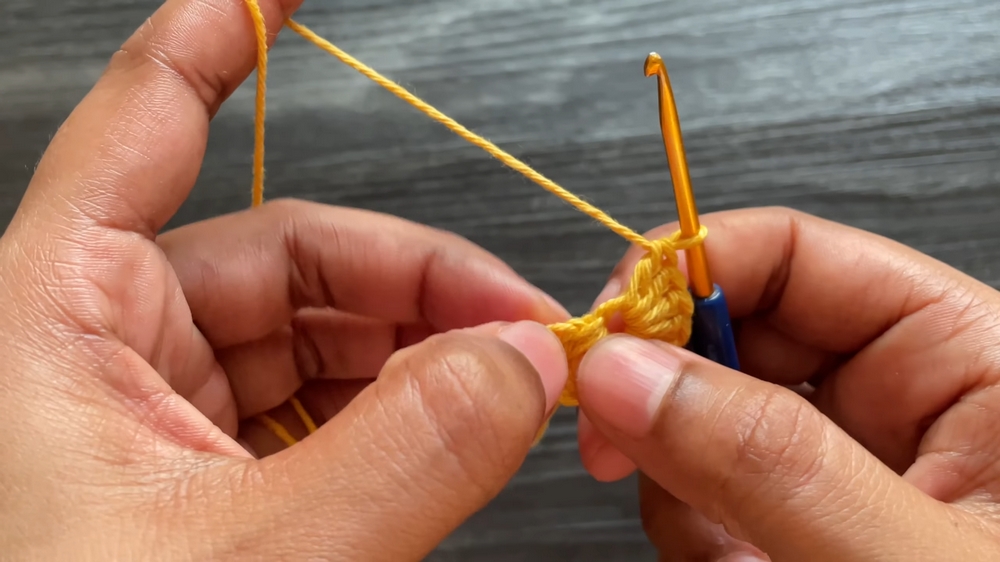
Step 2: First Row – The Magic Ring Foundation
- Start by making a magic ring.
- Chain 1 to secure the ring, then chain 2 more for a total of three chains (these count as your first double crochet).
- Work 11 double crochets (DC) into the magic ring.
- Close the ring by pulling the yarn tail tightly.
- Slip stitch into the third chain of the initial chain three to complete the row.
- Tip: Use even tension to ensure the ring remains flat.
Step 3: Second Row – Back Post Stitches
- Begin by working a back post slip stitch around the first chain three of the previous row.
- Chain 4 (counts as a double crochet and chain 1).
- Work a back post double crochet (BPDC) into each double crochet of the previous row, adding a chain 1 between each BPDC.
- Continue around the row with BPDCs and chain 1 spaces until the end. You will have 12 BPDCs in total.
- Slip stitch into the third chain of the initial chain four to complete the round.
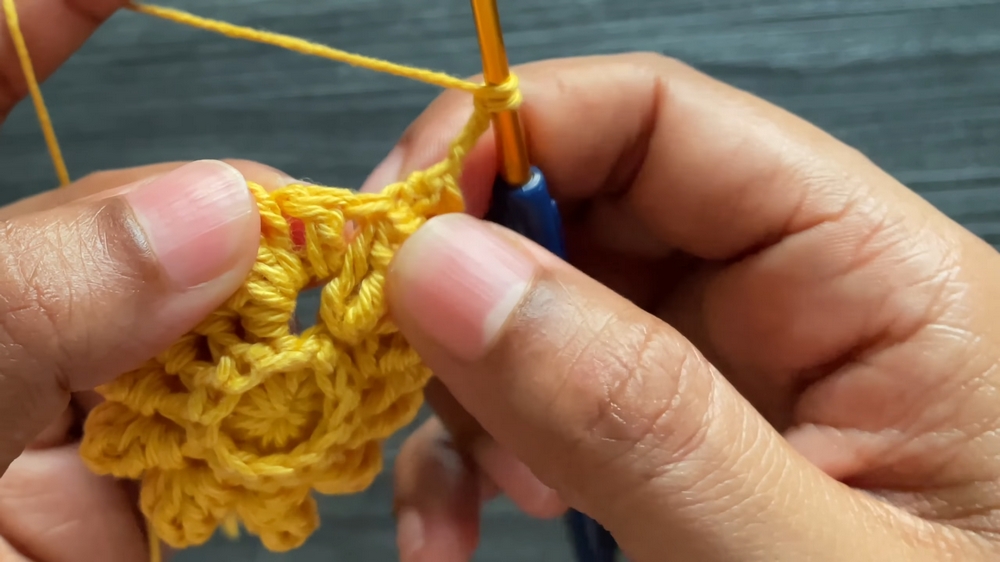
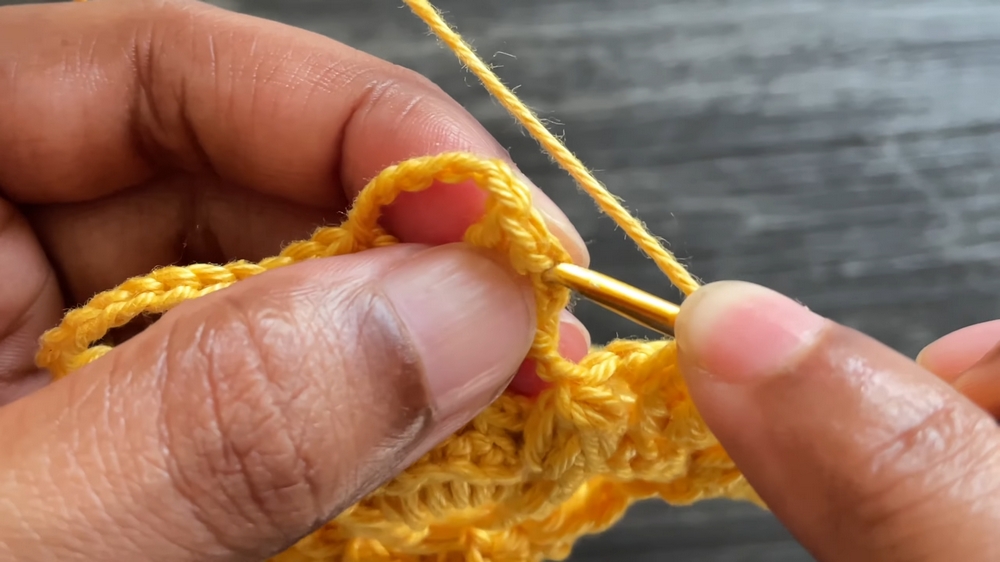
Step 4: Third Row – Popcorn Stitches
- Slip stitch into the next chain space.
- Chain 4, then work 5 treble crochets (TR) into the same double crochet (for the popcorn stitch).
- Drop the loop from the hook. Insert the hook into the top of the first treble crochet, pick up the dropped loop, and pull it through to form the popcorn stitch.
- Chain 1, then work a double crochet into the next chain 1 space.
- Continue the pattern: 5 TR (popcorn) → chain 1 → double crochet in the chain 1 space, across the row. You should have 12 popcorn stitches in total.
- Finish the row with a slip stitch into the third chain of the starting chain-4.
Step 5: Fourth Row – Front Post Double Crochets
- Work a front post slip stitch around the chain-3 of the previous row.
- Chain 3 (counts as the first double crochet), then work a front post double crochet (FPDC) into the first and next double crochet between two popcorn stitches. These form two front post double crochets together (FPDCTogether).
- Chain 4, then repeat the process of working 2 FPDCTogethers between popcorn stitches, separated by chain 4 spaces, all the way around.
- Join the row with a slip stitch into the third chain of the starting chain-3.
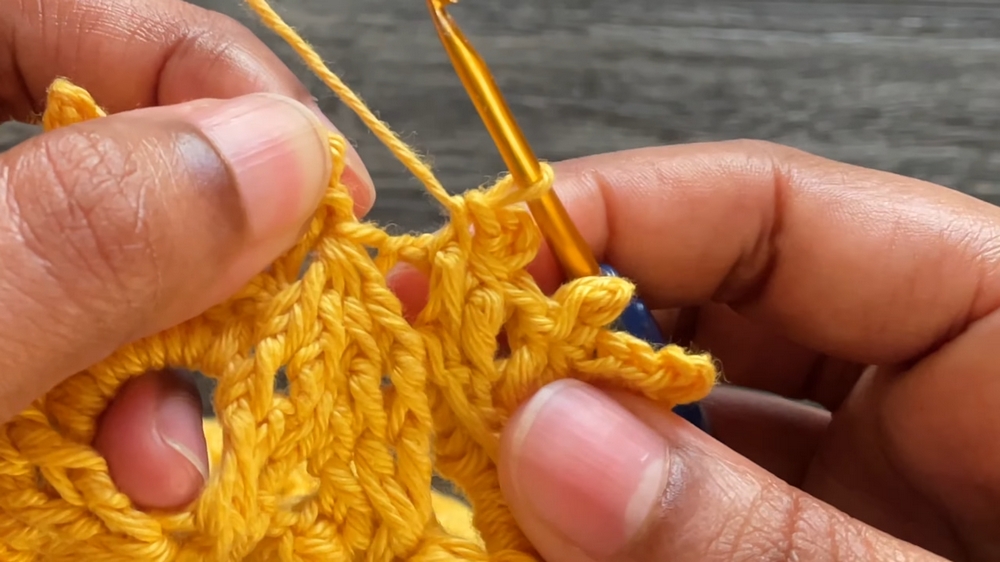
Step 6: Fifth Row – Double Crochet Groups
- Work a slip stitch into the first chain-4 space of the previous row.
- Chain 3, then add 5 double crochets (DC) in the chain-4 space (total: 6 DC with the starting chain).
- Continue creating groups of 6 DCs in every chain-4 space around.
- Finish the row with a slip stitch into the third chain of the starting chain-3.
Step 7: Sixth Row – Back Post Details and Treble Stitches
- Work a back post single crochet (BPSC) over the chain-3 from the previous row, then work 2 more back post single crochets in the next two stitches.
- Chain 2, then repeat the pattern: 3 BPSCs → chain 2 → a front post treble crochet (FPT) around the two FPDCTogethers from the fourth row.
- Continue this pattern across the round.
- End with a slip stitch in the first single crochet.
Step 8: Final Rows – Puff Stitches and Picots
For the final rows, the design transitions into puff stitches and decorative picots to add texture and a scalloped finish:
- Work puff stitches on the front post treble crochet stitches. Form puff stitches by pulling yarn through the same space 4 times before finishing.
- Add picots for extra detail: picots are made by chaining 3, inserting the hook into the base stitch, and slip stitching to form a dot.
- Repeat puff stitches and picots around, joining with slip stitches at the end of each row.
Special Features
- Textured Design: Includes popcorn, puff, and picot stitches as well as front and back post techniques to create dimension.
- Customization Options: Use as a standalone doily, or incorporate multiple repeats into a tablecloth, wall hanging, or cushion for a larger piece.
- Elegance in Simplicity: Despite its complexity, careful attention to detail results in a refined and sophisticated finish.
Level of Difficulty
Intermediate to Advanced – The project involves various techniques like popcorn stitches, front and back post stitches, and picots. Familiarity with foundational crochet skills is important before attempting this project.
Tutor’s Suggestions
- Use Markers: To identify your starting stitch in each row, a stitch marker can be very helpful to avoid confusion.
- Work Slowly: Take your time, especially with popcorn stitches and puff stitches, to ensure uniformity in your stitches.
- Block Your Doily: After completing the project, block the doily to help it lay flat and showcase the intricate design.
Uses
- Decorative Tablepiece: Use the Zara Doily to dress up coffee tables, dining areas, or consoles.
- Gift Idea: Handmade crochet doilies make thoughtful presents for family and friends.
- Layered Designs: Combine multiple doilies to create tapestries, curtains, runners, or wall art.
Tip
The final rows include a lot of delicate details like puff stitches and picots. Use consistent tension, and take breaks between rows to avoid hand fatigue when working on the intricate sections.
Conclusion
The Doily is the perfect crochet project for those who love texture and detail. Featuring popcorn stitches, back post stitches, puff details, and picots, this design showcases how creative and versatile crochet can be. While the project may be challenging, the end result is a stunning, decorative piece that is well worth the effort.


Leave a Reply