

Build playful memories with this crochet teddy bear pattern featuring easy guidance for cuddly keepsake full of charm and warmth at home.
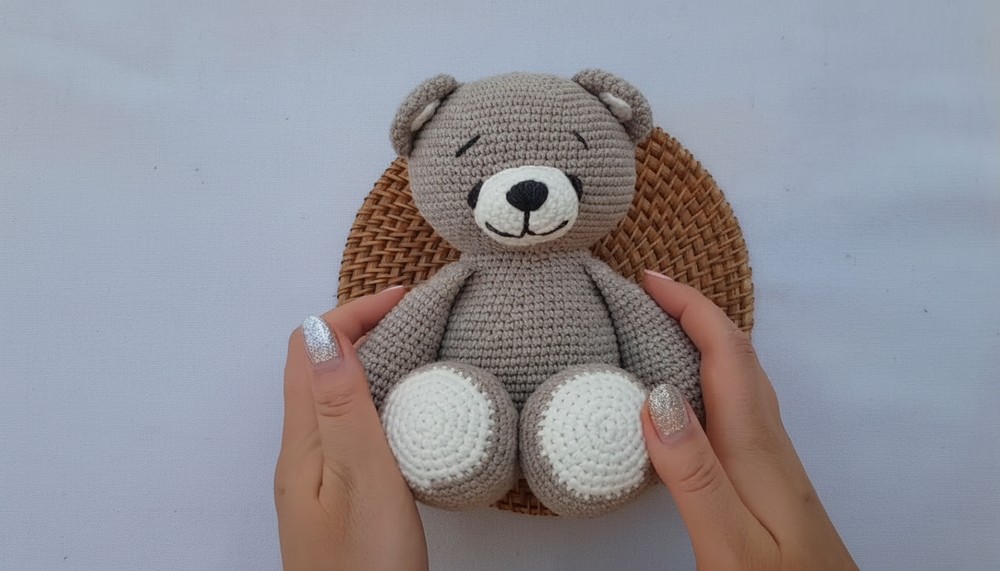
This is one of the most lovable and heartwarming toys you can ever make with your own hands. Soft yarn and simple stitches come together to form a sweet little bear that feels full of comfort and care. A Crochet Teddy Bear pattern helps you shape a cute bear with a round face small ears and tiny paws that make everyone smile. Its beauty shines in its softness and gentle look which brings peace and happiness to any space.
Magical Crochet Teddy Bear Pattern That Feels Extra Special

You can place it in a baby room on a bed or on a table to make the area feel warm and welcoming. It is also a perfect gift for birthdays baby showers and special moments because it shows true love and effort. Many people keep it as a sweet memory that reminds them of childhood joy and simple happy days.
Materials List
- Yarn: Alize Cotton Gold (color #152 shown, but any DK cotton or acrylic yarn will work; fluffy, chunky, or standard)
- (Yarn weight: DK)
- Hook Size: 3 mm crochet hook
- Stuffing: Polyester fiberfill (holofiber or toy filling)
- Yarn Needle: For sewing and embroidery
- Stitch Markers: Optional, for marking rounds and pieces
- Pins: To position pieces before sewing (optional)
- Scissors
- Optional Accessories:
- Contrasting yarn for embroidery (initials, nose, eyes)
- Inner ear circles (in a secondary color)
- Small scarf, bow, or other accessories
Key Abbreviations
All steps use US crochet terminology.
| Abbreviation | Meaning |
|---|---|
| ch | chain |
| sc | single crochet |
| inc | increase (2 sc in 1) |
| dec | decrease (sc2tog) |
| sl st | slip stitch |
| st(s) | stitch(es) |
| FO | finish off |
| MR | magic ring |
Special Notes
- All parts are worked separately and assembled at the end.
- Leave long yarn tails on each piece for sewing.
- Use a long sewing needle for attaching parts securely.
- For a child-safe teddy: Use only yarn for features (embroidered eyes/nose), no safety or plastic eyes, especially for babies.
Pattern
(Body parts such as head, body, arms, legs, ears, muzzle, and tail are crocheted separately. Assembly guide is included.)
This is an assembly pattern and assumes you have crocheted the necessary parts per your favorite basic bear pattern (or a pattern purchased from the designer’s shop).
1. Preparing the Pieces
- Make all bear parts:
- Head
- Body
- 2 arms
- 2 legs
- 2 ears (+ optional inner ear circles)
- Muzzle
- Tail (optional)
- Leave long yarn ends for sewing.
2. Assembling the Ears
- (Optional) Sew Inner Ear Circles:
- With a tapestry needle, attach inner ear circles to ear pieces, leaving the last round of the ear open.
- Leave a long tail for sewing the ear to the head.
- Sew Ears to Head:
- Position ears on the top sides of the head, about the fifth round from the center.
- Sew each ear using a needle, attaching securely within the unclosed round, then close the ear and fasten off yarn.
- Tip: Make 2 rounds of stitches for a neater, more secure join.

3. Stuffing the Head
- Partially stuff the head before sewing the muzzle.
- Add more stuffing as needed after muzzle and ears are attached.
4. Attaching the Muzzle
- Placement:
- Position the muzzle low and close to the neck for maximum cuteness.
- Hold in place with your thumb (or use pins).
- Sewing Muzzle:
- Sew around the muzzle with a long yarn tail, leaving an opening for stuffing.
- Insert stuffing (polyester fiberfill, preferably holofiber) and close seam with a second round of stitches for durability.
- Tip: Using a long tail, you can sew nose, mouth, and eyes without changing yarn.
- Embroidering Face:
- Nose: Embroider a triangle for the nose with the yarn end before closing the seam.
- Mouth/Eyes: Embroider eyes just above the nose, 2-3 stitches long. Add a mouth and optional eyebrows as desired.
- Secure all features with knots hidden inside the head.

5. Attaching the Ears to the Head
- Place ears symmetrically, choosing whether you prefer "floppy" style or upright.
- Pin in place, sew using strong, even stitches, and knot the ends before concealing yarn.
6. Stuffing and Closing the Head
- Finish stuffing the head, shaping firmly but not over-filling.
- Sew the final seam, knot securely, and hide ends inside.
7. Attaching the Legs to the Body
- Do not completely close the bottom of the body; leave an opening for ease of sewing.
- Position legs symmetrically, more toward the front than exact sides.
- Pin or hold in place and sew both legs using a two-way technique:
- First: Sew around once, secure with a knot.
- Second: Sew around a second time for extra strength, knot again.
- Join the inside of both legs together with a few stitches for stability (legs sit straight).

8. Stuffing and Completing the Body
- After attaching legs, finish crocheting the body and stuff firmly.
- Place the head and make sure the openings fit. If needed, add or remove stitches to match openings (pattern correction).
9. Attaching the Head to the Body
- Position the head so the muzzle faces forward.
- Use pins or a long needle to secure in place.
- Sew head to body using the remaining yarn tail, making multiple rounds for strength; regularly add stuffing to neck and body as you stitch closed.
- Shape the cheeks by adjusting stuffing.

10. Attaching the Arms
- Place arms about two rounds down from the top of the body, angled slightly toward the belly.
- Use pins, sew evenly and finish with secure knots hidden inside the arms.
11. Attaching the Tail (Optional)
- Add a small amount of stuffing to the tail.
- Place at the center back, use the visible seam as a guide for symmetry.
- Sew tail with at least 2 rounds of stitches; knot and hide ends.
12. Personalize Your Teddy (Optional)
- Embroider an initial or heart on the belly or back.
- Add a crocheted patch or accessories:
- Scarf, bow, little collar, or flower.
- Use your imagination!
Conclusion
You have now assembled a classic, sturdy, and absolutely adorable crochet teddy bear. This design is safe for babies (no small detachable parts) and loved by all ages. With strong joins and customizable features, it makes a heartfelt gift or keepsake.
Personalize further with your favorite colors, fun accessories, and embroidered details!
Pattern Corrections
- This assembly guide suits a wide range of basic bear patterns. Adjust join locations as needed if your pattern’s proportions differ.
- Make sure the number of stitches around each attached piece is compatible; add or skip stitches if necessary for a perfect fit.
Pro Tips
- Secure the Parts: Always double-sew each limb and knot yarn ends before hiding for extra security—crucial for toys meant for children or frequent washing.
- Symmetry: Use pins, stitch markers, or measuring tape for symmetrical attachment of limbs, ears, and facial features.
- No perfect symmetry is needed! Embrace the handmade charm.
- Stuff Firmly: Slightly overfill head and body, as stuffing will settle over time.
- Use contrasting yarn for facial embroidery if desired, but keep it soft and non-irritating.


Leave a Reply