

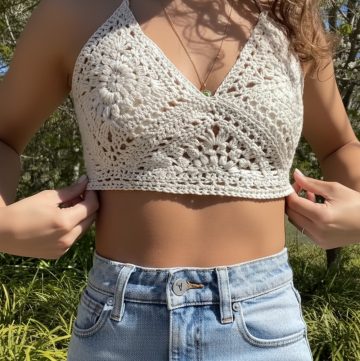
Slip into the delightful universe of Crochet Crossbody Bag, where style seamlessly meets practicality. These bags aren't just simple accessories; they narrate a tale of individual flair, finesse, and the joy of carrying something that's both pretty and functional. With their distinctive textures and patterns, crochet crossbody bags add a special touch of handmade charm to any look.
Crochet Crossbody Bag

Making them a perfect pick for those who love to pair the artistry of crochet with the convenience of a bag that keeps everything you need within easy reach. Heading out for a relaxed day or off to a social event, these bags prove to be a fashionable and wise choice time after time.
Materials Needed:
- Loops and Threads yarn (multiple colors for color changing effect)
- 8 mm crochet hook
- Scissors

Bag Base:
- Create a slip knot and make 30 chains using two strands of yarn held together to create a thicker texture.
- Start with a half double crochet stitch in the 30th chain from the hook. Continue this stitch across all chains, making sure not to crochet too tightly.
- At the end of the row, turn your work around to start the next row.

Bag Body:
- Begin the next row by making a half double crochet stitch, but insert the hook in the middle of the previous row's stitches (creating a knit-like pattern).
- Continue with this middle-stitch half double crochet pattern until you reach the desired bag height, change colors every row and a half until you decide you want a different color.
- To change colors, cut off the yarn color you do not want, and start crocheting with the new color by adding it to the remaining yarn and continuing the pattern.

For Bag Assembly:
- Once you have two panels of equal size (suggestion in the tutorial is 10.5 inches for both panels), lay them on top of each other with the right sides facing inwards.
- Use a slip stitch to join the panels along three edges, leaving the top open. Work all the way along the sides and bottom.
- Turn the bag right side out, ensuring the edges are neat.

Strap:
- Decide how wide you want the strap (suggestion in the tutorial is eight stitches).
- Count four stitches on each side of a panel and mark them to start the strap evenly.
- Crochet eight half double crochet stitches for the width of the strap, and continue with the pattern back and forth. Changing colors every three to four rows as desired.
- Carry the loose ends of the yarn along with your stitches to avoid them poking out.
- Once the strap is long enough (suggestion in the tutorial is 27.5 inches). Attach the end of the strap to the opposite side of the bag with slip stitches, mimicking the attachment point on the first side.

Finishing:
- With a smaller hook (5mm has been suggested), weave in all the loose ends to finish your bag neatly.
- Trim off any remaining loose yarn.
Leave a Reply