

Find your perfect accessory with this free crochet clutch purse pattern, offering style and functionality for any occasion in a unique, handmade design.
Timeless and sophisticated, a crochet clutch purse is a perfect fusion of creativity and functionality, adding a touch of elegance to any ensemble. Whether crafted with vibrant yarns or neutral tones, free crochet clutch purse patterns make it easy to design an accessory that effortlessly complements both casual outings and formal events.
Versatile Crochet Clutch Purse Pattern to Suit Any Mood

Compact yet stylish, each handmade clutch is a unique creation, woven with intricate stitches that showcase your creativity while offering a practical way to carry your essentials like your phone, wallet, or makeup. With options for bold designs, subtle textures, or playful embellishments, it’s a versatile piece that truly completes any look.

The allure of making a clutch purse stretches far beyond its visual charm, it’s about the joy of crafting something meaningful with your hands.

The process brings relaxation and creativity, while the final product reflects your personal style in a functional, lightweight design that’s durable enough for any occasion.

For beginners and seasoned crocheters alike, access to free patterns opens up exciting possibilities to experiment with new stitches and achieve a design that’s elegant, purposeful, and unforgettable.

More than just an accessory, a crochet clutch purse is a timeless expression of artistry, a practical essential, and a beautiful gift all in one.
How to Crochet a Beautiful and Easy Leather Clutch
Materials Needed
To create your leather clutch, prepare the following materials:
- Leather material (customized to the required size).
- Knitting/Crochet thread (express knitting thread; link available in the video description).
- Crochet hook.
- Scissors.
- Measuring tape for precision.
- Compass and pen for marking accurate patterns.
- Pricking iron to punch holes in the leather.
- Cardboard paper for core reinforcement.
- Lining fabric for added structure.
- Glue to attach materials securely.
Step-by-Step Instructions
1. Prepare the Leather Material
- Use a measuring tape to mark and cut the leather to size.
- Cut a 10-inch by 13-inch rectangular piece for the clutch base.
- Mark four and a half inches on the edges for a smooth curve.
- Employ a compass to locate the exact center and draw rounded edges.
- Trim the leather to match the sketched design.
2. Prick Holes on the Leather
- Lightly draw sketches on the leather to guide where you will place holes.
- Use a pricking iron to punch holes along the edges of the leather.
- These holes will serve as guides for crocheting the clutch together later.
3. Attach Lining and Cardboard Paper
- Cut both the lining fabric and cardboard paper to the same size as the leather.
- Glue the lining on top of the cardboard and place it inside the leather piece.
- Ensure proper alignment, and press firmly so that all layers adhere securely.
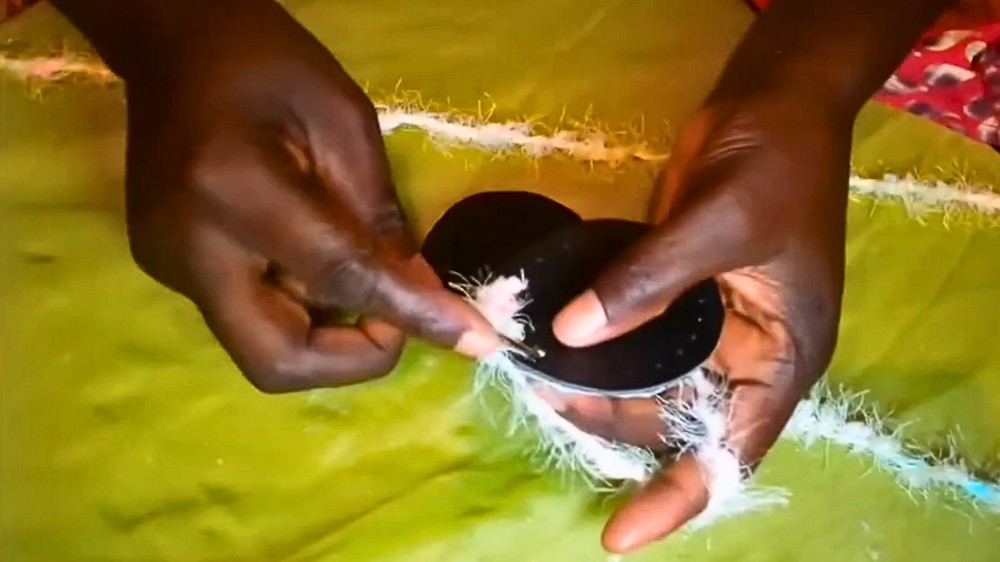
4. Crochet: Slip Stitch and Single Crochet Edges
The base clutch structure involves two main stitches:
a. Slip Stitch (for certain areas)
- This stitch joins areas of the leather neatly and is used for curved edges.
- Insert the crochet hook into a pre-punched hole, pull through the thread, and complete the slip stitch. Continue stitch by stitch along the sketch-marked areas.
b. Single Crochet (for other sections)
- For the rest of the edges, use single crochet.
- Insert the hook into a pricked hole, pull through the thread, yarn over, and pull through two loops.
- This adds strength and a neat look to the clutch edges.
5. Add and Crochet Side Panels
- Fold the main leather piece to form the clutch body.
- Cut additional leather pieces to form the side panels at the edges of the clutch.
- Attach the panels by pricking holes, adding lining, and using single crochet stitches to secure them to the clutch body.
6. Insert a Clutch Hook
- Before attaching the lining inside the clutch, insert the metal hook (or clasp) so that it securely attaches to the leather.
- This ensures the hook is hidden and does not show through the lining, keeping the project professional and polished.
7. Finalize with Crocheting and Assembly
- Once the lining, side panels, and hook are attached, finalize the clutch with slip stitch or single crochet along all edges for a clean and strong finish.
- Trim loose threads or uneven yarn ends.
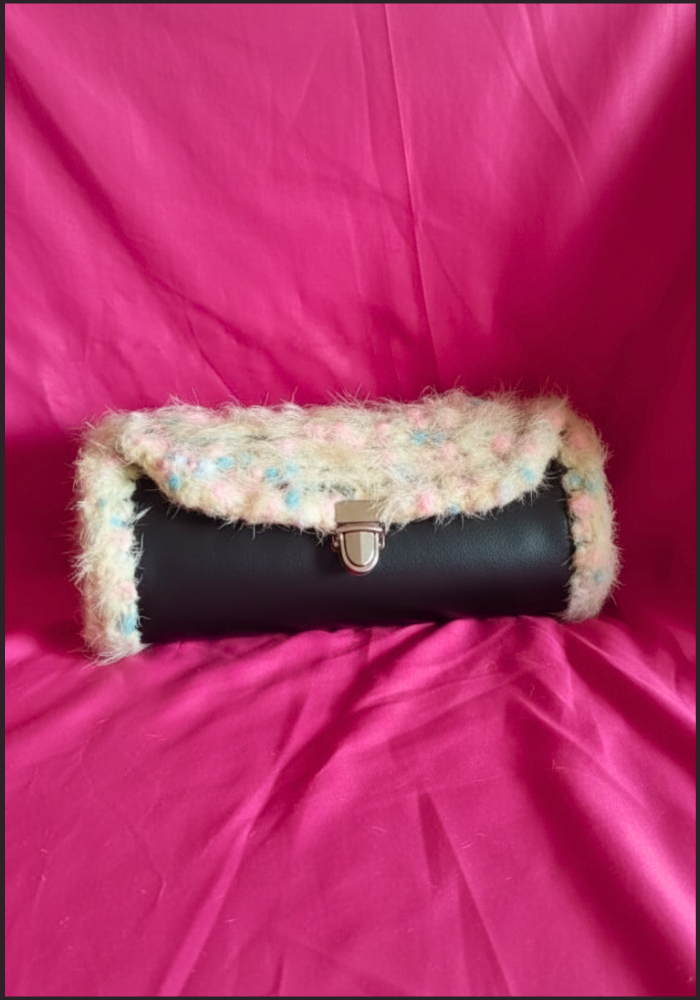
Special Features of the Clutch
- Combination of Materials: The mix of leather, lining, and crochet makes the clutch unique and durable.
- Customizable Design: Adjust the dimensions, yarn color, and leather finish to fit your preferences.
- Professional Finish: Techniques like lining attachment and concealed hook installation elevate the final result.
Level of Difficulty
- Beginner to Intermediate Level: While the tutorial explains everything step-by-step, new crocheters may need extra practice with slip stitch and single crochet techniques on leather.
Tutor’s Suggestions
- Use a visible thread color to practice stitches before working on the final leather material.
- Ensure leather, lining, and cardboard are precisely cut and aligned for a perfect fit.
- Always use a pricking iron for clean and consistent stitching holes.
- Follow the compass-drawn curves to ensure the clutch edges are smooth.
Uses of the Clutch
- A stylish, handmade addition to your accessory collection.
- Great as a thoughtful handmade gift.
- Functional for casual outings or formal settings.
Expert Tip
Always insert the clutch clasp or hook before attaching the lining to ensure it is secure and hidden. Use glue to lightly bind materials before crocheting for additional support.
Conclusion
This leather crochet clutch is a versatile and stylish project that allows you to enhance your skillset by combining crochet with leatherwork. The detailed tutorial ensures that even beginners can follow along and create an elegant clutch. With its lasting durability and modern design, this project is both practical and rewarding.


Leave a Reply