

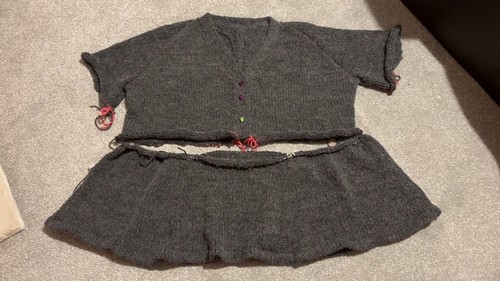
Snuggle up in style with our charming Cozy Knit Peplum Top! This delightful knitwear piece combines comfort and a touch of playfulness, perfect for adding a splash of joy to your everyday wardrobe. With its snugly feel and the sweet, flared waist, it's a piece of clothing that makes you feel both at home and lovely at any moment.
Knit Peplum Top

Materials:
- Sentro knitting machine
- Saltaire yarn by Sidar (55% acrylic, 25% nylon, 20% alpaca)
- Knooking or crochet tools for small handworked sections
- Tape measure
- Mattress stitch needle for seaming
- Buttons for cardigan closure

Steps:
Make a Swatch:
- Knit a tube of about 50 rows on the Sentro machine to check how the yarn behaves, its stitch definition, and how opaque it is.
- Measure the swatch to determine stitches and rows per 10 cm to adjust your pattern accordingly.
Create Schematics and Pattern:
- Measure a fitting sweater or use preferred body measurements to derive dimensions for various parts of the sweater, such as the neckline, arm circumference, etc.
- Translate these measurements into stitches and rows using the gauge you got from your swatch.

After Knit the Front Panels:
- Cast on 3 stitches, and continue to increase to 39 stitches.
- For creating the armhole, use waste yarn to add extra stitches.
- Incorporate symmetrical waist decreases spaced over several rows, then cast off.
Knit the Back Panel:
- Cast on 20 stitches, and follow a similar increase pattern as the front panels.
- Make sure to allow for extra stitches for the underarm, maintaining symmetry to front panels.

Knit the Sleeves:
- Start by casting on 3 stitches and increase on both sides until all needles are filled (varies based on the width of the arm).
- Transition to knitting in the round, and continue until you reach desired sleeve length or run out of yarn.
- Plan sleeve length based on remaining yarn after other pieces are complete.
Assemble the Pieces:
- Use mattress stitch to join the back panels cleanly.
- Attach sleeves and front panels, ensuring correct alignment and fit.
- Seam any leftover sides or adjustments needed.
Knit the Button Band and Collar:
- Pick up stitches along the cardigan edge, and knit a ribbed band vertically.
- Attach the buttons and make corresponding buttonholes.
Finishing Touches:
- Block the sweater to even out the stitches and fit.
- Sew on the buttons tightly, checking alignment for neat closure.
Adjustments and Variations:
- Modify the number of stitches and rows based on personal measurements and fit preferences.
- Decorative patterns or colors can be introduced based on your creative design.


Leave a Reply