

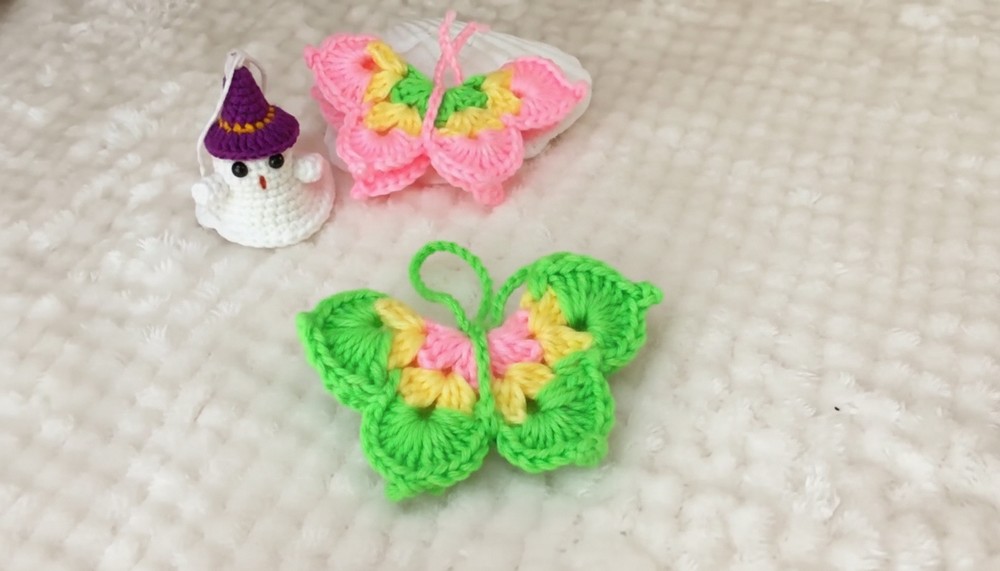
Delight in the beauty of a crochet butterfly pattern that effortlessly inspires charm and grace to decorate your favorite space with love.
It's a shame when home decor looks dull and uninspired, but a crochet butterfly can fix that instantly. This colorful crochet butterfly pattern brings charm and vibrancy to any space. Whether you're decorating a cushion, adding flair to a baby blanket, or crocheting unique wall art, a butterfly design makes everything feel extra special. You can use it as a delicate appliqué for clothing or accessories, turn it into a fridge magnet, or display it as a standalone piece to create a beautiful centerpiece.
Colorful Crochet Butterfly Pattern That Looks Like a Dream

It’s perfect for gifting to someone you love or as a personal keepsake that spreads joy every time you see it. With crochet, you have the freedom to play with different colors, sizes, and pattern, bringing your vision of a butterfly to life. Plus, it’s quick to make and incredibly fun, making it ideal for beginners or anyone who loves simple yet artistic projects.
Materials Needed
- Yarn:
- Select two contrasting colors (e.g., Color A for the body and Color B for the wings) for a visually striking butterfly.
- Weight: Light or medium (size 3 or 4 recommended).
- Hook Size: 3.5 mm or recommended size for your yarn choice.
- Accessories:
- Scissors
- Yarn needle (for weaving in ends)
Key Abbreviations (US Terminology)
- ch – Chain
- dc – Double crochet
- sl st – Slip stitch
- Magic Ring (MR) – A foundation method worked in a circle (used to start a rounded project)
- Group – A set of stitches (e.g., 3 dc or 6 dc) combined to form part of the design.
Special Notes
- Always count the 3 chain stitches at the beginning of a round as your first double crochet (dc).
- Work in continuous rounds unless stated otherwise.
- Make sure stitches are even, and yarn ends are securely tucked or hidden as you go.
- The project includes three rounds to build the 3D butterfly wings.
Step-by-Step Pattern
Round 1: Magic Ring Foundation
- Start with a magic ring (MR) using Color A.
- Ch 3 (counts as first dc).
- Work 2 dc into the magic ring. (This forms the first group.)
- Ch 2, then work 3 dc into the magic ring. (Second group.)
- Repeat this pattern: [3 dc in the ring, ch 2], until you have 8 groups of three double crochets each.
- Pull the magic ring tightly closed, ensuring the stitches are snug.
- Slip stitch (sl st) into the top of the initial ch 3 to close the round.

(At the end of Round 1, your work will have a total of 8 groups separated by chain-2 spaces.)
Round 2: Adding the Second Layer
- Change to Color B. Insert hook into a chain-2 space from Round 1 and join the new color.
- Ch 3 (counts as first dc).
- Work 2 dc into the same chain-2 space.
- Ch 2, then work 3 dc into the same chain-2 space. (First group of Round 2 completed.)
- Move to the next chain-2 space from Round 1.
- Repeat the pattern: [3 dc, ch 2, 3 dc] into each chain-2 space around. (This forms a second layer of groups on top of Round 1.)
- Continue until all 8 chain-2 spaces from Round 1 are filled.
- Slip stitch into the top of the initial ch 3 to close Round 2.
- Fasten off Color B and weave in the ends.
(At the end of Round 2, each chain-2 space will contain 2 groups separated by a chain-2 space.)
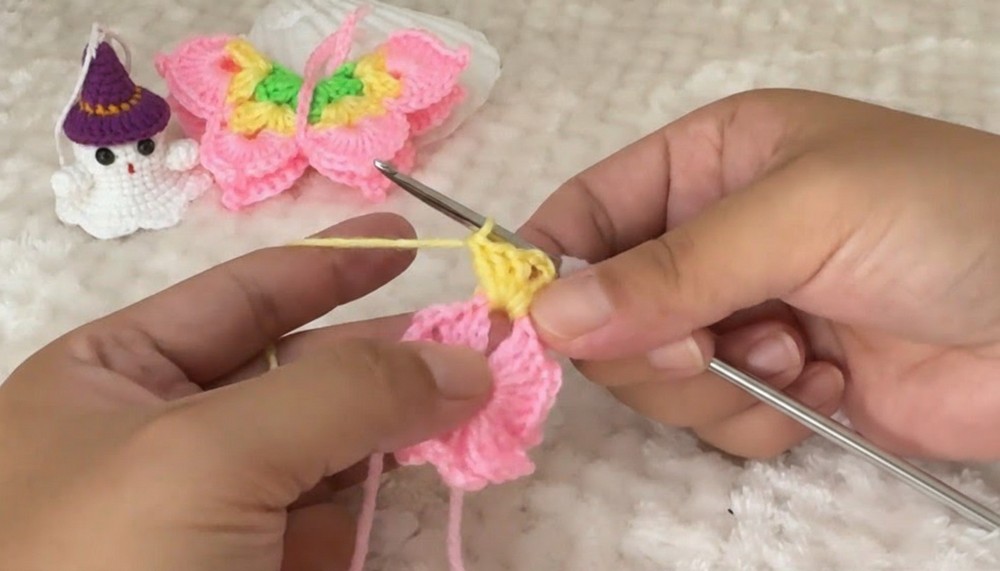
Round 3: Final Layer for Wings
- Insert hook into a chain-2 space from the previous round and join Color A again.
- Ch 3 (counts as first dc).
- Work 6 dc into the same chain-2 space. (First wing of the group completed.)
- Ch 3, then work 1 single crochet (sc) into the same chain-2 space to form the point of the butterfly wing.
- Move to the next chain-2 space.
- Repeat the pattern: [6 dc, ch 3, 1 sc in the same space] around. Create this wing structure in all 8 chain-2 spaces.
- Once complete, slip stitch into the top of the initial ch 3 to close the round.
- Fasten off and weave in the ends.

(At the end of Round 3, each section of the chain-2 spaces will have 2 wings, forming the 3D butterfly.)

Antennae
- Using Color A, join to the top center of the butterfly (directly opposite from Round 3 wings).
- Ch 32.
- Fasten off and weave in the end.
Conclusion
You have successfully completed your 3D crochet butterfly! With its delicate layers and unified stitches, this butterfly is a lovely addition to any project or as a standalone ornament.
Pattern Correction
- If your butterfly appears uneven, ensure the chain-2 spaces from previous rounds are evenly spaced between groups.
- Double-check the stitch count in each group, especially for Round 3’s wings. Each section should include 6 dc, ch 3, and 1 sc.
Tips
- Tighten the Magic Ring Carefully: Pull the loop gently but tightly to avoid bunching on one side of the butterfly.
- Variety of Colors: Use gradient or hand-dyed yarn for added texture and effect.
- Blocking the Project: Lightly block the wings after completion to highlight the texture and give the butterfly its perfect shape.


Leave a Reply