

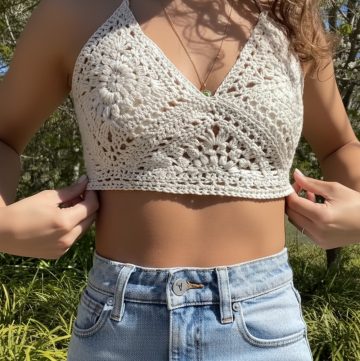
Whip up a chic crochet crop top that's as unique as you are! With this straightforward pattern, even those new to the yarn game will find themselves quickly creating a fashionable piece to proudly wear or share. Picture this: soft yarn gliding through your fingers as your hook brings to life a garment tailored by you, for you.
Crochet Crop Top

Materials Needed:
- Medium weight yarn (acrylic recommended)
- 3.5 mm crochet hook
- Scissors
- Yarn (darning) needle
- Stitch markers
- Measuring tape

Measurements:
- Measure the front part of a top you're recreating for the width and the length.
- The length of the top at the back is almost 8 inches, while the width is 16 inches (which will be doubled since it wraps around).
Pattern Overview
Foundation Chain:
- Start with a slip knot and chain to the length measurement of the top's back part (8 inches in this scenario).
Starting Length:
- Work a total of 28 chains (adjust based on your length measurement).

Row 1:
- Start in the second chain from the hook, yarn over, insert the hook, and complete a half double crochet (HDC). Place one HDC in each stitch across.
Row 2 and Beyond:
- Chain one (turning chain), then place one HDC into each stitch across. Remember, if you begin with 28 stitches, maintain 27 stitches for each row by reducing one stitch due to the turning chain.
Body of the Top
- Repeat the pattern of creating one HDC in every stitch across for every row. To achieve the desired width of your back measurement, continue adding rows until you're halfway to your bust measurement (for example, if your bust is 32 inches, work until the piece measures approximately 16 inches, but remember the piece will stretch).
- Ensure the total number of rows is divisible by 4 for symmetry in the design.

Shaping the Front Panel
Increasing for the Bust:
- Begin increasing at the quarter point of the top for 10 rows to create shaping for the bust. Increase by making two HDCs in the first stitch of every alternate row on one side while continuing with regular HDCs on the other.
Middle Part:
- After the increases, work straight for twice the number of increased rows without increases (20 rows if you increased for 10 rows), maintaining the new stitch count.
Decreasings to Form the Top Shape:
- After the straight section, start decreasing for the same number of rows as your increase rows (10 rows here) to taper the top back in.
- Decreases are performed by pulling a loop through two stitches together and completing it as one HDC.

Joining and Finishing:
- Join the sides of the top by slip stitching or sewing the front and back panels together, ensuring you leave appropriate gaps for armholes.
- Add straps by creating chains or small rows of HDC, then attach them securely to the top.
Edging and Straps:
- Work a single crochet edging along the bottom and the armhole edges for a neat finish.
- For the straps, measure and crochet chains or rows of HDC according to the desired length, then attach them to the top at the marked locations.
Final Touches:
- Weave in all ends with a yarn needle for a clean finish.
- Optionally, add decorative edging or details to customize the top to your liking.

Closing:
- Finish by weaving in any remaining loose ends and blocking your top if desired for a professional finish.
- Enjoy your beautiful, handmade crochet top!
Leave a Reply