

Warm up your autumn days by learning how to crochet an ear warmer with this simple tutorial. It's perfect for those who love adding a personal touch to their wardrobe or for anyone looking for a cozy, handmade gift. This guide is straightforward, making it easy for anyone to follow along and stitch up a snug, stylish accessory.
Crochet Ear Warmer

Materials Needed:
- Yarn: Wool-Ease Thick & Quick or similar (6 Super Bulky category). The example uses a blend that is 79% Acrylic, 20% Wool, and 1% other fibers.
- Hook: 10 mm crochet hook
- Additional: Yarn needle for sewing
Pattern Instructions:

Starting Chain:
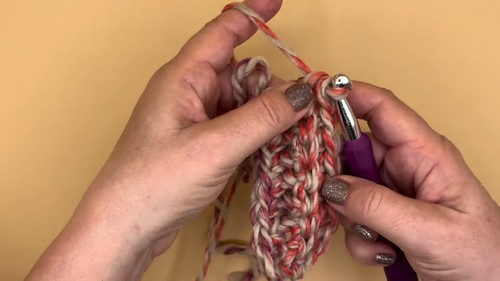
- Make a slip knot on your hook, then chain 9.
Row 1:
- Skip the first bump from the hook.
- Insert hook into the second bump, yarn over, and pull through to have 2 loops on the hook.
- Yarn over again and pull through both loops on the hook. This creates a single crochet.
- Repeat the single crochet in each bump across the chain. By the end of this row, you should have completed single crochets in all the bumps.
After Row 2 (Creating Ribbed Texture):

Turning the Work:
- After completing the last stitch in row 1, turn your work to start row 2 without using turning chains.
First and Last Stitches:
- Insert your hook through both loops (front and back loop) of the V on the first and last stitches. Complete a single crochet.
Middle Stitches:
- For the stitches between the first and last, only insert your hook through the back loop and complete single crochets as usual. This creates the ribbed effect.
Following Rows:
- Repeat the pattern established in Row 2 for each subsequent row. This involves single crocheting through both loops on the first and last stitches and only through the back loop for all stitches in between.
Sizing and Finishing:

Size:
- The example provided is for a large size, with suggested 42 rows for completion. Adjust the number of rows based on the desired size (small, medium, large). The written pattern includes size adjustments.
- To fit correctly, the headband should be a couple of inches smaller than the head circumference because of the stretch in the stitches and the yarn.
Joining:
- After completing the desired number of rows, finish off by cutting the yarn, leaving a long tail for sewing.
- Use a yarn needle to stitch the short ends of the headband together.
- Align the V’s from both ends and sew through the inside loops (closest ones) of each V, alternating from one side to the other.
- To hide the seam and secure the ends, go through the first and last stitch a couple of times.
Finishing Touches:
- Weave in any loose ends, and your headband is ready to wear or gift!
Leave a Reply