

The Crochet Eagle Amigurumi Pattern is a fun project where you make a cute little eagle toy using yarn and a crochet hook. You start by making the eagle's feet with yellow yarn, then you crochet its body and head with brown and white yarn.
Crochet Eagle Amigurumi
There are steps to add a beak and even little wings and a tail to make it look just like a real eagle. You crochet in rounds and use different stitches to make parts like the eyes, beak, and feet. In the end, you fill your eagle with stuffing to make it soft and cuddly. This pattern is great for making a little eagle friend to play with or to give to someone as a special handmade gift.
Materials Needed:
- Yarn Colors: White (whipped cream) for the head, Yellow (lemon meringue) for the beak and feet, Brown (brown butter) for the body.
- Yarn Type: The example uses Big Twist Posh, but Bernat Blanket, Parfait Chunky, or any Acrylic weight 4 yarns are also suitable.
- Crochet Hook: Size 4.5mm or suitable size for your yarn to achieve tight stitches that don't let stuffing through.
- Additional Supplies: Sharp scissors, stitch marker, tapestry needle, 12mm safety eyes, stuffing.
Feet (Make 2):

- Create a Slip Stitch: Wrap yarn around fingers, push through the center, tighten and place on the hook.
- Chain 5:
- Into the Second Chain from the Hook: Insert hook, yarn over, and pull through all loops on hook (slip stitch). Repeat slip stitch.
- Chain 2 Twice: Insert hook into the second chain from the hook each time and slip stitch. Lastly, slip stitch into the base chain creating a talon shape.
- Work Up the Leg: Slip stitch in the remaining two chains up the leg, yarn over chain one, cut yarn leaving a long tail for attaching later.
Head and Body:
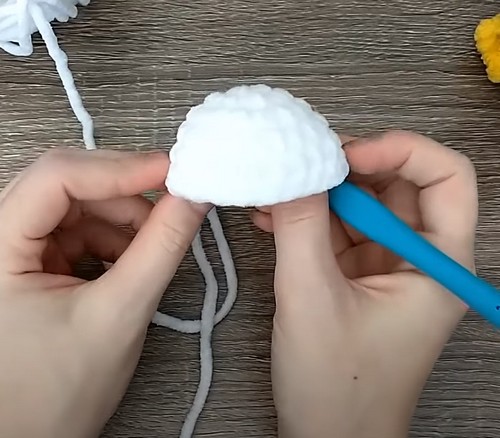
Create a Magic Ring: Wrap yarn over hand, cross over fingers, secure, pull loop through and secure the circle.
Round 1: 7 single crochets (SC) into the ring.
Round 2: Increase in every stitch (14 SC total).
Rounds 3-6: Follow the pattern increases per round as mentioned for shaping the head.
Switch to Beak Color: At the designated stitch, switch to yellow yarn for the beak.
Create the Beak: Using front loops only, work a pattern of double crochet (DC), triple crochet (TC), and DC into the same stitch.
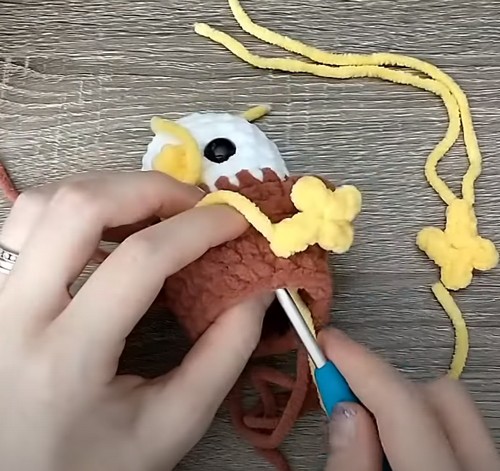
Switch Back to Head Color: Seamlessly transition back to white yarn after the beak is complete.
Continue Shaping the Head: Further rounds define the eagle's head shape.
Switch to Body Color: Transition to brown yarn for the body.
Create Tail and Wings: Follow specific instructions for tail and wing stitches, ensuring the wing flaps are created from double crochets and positioned correctly.

Finish the Body: Continue rounds increasing where necessary, paying attention to the placement of the wings and tail.
Attach Eyes: Position and secure safety eyes between specific rounds for the correct look.
Attach Feet: Attach the crocheted feet to the body at the correct position.
Stuff the Amigurumi: Stuff the eagle’s body, ensuring it's firm but not overstuffed.
Close and Finish: Seam the project closed and weave in any loose ends.


Leave a Reply