

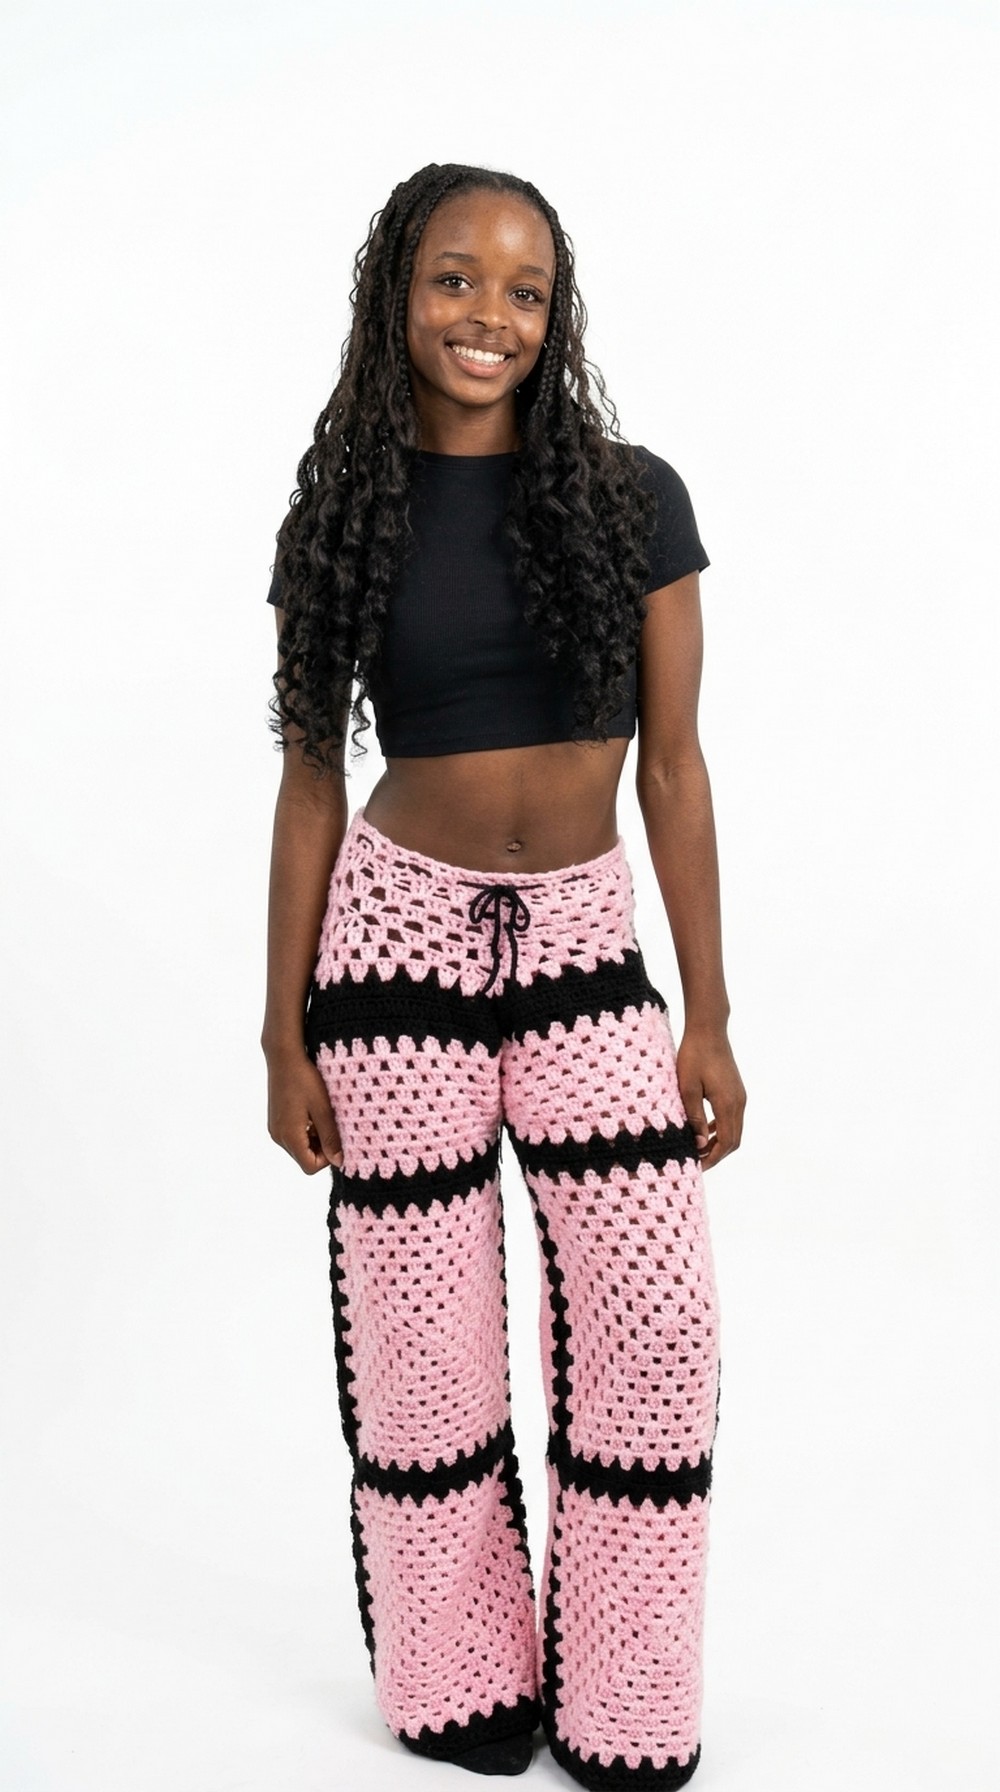
Rock your style with this Free Crochet Granny Square Pants Pattern that brings colorful, comfy pants ideal for casual wear, festivals, or unique handmade gifts.
Who doesn’t love a pair of pants that is colorful, cozy, and completely handmade? The Free Crochet Granny Square Pants Pattern shows how to turn small bright crochet squares into a fun and stylish pair of pants. These pants usually have a relaxed fit, soft yarn, and neat stitches that give them a charming handmade look. The granny squares can be made in different colors, making each pair playful, bold, or cheerful.
Cozy Free Crochet Granny Square Pants Pattern Perfect for Lazy Days
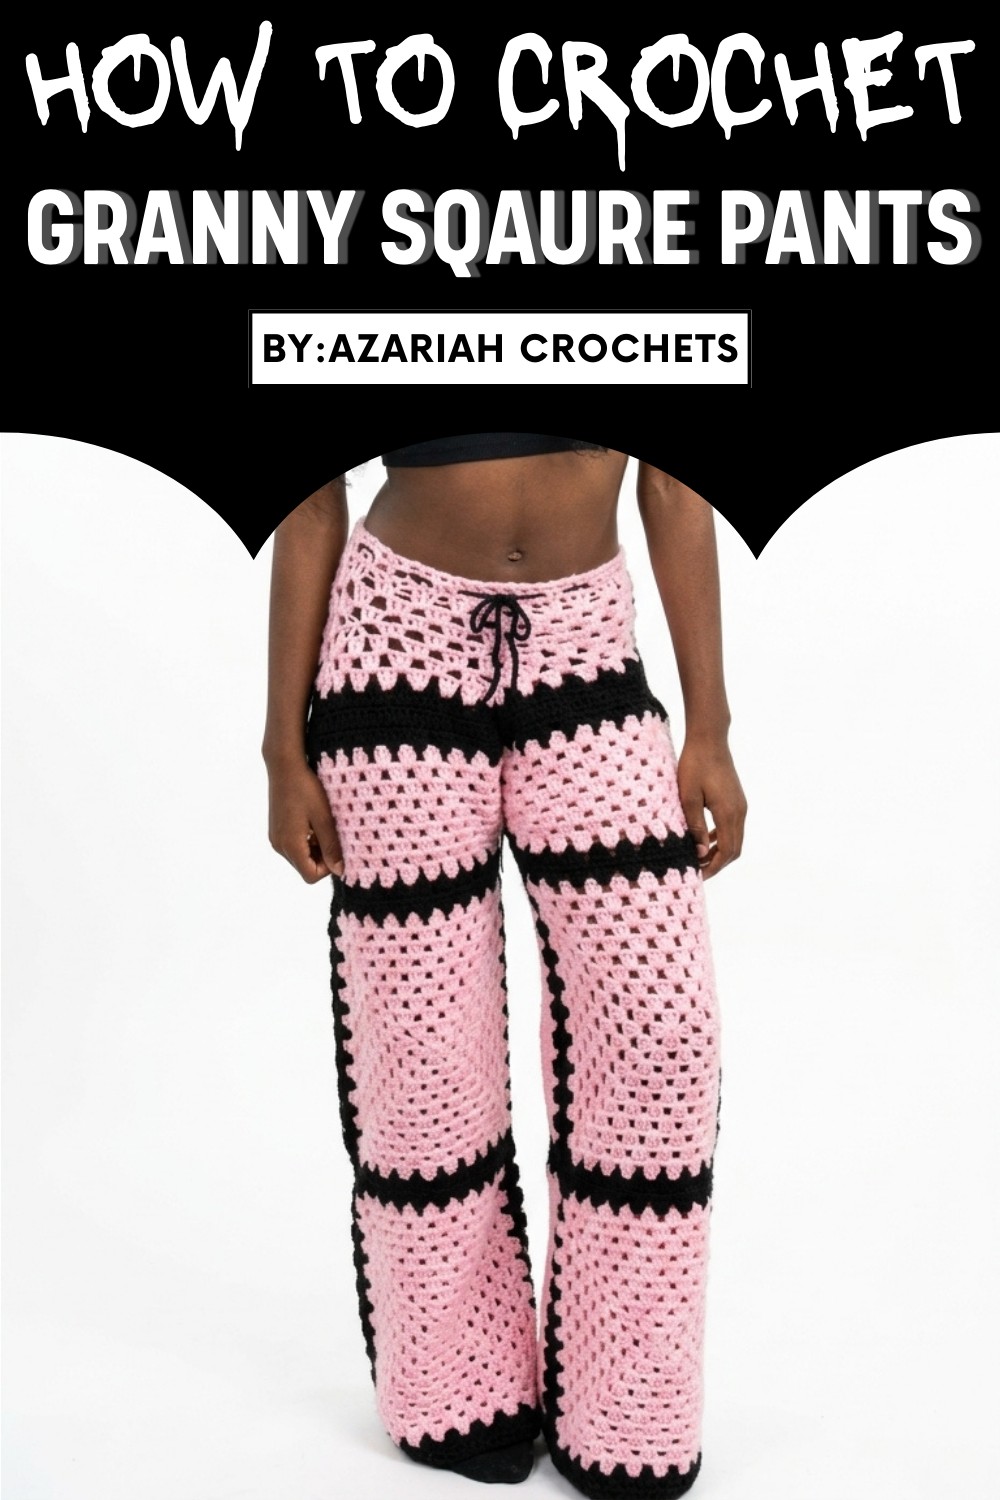
They are perfect for casual days, lounging at home, or even as a statement piece in your wardrobe. The pattern uses simple and clear steps, so even beginners can create something unique without feeling lost. By choosing different yarn combinations, the pants can look vibrant, soft, or completely eye-catching. In the end, this crochet granny square pants project is a fun, cozy, and creative handmade item that blends comfort, style, and joy in every stitch.

Crochet Granny Square Pants Pattern
These pants are versatile, stylish, and customizable for any size or style preference. The construction involves large granny squares, granny stitch panels, and seamless joining for a perfect fit.
Materials
- Yarn:
- Weight #4 acrylic yarn (medium weight). Two colors if desired (main color & contrast color).
- Quantity:
- Main Color (MC): 400–800 grams depending on size (e.g., ~520g for someone 5'3"-5'4").
- Contrast Color (CC): ~200 grams.
- Hook: 5mm hook for granny squares, 3.5mm-4mm hook (optional for finer stitches like the waistband).
- Darning Needle: For joining and weaving in ends.
- Scissors
Gauge
- Granny Squares: 10 granny square rounds measure approximately 9" x 9".
- Granny Stitch Panels: Row width should match the granny square edges (row measurements depend on your gauge).
Pattern Instructions
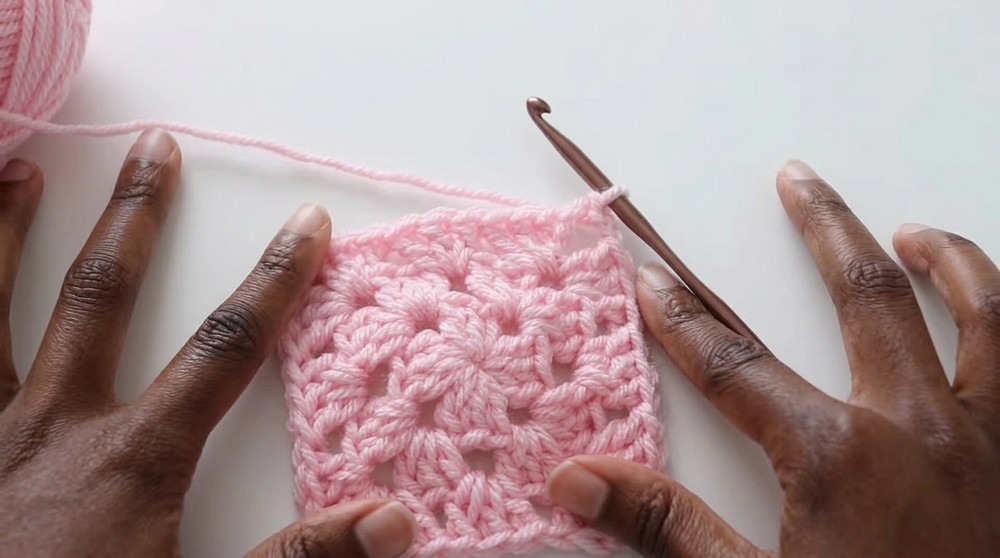
1: Granny Squares (Make 4)
Foundation Round (Magic Ring or Chain Start):
- Magic Ring:
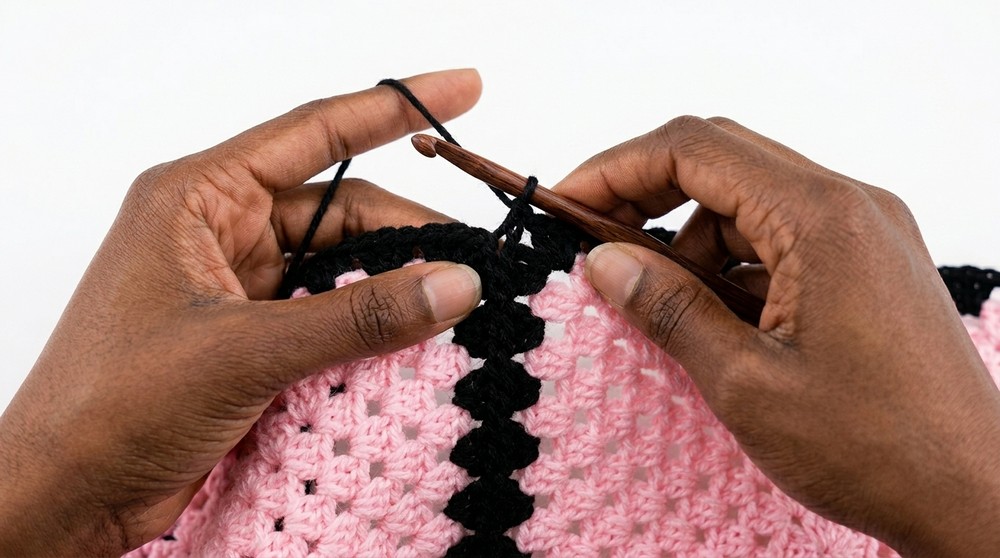
- Create the loop and pinch it for control. Wrap yarn to form an "X". Insert your hook under the first yarn strand, pull through, and secure with chain 1.
- Alternatively, if you don’t use the magic ring, chain 4 and slip stitch to form a ring.
Row 1:
- Ch 3 (counts as the first dc).
- Into the ring:
- Work 2 dc, ch 2. [1 cluster and corner formed]
- (3 dc, ch 2) Repeat 3 times (total of 4 dc clusters with ch-2 corners).
- Pull the tail to close the ring tightly.
- Slip stitch to the top of the starting ch-3.
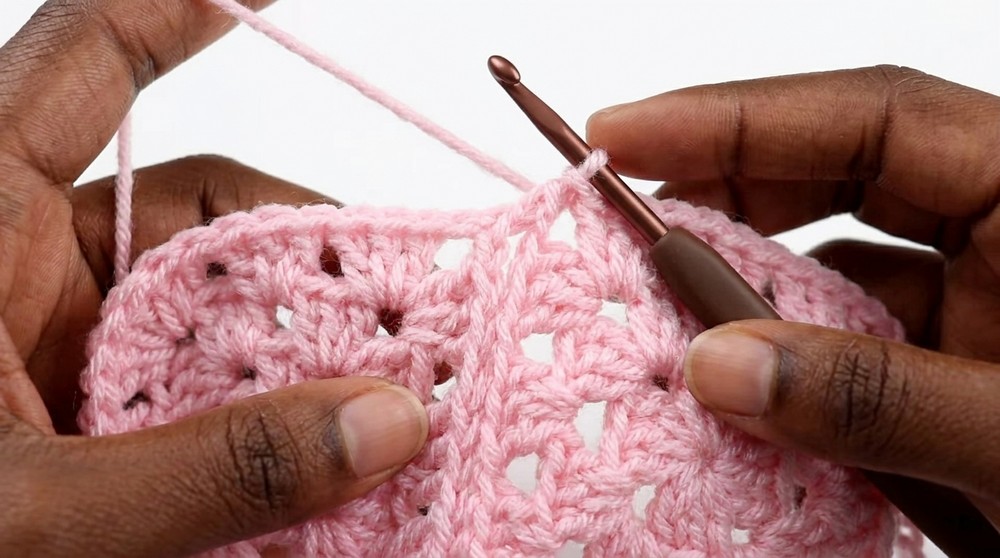
Row 2:
- Slip stitch to the next corner space, ch 3 (counts as first dc).
- Into the corner space: 2 dc, ch 2, 3 dc [corner formed].
- Work (3 dc, ch 2, 3 dc) into each remaining corner space.
- Slip stitch to join.
R 3 and On:
- At the start of each row, slip stitch into the corner space, ch 3.
- Work (3 dc, ch 2, 3 dc) into each corner space (corners), and 3 dc into each non-corner gap (shells).
- Continue this pattern until you have 10 rounds (or desired size). Each round adds width incrementally.
2: Granny Stitch Panels (Make 2)
Foundation
- Calculate the chain for the panel: Multiply the number of non-corner gaps on the granny square edge by 3, then add 6.
Example: If the edge has 8 gaps: (8 \times 3 + 6 = 30 chains.)
Row 1:
- Ch 30 (or calculated chain), skip the first 3 chains.
- Into the 4th chain from the hook, work 3 dc in the same stitch (shell made).
- Skip the next 2 chains, then work 3 dc in the 3rd chain. Continue repeating:
- (Skip 2 chains, work 3 dc in the 3rd chain).
- Into the final chain: Work 1 dc (edge stitch).
Row 2: (Building Up the Panel)
- Ch 3, turn your work.
- Work 1 dc into the top of the previous row’s edge stitch.
- Into each gap between clusters, work 3 dc (shells).
Repeat the granny stitch rows until the panel matches the length of the granny squares. For me, this was 8 rows total. Adjust to your size.
Final Row (Border):
- Once your granny stitch panel has matched the width of the squares, work a granny stitch border around all edges:
- In corners: Work 3 dc, ch 2, 3 dc.
- In straight gaps: Work 3 dc (shells).
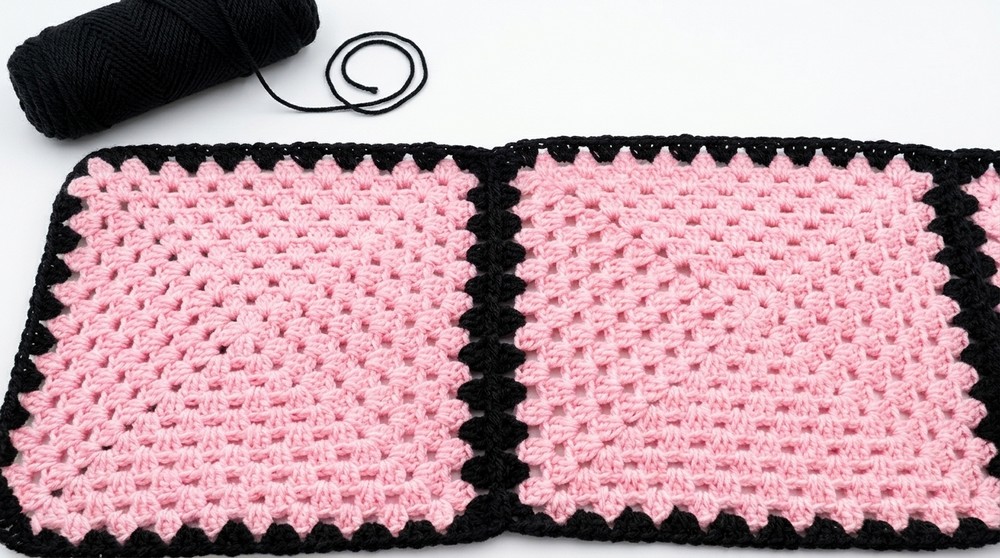
3: Assembling the Legs
Each pant leg is made up of 2 granny squares and 1 granny stitch panel.
Steps:
- Join granny squares vertically: Place two squares right side together. Whip stitch or use slip stitches to join along one edge.
- Attach panel: Seam the panel to the bottom edge of the joined squares.
- Repeat: Create two identical pant leg panels.
4: Join Pant Legs (Form crotch seam)
- Prepare pieces:
- Turn one pant leg inside out and leave the other right side out.
- Insert the right-side-out pant leg into the inside-out leg, aligning the crotch seams.
- Seam method:
- Using slip stitches or single crochets, join the inner leg seam from one edge to the other (continuous seam).
- Once joined, turn the pants inside out.
5: Add Waistband
The waistband uses rows of decreases mixed with stable rows to cinch the waist and create elasticity.
Row 1 (Decrease):
- Attach yarn to the top edge, ch 3.
- Work 3 dc per gap around; in the middle sections (e.g., front/back), work dc-3-tog (double crochet 3 together):
- Yarn over, pull through for 3 unfinished dc in different spaces, then pull through all loops on your hook to complete the decrease.
Row 2 (Stable Row):
- Ch 3. Work 3 dc per gap around with no decreases.
Alternating Rows:
Repeat 1 decrease row followed by 1 stable row until the waistband fits snugly.
Final Single Crochet Row:
To cinch further, work alternating:
- 2 single crochets + 1 single crochet decrease.
When the waistband fits securely, finish with 1 or 2 rows of regular double crochets (optional).
Tips for Customization
- Adjust Width: Add more granny square rounds or granny stitch rows to increase the bagginess of the pants.
- Drawstrings: Thread a crocheted chain or cord through the waistband to customize fit.
- Color Play: Experiment with stripes, alternating granny square colors, or even textured yarns.
Conclusion
Congratulations on completing your crochet pants! These pants combine comfort and style effortlessly. Pair them with crop tops, tuck sweaters into them, or wear them casually—it's your design.


Leave a Reply