

Experience the joy with Crochet Teddy Bear with Headphone Pattern for a unique gift or a charming addition that delights every heart and home.
Soft toys bring joy to everyone, and a crochet teddy bear with headphone pattern is something extra special. You look at this beautiful bear and feel happy. The big round face and tiny arms show gentle love and comfort. The headphones add a fun twist, so the bear looks cool and modern. This lovely creation fits perfectly as a gift for a child or can decorate your room to make it more lively.
Trendy Crochet Teddy Bear with Headphone Pattern for Modern Toy Collections

People place this bear on beds, desks, and shelves, so daily life feels warm and cheerful. Crochet Teddy Bear with Headphone pattern makes it easy for anyone to make one, even if you are new to crochet. By using simple yarn and hooks, you shape the bear step by step and add the headphones for a touch of style. After finishing, you can share your handmade bear with friends and family. The pattern is friendly for all ages, and each teddy becomes a treasure that brings smiles and happiness wherever you keep it.
Materials
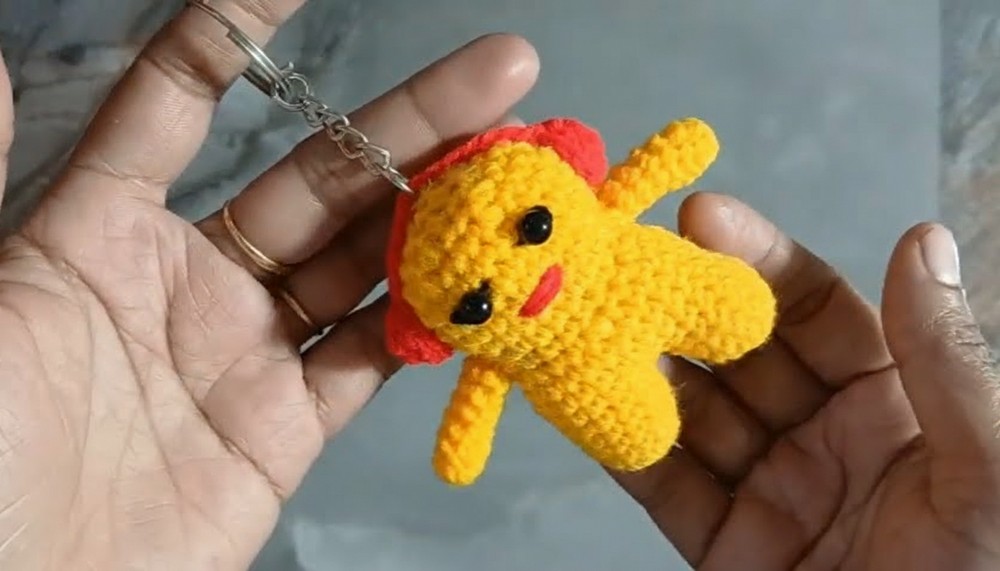
- Yarn:
- Yellow (bear)
- Red (headphones, mouth)
- Black (eyes)
- Crochet Hook: Size 2.5–3.5 mm (depending on yarn thickness)
- Stuffing: Polyester fiberfill
- Yarn Needle
- Fabric Glue (optional; for headphones and kitchen/keychain attachment)
- Scissors
- Keychain ring (optional, for kitchen/keychain finishing)
Key Abbreviations (US Terminology)
| Abbreviation | Meaning |
|---|---|
| MR | Magic ring |
| ch | Chain |
| sc | Single crochet |
| sl st | Slip stitch |
| st(s) | Stitch(es) |
| inc | Increase (2 sc in one st) |
| dec | Decrease (sc2tog) |
Special Notes
- Always slip stitch to the first stitch to join each round unless stated.
- For changes between legs/body, see specific joining instruction.
- Adjust stuffing to ensure a firm shape.
- Increase or decrease the number of rows for a larger or smaller bear.
Pattern Instructions
1. Legs (Make 2, Yellow Yarn)
Leg 1:
- Rnd 1: MR, ch 1, 6 sc in ring, sl st to first sc. (6)
- Rnd 2: Ch 1, 2 sc in each st around, sl st to join. (12)
- Rnd 3: Ch 1, 1 sc in each st around, sl st to join. (12)
- Rnd 4-5: Ch 1, 1 sc in each st around, sl st to join. (2 rounds, 12 sts each)
- Fasten off, cut yarn.

Leg 2:
- Same as Leg 1, BUT do not fasten off on Leg 2.
- Do not cut the yarn; continue to join the legs for the body.
2. Join Legs and Form Body
- Joining:
- Ch 1, sc in same st and next 5 sts of Leg 2 (6), then continue to Leg 1—sc in any stitch and next 5 sts (6) of Leg 1.
- You should now have a continuous circle of 12 sts (6 from each leg).
- Sl st to first sc to join. (12)
- Next:
- Ch 1, continue sc in each st around, sl st to join. (12)
- Repeat for one more round.

Body Increases:
- Next Round: Ch 1, 2 sc in each st around, sl st to join. (24)
- Next: Ch 1, 1 sc in each st around, sl st to join. (24)
- Repeat previous round two more times (total 3 rounds with 24 sc per round).
3. Body Shaping
- Dec Round: Ch 1, sc in next 2 sts, dec over next 2 sts, repeat around. Sl st to join.
- Next Round: Ch 1, 1 sc in each st around, sl st to join.
- Next Round (Increase): Ch 1, sc in next 2 sts, 2 sc in next st, repeat around. Sl st to join.
- Next: Ch 1, sc in next 3 sts, 2 sc in next st, repeat around. Sl st to join.
- Next Round: Ch 1, 1 sc in each st around, sl st to join.
- Repeat last round two more times (total 3 rounds).
4. Begin Head Shaping
- Round: Ch 1, sc in next 3 sts, dec over next 2 sts, repeat around, sl st to join.
- Next: Ch 1, sc in next 2 sts, dec over next 2 sts, repeat, sl st to join.
- Stuff bear at this point. Continue stuffing as you shape the head.
- Round: Ch 1, sc, dec, repeat, sl st to join.
- Final Dec: Ch 1, work 6 decreases, sl st to join.
- Fasten off, leave a long tail.
- Thread yarn tail through front loop of each st, pull to close, knot and weave in.
5. Arms (Make 2, Yellow Yarn)
- Rnd 1: MR, ch 1, 6 sc in ring, sl st to join. (6)
- Rnd 2: Ch 1, 1 sc in each st around, sl st to join. (6)
- Rnds 3-7: Repeat round 2 for 5 more rounds (arms = 6 rows long).
- Fasten off, leaving a long tail for sewing.
- Sew arms to each side of body, just below the head, securely.
6. Face Embroidery
- Eyes: Using black yarn/thread, embroider two small ovals, spaced evenly.
- Mouth/Smile: Using red yarn/thread, embroider a small smile below and between the eyes.
- Optional: Use felt circles or safety eyes.

7. Headphones
Earpieces (Make 2, Red Yarn):
- MR, ch 1, 8 sc in ring, sl st to join. (8)
- Ch 1, 1 sc in each st around, sl st to join. (8)
- Fasten off (for first earpiece only).

Headband:
- After completing the second earpiece, DO NOT cut the yarn.
- Ch 13, sl st to an st of the first earpiece.
- Fasten off, cut yarn, secure, and weave in ends.
Finishing:
- Using a tapestry needle and leftover yarn tails, secure the open side of the earpieces and the band shape.
- Shape the headphones as desired.
- Attach headphones to the bear’s head with fabric glue (or sew in place for extra security). Let dry before handling.
8. Keychain Loop (Optional)
- Use a small length of yarn to attach a metal keyring to the bear.
- Sew securely to top or back of the head.
Conclusion
Your cute Teddy Bear with Headphones is finished! This amigurumi is beginner-friendly, quick to make, and perfect as a kitchen (keychain) decoration, gift, or fun desk buddy.
Pattern Corrections & Tips
- Stitch Count: Always count stitches at the end of each round, especially after joins and increases.
- Firmness: Stuff firmly but carefully to avoid stretching stitches.
- Joining Limbs: Use multiple stitches and knots for durability.
- Safety: Ensure all small parts and embellishments are secure—especially for children.
- Personalization: Change yarn color for different bear types, or add a bowtie, scarf, etc.
Tip:
When shaping (decreasing) the head and body, frequently add small pinches of stuffing for a smooth finish.


Leave a Reply