

Sprinkle woodland magic with this Crochet Amigurumi Fox Pattern that adds soft texture, adorable charm, and whimsical décor to any space.
Forests have always held a sense of mystery and charm, where the quiet rustle of leaves and sudden glimpse of wildlife sparks curiosity and admiration. Among these woodland creatures, the fox stands out with its playful nature and striking appearance. The Crochet Amigurumi Fox pattern brings this lively animal into the hands of crocheters, transforming yarn into a charming, huggable figure that delights both children and collectors alike.
Delightful Crochet Amigurumi Fox for fun gifting

The process begins with a magic ring to form the fox’s body, gradually increasing stitches to achieve a balanced and sturdy shape. As the work progresses, careful color changes highlight the fox’s iconic fur patterns, from its rich orange coat to the white-tipped tail and ears. Limbs, ears, and tail are crocheted separately, using a combination of single crochet and decreases to achieve realistic proportions. Facial features are positioned with precision, giving the fox a playful and expressive personality.
Finished pieces are versatile, suitable as decorative accents for shelves, desks, or nurseries, or as unique, handmade gifts that carry charm and character. The compact size and soft texture make it ideal for tactile interaction, encouraging creativity and appreciation for handmade artistry. Beyond its visual appeal, completing the Crochet Amigurumi Fox offers a satisfying sense of accomplishment, combining skillful technique with the joy of bringing a woodland friend to life.
Materials Needed
To make this velvet fox, you will need:
- Velvet Yarn: For the main body (orange for the fox and white for parts like its face and belly).
- Black Yarn: A small amount for face features like the eyes and any details.
- Crochet Hook: Use a size matching your velvet yarn (3mm–5mm hooks generally work well).
- Stuffing Material: To stuff the body, head, and legs for shape.
- Big Plastic Nose: For the fox's nose (or you could crochet the nose).
- Yarn Needle: For sewing parts together and weaving in ends.
- Marker: To mark stitches and rounds.
- Scissors: For cutting yarn.

Step-by-Step Instructions
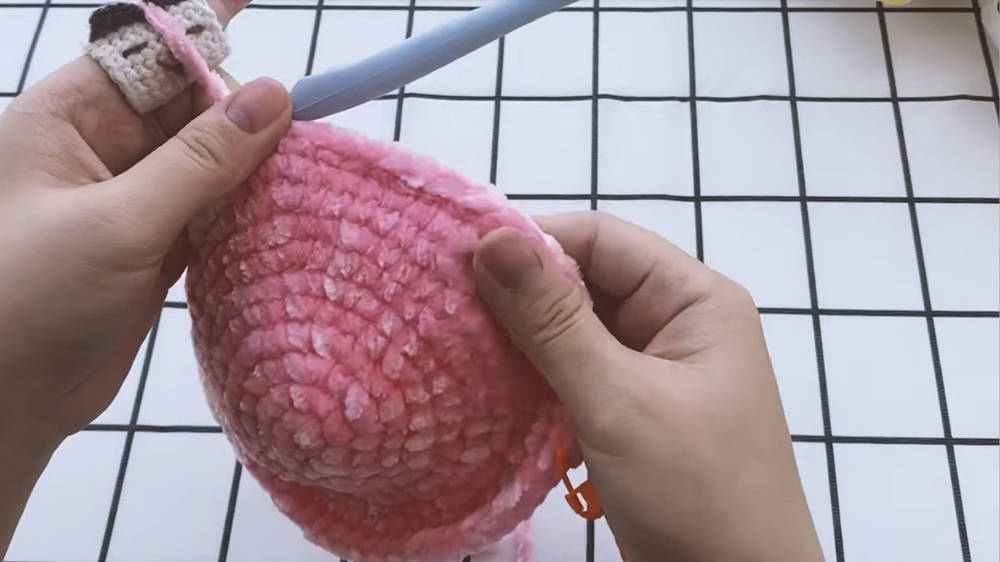
Step 1: Making the Head
- Create a Magic Ring
- Start by making a magic ring and crocheting 6 single crochets (sc) into the ring.
- Pull the ring tight, then slip stitch to close the round, and chain 1. Use a stitch marker to track the start of the next round.
- Round 2: Increase
- Do 6 increases (2 single crochets in each stitch). By the end of the round, you’ll have 12 stitches.
- Slip stitch and chain 1 at the end of the round.
- Round 3: One Single Crochet and Increase
- Crochet 1 single crochet, followed by an increase (2 single crochets in the next stitch).
- Repeat the pattern around to complete the round.
- Continue Following the Pattern
- The video guides you on increasing rounds as the head expands. Follow along according to the pattern provided.
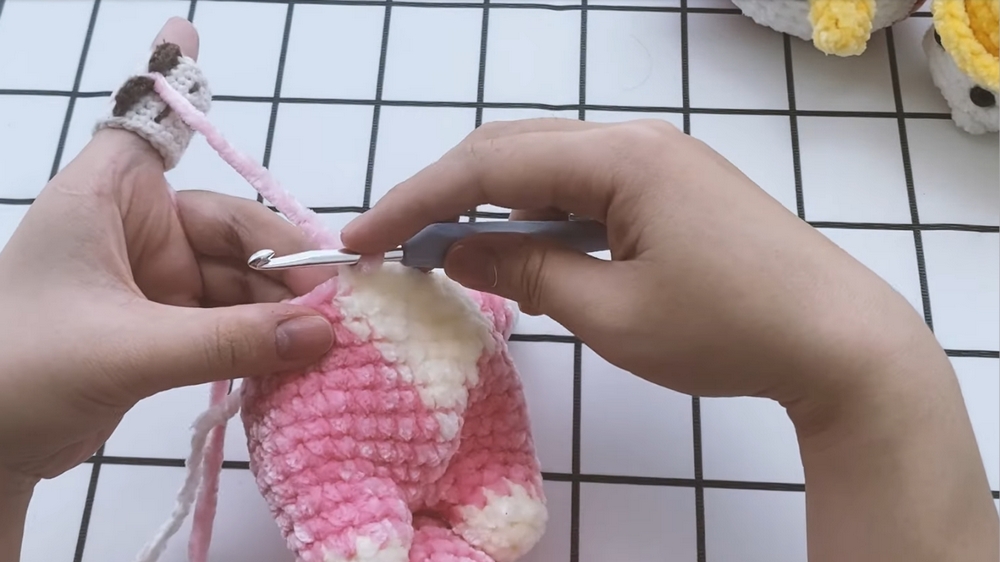
- Switching Colors for the Face
- In the designated round (e.g., the 20th stitch), change to white yarn for the fox’s face by tying a secure knot.
- Continue crocheting and completing the head.
- Creating Shape and Decreasing
- Start decreasing the head by doing 7 single crochets and 1 decrease around. Continue the pattern as instructed.
- Leave a long yarn tail at the end to attach the head to the body later.
- Adding Face Features
- Attach the big plastic nose and embroider facial features like eyes using black yarn.
- Optionally, apply blush to give the fox a cute and lively expression. You can add face features either before or after stuffing.

2: Crocheting the Body
- Follow a similar process to create the fox’s body, working in rounds. Increase and decrease according to the video’s instructions.
- Ensure that you leave a long tail to stitch the body to the head.
3: Crocheting the Legs
- Follow the pattern to create curved cylindrical legs.
- Stuff each leg with filling to give the fox a stable, balanced structure.
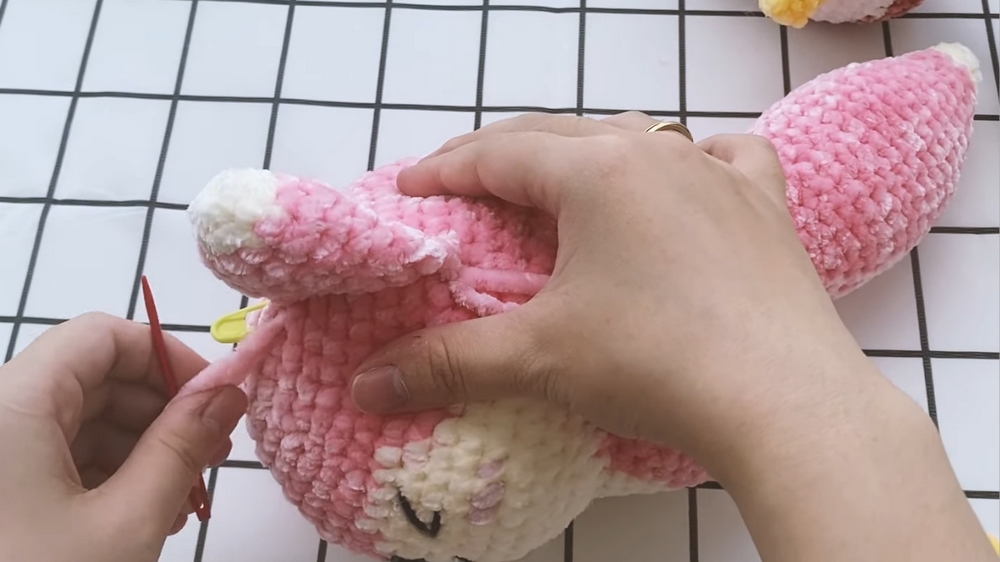
4: Assembling the Fox
- Attach the Head to the Body
- Carefully align the head and body.
- Use a yarn needle to sew the pieces together, going one hole at a time, and pull the yarn tight after each stitch for a secure bond.
- Ensure proper stuffing before fully closing the seams.
- Attach the Legs
- Align the legs symmetrically and sew them to the body following the same secure stitching technique.
- Add the Ears
- Position the ears on the head between the 3rd and 4th rounds.
- Mark the spots carefully to ensure symmetry and stitch the ears in place securely.
Special Features
- Adorable and Soft Design: Made with velvet yarn, this fox has a super soft and cuddly finish, ideal for decorations or gifts.
- Color Change Technique: The pattern incorporates smooth yarn transitions to create the fox’s white face details.
- Personalization: You can adapt face features like eye placement, expression, or even the yarn type to create unique variations.
Level of Difficulty
- Beginner to Intermediate: This project is suited for those comfortable with basic stitches (single crochet, magic ring, increases, decreases). Beginners may find assembling the parts and working with velvet yarn slightly challenging, but it’s manageable with careful attention.
Tutor’s Suggestions
- Use Stitch Markers: Velvet yarn can make it harder to see individual stitches, so stitch markers are essential to avoid losing your place.
- Tie Knots Between Yarn Changes: Tying knots when switching yarn colors prevents unraveling.
- Stuff Generously: Make sure to stuff the fox firmly, especially the limbs—this ensures a stable and plush finished product.
- Be Patient with Assembly: Sewing the pieces together requires precision to achieve symmetry. Take your time at this stage.
Uses
- Plush Toy: A soft and huggable fox perfect for children or collectors.
- Gifts: Ideal handmade gift for birthdays or special occasions.
- Home Decor: Display it on shelves, work desks, or cribs as charming décor.
Tip
When crocheting amigurumi with velvet yarn, keep your tension tight to prevent stuffing from showing through the stitches. Use a slightly smaller hook size if necessary for more compact stitches.
Conclusion
This pattern walks you through creating a cute and cuddly velvet fox, perfect for amigurumi lovers. With a focus on clear instructions and step-by-step guidance, this project enhances fundamental crochet skills while allowing you to create an adorable keepsake or gift. Personalized with face features, colors, and expressions, your velvet fox is sure to be a hit.

Leave a Reply