

Surprise loved ones with this crochet heart butterfly keychain pattern made in easy to add fun and beauty to your bags keys or special gifts.
Bright colors and soft shapes create a joyful touch that can light up any space. This little butterfly with heart-shaped wings is made with simple crochet, turning ordinary yarn into something special. You can hang it on bags use it as a gift for friends or even decorate your room for a cheerful feel. The crochet heart butterfly keychain pattern is easy to follow and lets you make a unique charm with your own hands.
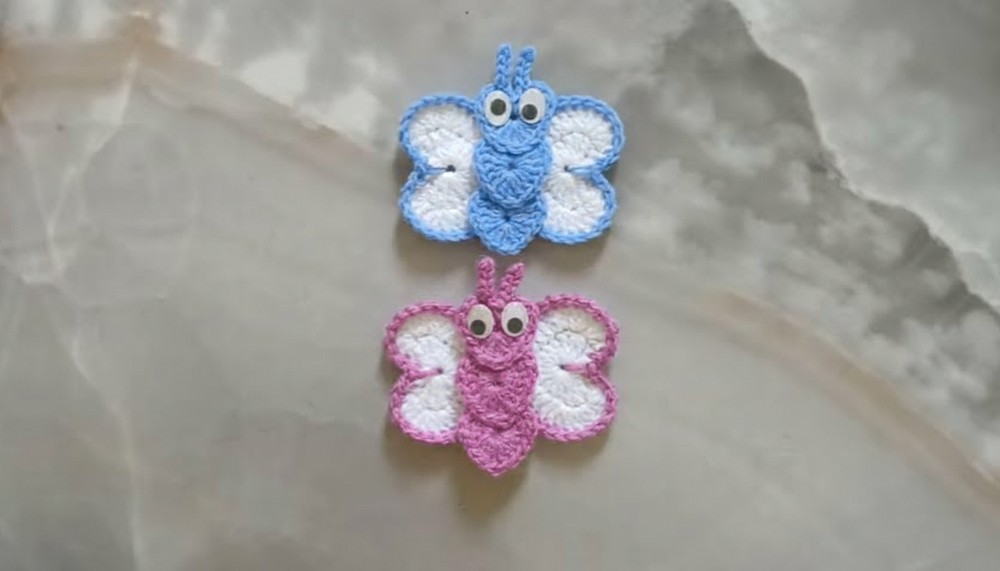
Snazzy Crochet Heart Butterfly Keychain Pattern to Jazz Up Your Style

Each piece you create shows love and creativity making it not just cute but meaningful too. Imagine handing one to someone special or keeping it close on your own keyring as a gentle reminder of happiness. With just a few basic stitches and bright yarn you can turn free time into a fun and beautiful project. Let your hands dance with color and shape and create a small treasure that makes everyday life a bit more magical.
Materials Required
- Yarn:
- White or any color of your choice (for the main butterfly hearts).
- Blue or contrast color (for edging hearts).
- Yellow or any color (for small decorations/antennae).
- Hook Size:
- 2.5 mm crochet hook.
- Tapestry Needle: For sewing and weaving in ends.
- Scissors: For trimming yarn ends.
- Glue: For assembling the butterfly parts.
- Optional Accessories: Small embellishments like beads to decorate the butterfly.
Key Abbreviations (US Crochet Terminology)
- ch: Chain
- sc: Single Crochet
- sl st: Slip Stitch
- hdc: Half Double Crochet
- dc: Double Crochet
- tr: Treble Crochet
- st(s): Stitch(es)
- magic ring: Adjustable loop to begin crocheting in a circle.
Special Notes
- Shapes: The butterfly is made by crocheting two large heart pieces (for the wings), three smaller heart pieces (body details), and assembling them together.
- Edges: Edging the hearts with contrasting yarn adds a decorative touch, so experiment with colors.
- Assembly: Glue is used to fix the butterfly pieces together for a neat finish; sewing is also an option if preferred.
Pattern Instructions
Step 1: Large Heart Pieces (Wings)
Using White Yarn:
- Magic Ring:
- Make a magic ring and secure with a slip knot.
- Ch 3 (counts as the first tr).
- Row 1:
- Work 3 tr into the magic ring.
- Work 4 dc into the ring.
- Work 1 tr into the ring.
- Work another 4 dc into the ring.
- Work 3 tr into the ring.
- Ch 3, sl st into the ring to close the row.
- Pull the tail to tighten the magic ring.
Result: The large heart shape is complete. - Fasten Off: Cut the yarn, fasten off, and weave in the ends.


Make 2 large heart shapes.
Step 2: Decorative Edging for Large Hearts
Using Blue Yarn:
- Attach the blue yarn to any point on the edge of the large heart.
- Work 3 sc into the corner stitch to create a sharp edge.
- Continue working sc evenly across the entire edge of the heart:
- For rounded sections: Add 1 sc in each stitch.
- For corners: Add 3 sc in the same stitch to enhance the curve.
- Fasten Off: Cut the yarn, fasten off, and weave in the ends.


Step 3: Small Heart Pieces (For Antennae Decoration)
Using White Yarn:
- Magic Ring:
- Make a magic ring and secure with a slip knot.
- Ch 3 (counts as the first tr).
- Row 1:
- In the magic ring, repeat the sequence below:
- 3 tr, 4 dc, 1 tr, 4 dc, 3 tr.
- Ch 3, sl st into the ring to close the row.
- In the magic ring, repeat the sequence below:
- Pull the tail to tighten the magic ring.
Result: A small heart shape is complete. - Fasten Off: Cut the yarn, fasten off, and weave in the ends.
Make 3 small heart shapes.
Step 4: Antennae
Using Yellow Yarn:
- Ch 5.
- Starting in the 2nd ch from the hook, sl st across the remaining chains.
- Fasten Off: Cut the yarn and leave a tail for attaching.
Result: 1 antenna. - Repeat for the second antenna.
Step 5: Assembly
- Positioning Hearts:
- Place the 2 large hearts next to each other to form the butterfly wings.
- Stack the 3 small hearts vertically in the middle between the wings, forming the body.
- Attaching Pieces:
- Use glue (or sew the pieces together with a tapestry needle) to attach:
- The 2 large hearts.
- The 3 small hearts vertically along the center.
- Use glue (or sew the pieces together with a tapestry needle) to attach:
- Add Antennae:
- Position the 2 yellow antennae at the top of the butterfly. Secure them using glue or sewing.
- Final Touches:
- Optionally, add small beads or decorations for detail.
Conclusion
Congratulations! You’ve created a beautiful crochet butterfly! This project is simple yet elegant, and the butterfly can be used as a gift, keychain, applique, or even as part of a decorative mobile. Let your creativity shine with different color combinations to make your butterfly unique.
Pattern Corrections & Suggestions
- Edges Curling? Ensure you work the correct number of stitches evenly across the round, especially when forming corners of the hearts.
- Magic Ring Too Loose? Be sure to pull the initial ring tightly and weave in the tail securely to prevent it from coming undone.
Pro Tip
When crocheting the edging (step 2), use a slightly smaller hook (e.g., 2.0 mm) for a tighter and more defined edge around the hearts. This will give the butterfly a neat and professional finish.


Leave a Reply