

Sprinkle floral charm into your style with this Free Crochet Puff Flower EarBand Pattern, quick to make and perfect for playful elegance.
The soft chill of a brisk morning hints at the need for something both practical and beautiful, an accessory that effortlessly combines warmth and charm. A Crochet Puff Flower Ear Band Pattern brings this vision to life, combining textured stitches with a knit-like finish and graceful floral accents. With thoughtful techniques, this handmade accessory transforms ordinary yarn into something stylish that keeps your ears cozy while exuding sophistication.
How to Crochet Puff Flower EarBand Pattern Quickly and Easily

Durable and adaptable, this piece adds a timeless charm to winter attire while accommodating individual tastes in color and texture. Whether you pair it with casual layers or a polished winter coat, this accessory bridges practicality and beauty, complementing every outfit effortlessly. Simple but sophisticated, it brightens even the coldest days with its comforting presence and delicate artistry.
Materials Needed
- Yarn: Number 4 medium weight acrylic yarn (any color of your choice).
- Crochet Hook: 5 mm crochet hook.
- Darning Needle: For weaving in ends and attaching the puff flower.
- Scissors: For cutting the yarn.
- Measuring Tape: For ensuring the correct size of the ear band.

More than just protection against the cold, these ear bands become a personal statement of style, seamlessly merging comfort with visual appeal. Ideal for wintry walks, festive outdoor gatherings, or as a thoughtful personalized gift, they bring both functionality and elegance to your wardrobe. Made with soft acrylic yarn, they provide reliable warmth without compromising on breathability, while their stretchable design ensures a snug yet comfortable fit for all head sizes.

Step-by-Step Details of Crochet Ear Band
Special Features
- Knit-Like Texture: The tutorial focuses on a third loop half double crochet stitch that gives the ear band a polished, knit-like texture.
- Stretchability: The stitch creates excellent stretch in both directions, making the ear band fitting and comfortable.
- Decorative Puff Flower: The video includes instructions to make an optional puff flower, adding charm and uniqueness to your project.
- Clean Edges: Both sides of the ear band have neat edges, ensuring a professional and finished look.
Level of Difficulty
Beginner-Friendly
This ear band is suitable for beginners who have basic knowledge of crochet. Techniques like foundation half double crochet and working into the back third loop may require practice, but the instructor explains them clearly and in small, manageable steps.
Step-by-Step Instructions
1. Starting the Foundation Half Double Crochet
- Begin with a slip knot and chain two.
- Locate the back loop (or bump) of the first chain and yarn over, insert the hook, yarn over again, and pull through the loop.
- Yarn over and pull through only the first loop to create a chain on the bottom. Then yarn over again and pull through all three loops to complete a half double crochet.
- Repeat the process by inserting the hook into the bottom chain space created earlier, forming a continuous foundation half double crochet chain.

2. Creating the Main Band
- Continue stitching until the foundation chain measures between 17 to 21 inches (approximately 44 to 53 cm) or fits comfortably around your head.
- Join the ends to create a circle by slipping the last loop into the first stitch, using a snug pull to secure, and chaining one.
- For the next row, use a third loop half double crochet technique where you insert your hook into the back loop (third loop) of the stitch instead of the top two loops.
- This technique pulls the surface stitches forward, creating the knit-like effect.
- At the end of each row, join seamlessly by inserting the hook from behind the first stitch, pulling the last loop snugly, and chaining one.
- Continue repeating these rows until the ear band reaches your desired width. Typically, 10 to 12 rows will suffice.

3. Finishing the Ear Band
- Once the desired number of rows is completed, cut your yarn, leaving a small tail, and pull it through.
- Use a darning needle to weave in loose ends along the edge. Ensure weaving is done opposite the direction of stretch to avoid unraveling.

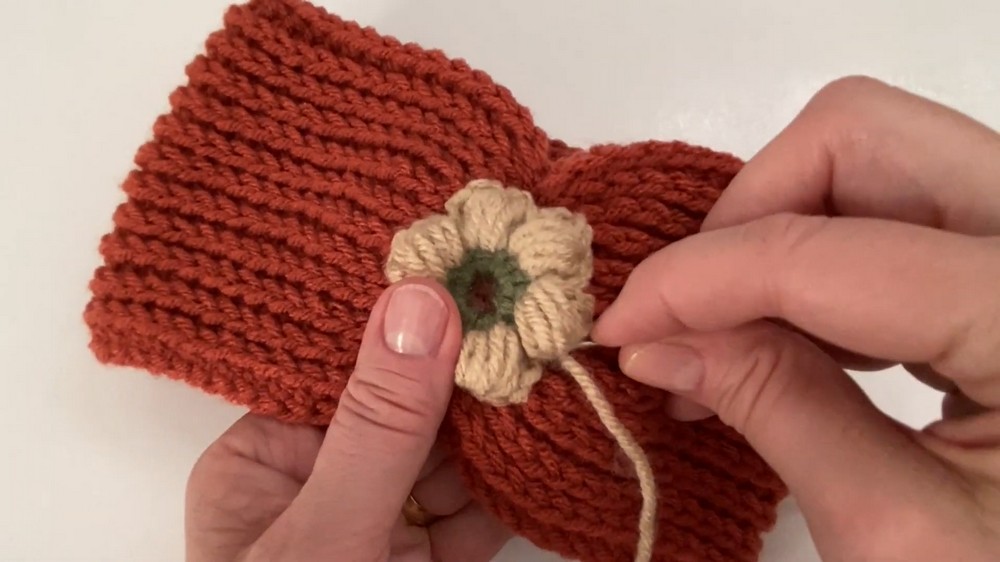
4. Creating the Decorative Puff Flower (Optional)
- Start with a slip knot and chain four. Slip stitch into the first chain to form a circle.
- Chain one, then crochet 12 single crochets into the center of the circle. Slip stitch into the first single crochet to close the round.
- If using two colors, join the second yarn color by pulling it through and snugging it tight.
- Chain three and begin your puff stitch: yarn over and insert the hook into the first stitch, pulling up a loop tall twice. Yarn over and repeat the process in the next stitch three times.
- Yarn over and pull through all loops on the hook, then close the puff stitch with two chains.
- Slip stitch into the next single crochet to secure the puff.
- Repeat the process until six puff petals are completed, ensuring the circle closes evenly.
- Weave in loose ends and attach the flower to the ear band with your darning needle.
Tutor’s Suggestions
- Work Upside Down for Ease: While creating the foundation half double crochet, the instructor recommends turning the work upside down to make stitching smoother.
- Maintain Stitch Count: Consistent stitch count in each row is vital to prevent uneven rows or loose sections.
- Customize Size and Design: Measure the wearer’s head and adjust the length and width of the band as desired.
- Use Markers: Consider placing a stitch marker at the start of each row to easily identify the first stitch while joining.
Uses and Benefits
- Winter Warmth: A stylish ear band keeps your ears warm while adding flair to your outfit.
- Gift Idea: Handmade crochet ear bands make thoughtful and customizable gifts.
- Stretchy Fit: The stretchy texture ensures comfort and adjustability for all head sizes.
- Versatile Yarn Choice: Use yarn of different weights or colors to create unique designs.
Tip
Ensure snug joins and perfectly aligned rows by checking each stitch placement after completing a round. Tight joins and consistent stitches enhance the finished look and avoid gaps within rows.
Conclusion
Crocheting an ear band with a puff flower embellishment is a rewarding and enjoyable project fit for beginners and experienced crocheters alike. The knit-like texture, stretchable design, and neat edges make it a practical and stylish accessory for chilly weather. The optional puff flower adds a delightful decorative touch, allowing you to personalize your creation. Follow the clear instructions in this tutorial, pay attention to suggested techniques, and enjoy creating a timeless piece that keeps you warm and fashionable.
Leave a Reply