

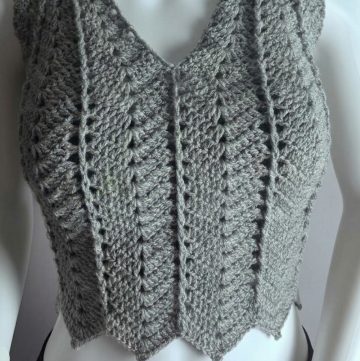
Style your outfits effortlessly with a crochet sleeveless cardigan pattern that combines comfort, versatility, and elegance for all seasons and any occasion.
Layering pieces never fail to enhance versatility in your wardrobe, and a crochet sleeveless cardigan pattern offers exactly that. Perfect for layering all year round, this lightweight cardigan pairs seamlessly with casual outfits like tank tops and jeans or more tailored looks such as blouses and trousers. Its sleeveless design provides comfort and ease, making it ideal for days when you want a little extra coverage without the bulk.
Pretty Free Crochet Sleeveless Cardigan Pattern for Any Style
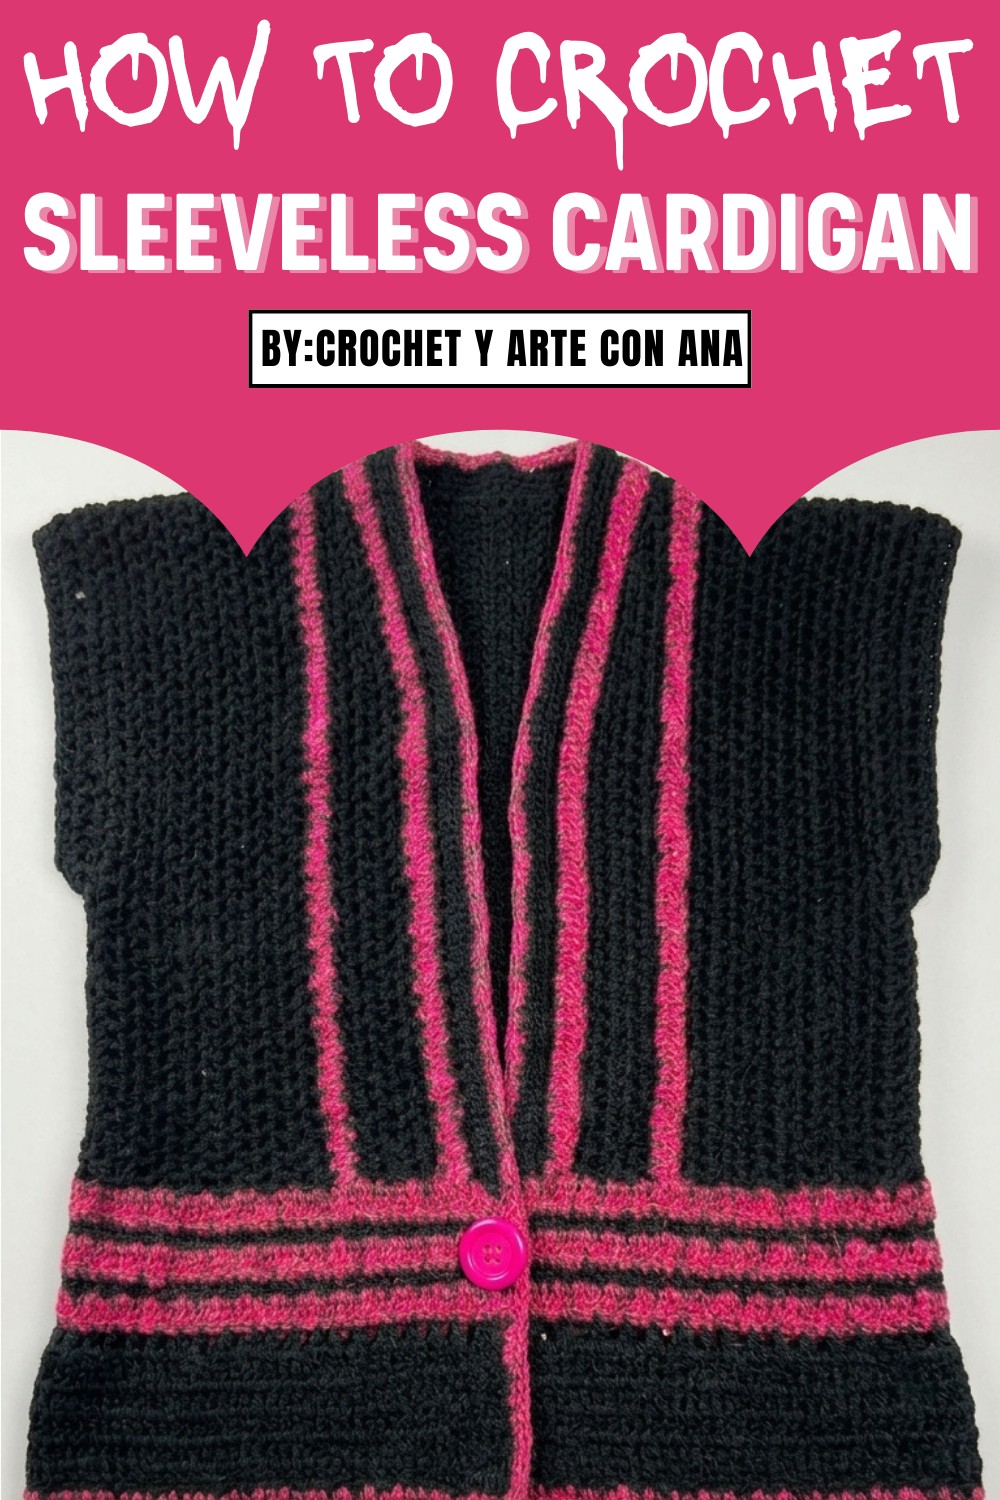
Stylish and functional, this piece transitions well between seasons while offering the practicality of breathable fabric. By combining your choice of yarn textures and colors, the cardigan becomes uniquely yours, fitting various occasions whether running errands or enjoying an evening out. Adding a simple belt or leaving it open gives plenty of styling options, making the sleeveless cardigan a wardrobe staple for effortless, chic layering.
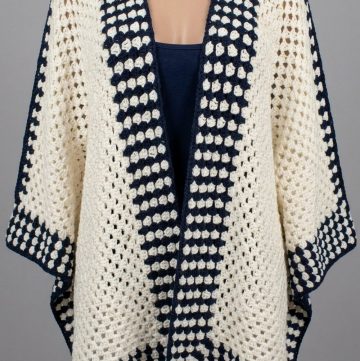
Free Crochet Jacket Pattern
Skill Level
Intermediate
This pattern uses basic stitches (chains, single crochet, double crochet) and layering techniques. Knowledge of joining, switching colors, and working around measurements is required.
Finished Size
- Size in Tutorial: Medium
- Custom Fit: The jacket is customizable based on personal measurements (waist/bust circumference, armhole, etc.).
- Length: Approximately waist-length with adjustable sleeve lengths.
Materials
- Yarn:
- Thread Type: Crystal Yarn or any lightweight yarn. Use double strands to avoid a flimsy finish.
- Colors: Two colors are recommended.
- Main Color (e.g., black): ~200g
- Contrasting Color (e.g., pink): ~200g
- Hook Size: 3.5 mm for medium-weight fabric.
- Additional Tools:
- Scissors
- Measuring Tape
- Stitch Markers (or alternatives such as safety pins)
- Wool/Tapestry Needle (for weaving and finishing)
Gauge
Gauge is flexible but ensure even tension to maintain a consistent structure.
Test Gauge:
Using a double strand of yarn and a 3.5 mm hook,
- 5 dc x 3 rows = 1 inch square.
Key Abbreviations (US Terminology)
- ch: Chain
- sc: Single Crochet
- dc: Double Crochet
- sl.st: Slip Stitch
- sp: Space
Measurements Needed
- Main Circumference: Measure just below the bust, around the waist and back.
- Armhole Size: Measure approximately 20–22 cm (8–9 inches) where sleeves will connect.
- Desired Jacket Length: Measure from just below the bust down to your desired jacket length.
Step-by-Step Pattern
Part 1: Base of the Jacket
Step 1: Foundation Chain
- Use the 3.5 mm hook and work a chain to match your waist circumference measurement (just below the bust).
- Example: 135 chains = 72 cm (28.3”) in tutorial.
- Ensure the foundation chain provides enough slack for a proper fit.
- Confirm the size:
- Wrap the chain around your body to verify if it meets the measured length.
Step 2: First Round (Double Crochet)
- Establish the Base:
- Work 1 dc in each chain, beginning with the second chain from the hook.
- At the end of the row, ch 3 (counts as the first dc for the next round), turn your work.
- Double-Check the Fit:
- Verify the completed row matches the required length around your body.
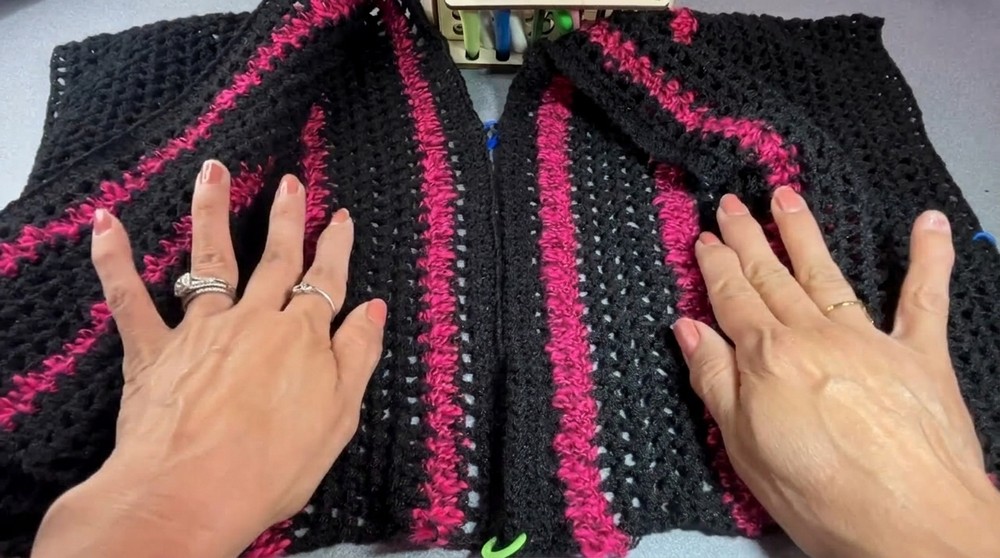
Step 3: Textured Design Rounds
- Round 2:
- Ch 3 (counted as the first dc), then ch 1 (chain space).
- Skip 1 st, work 1 dc in the next st, ch 1.
- Repeat across (dc, ch 1, skip 1) until the row ends.
- You should now have alternating spaces and dc stitches.
- Round 3 (Switch Color):
- Attach the secondary color using a slip knot.
- Ch 3, turn work, and dc into every stitch and chain space from the previous row (returning to a dense row).
- Continue with a 1 dc in each* stitch without skipping.
- Rounds 4–8:
- Return to black yarn. Repeat Round 2, followed by a solid row of dc with no chain spaces in each alternating round.
- Always alternate between light and dark rows.
- Height Tip: Complete 5 rows (dense + textured) alternating between colors as instructed.
Part 2: Two Identical Panels
Step 1: Repeat Design
- Create Two Identical Pieces:
- Follow the pattern above to create two identical rectangular panels.
- Ensure each panel matches the measurements of your waist and torso.
Step 2: Join Two Pieces
- Lay the two rectangles side by side.
- Use stitch markers to mark:
- Center Back: Align the panels for a seamless connection.
- Armholes: Leave approximately 20–22 cm (8–9 inches) open for sleeves.
- Neckline: Determine how open or closed you want the collar.
- Sew side seams or use sl.st to join the panels.
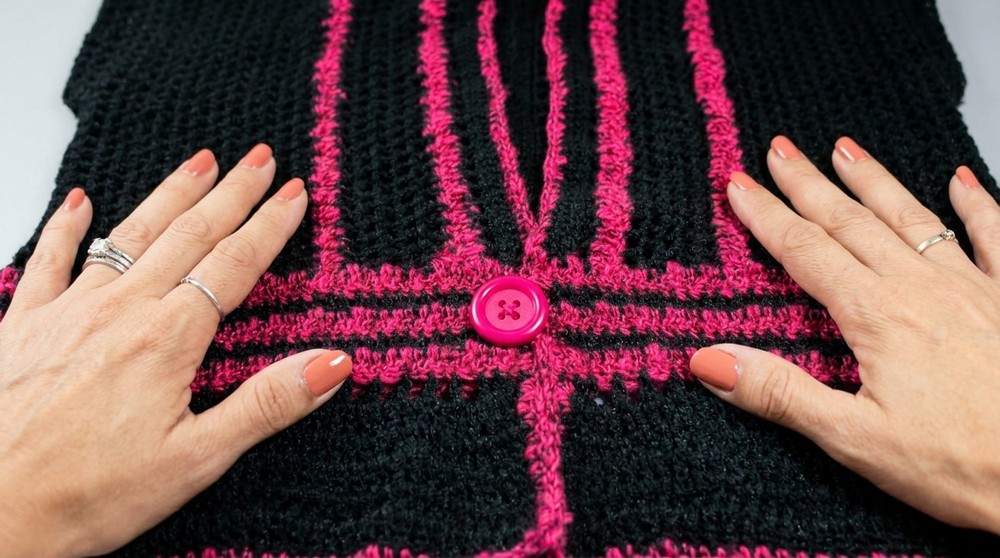
Part 3: Waistband
Step 1: Adding Waistline Rows
- Foundation Row:
- Beginning at one side of the jacket, attach pink yarn and ch 3 (counts as first dc).
- Work 1 dc in each stitch around the waistline.
- No chains or skipped spaces are required.
- Repeat Rounds:
- Alternate pink and black rows, finishing with pink.
- Complete five rows of dc for the waistband.
- Customization Tip:
- Reduce the stitch count to narrow the waistband by skipping occasional stitches during the row.
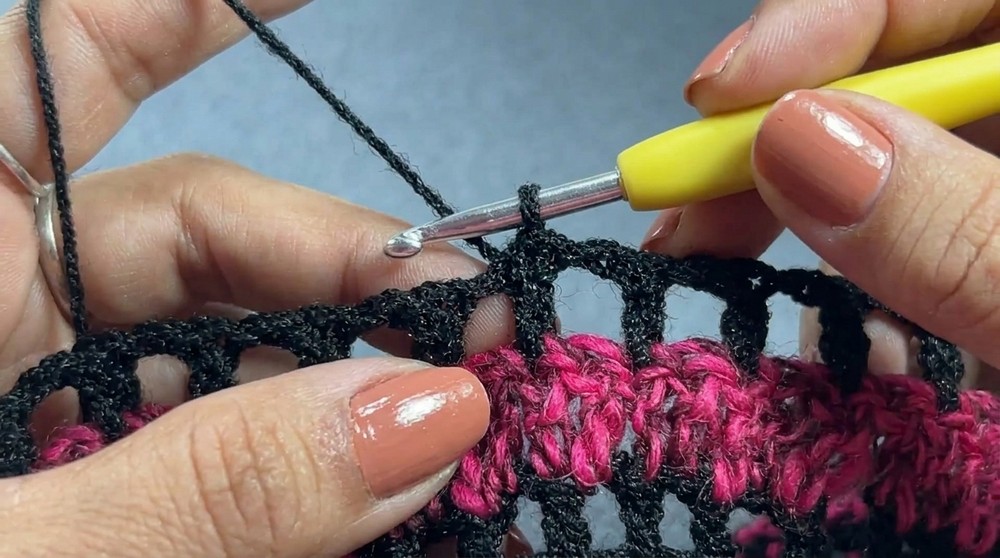
Part 4: Skirt (Ruffled Bottom)
Step 1: Starting the Skirt
- Return to black yarn.
- Begin at the end of the waistband.
- Ch 3 (counts as the first dc). Work 3 dc stitches in the next st. Skip 1 st and repeat.
- Increase for Ruffle:
- In the following row, add a chain space between dc (ch 1, skip 1).
- Complete 3–5 rows for a small ruffle, or extend for a longer skirt.
Part 5: Sleeves
Step 1: Sleeve Adjustments
- At the armhole opening, attach black yarn with a sl.st.
- Work dc around the opening and connect rows to form the sleeve.
- Complete the desired sleeve length with alternating color rows.
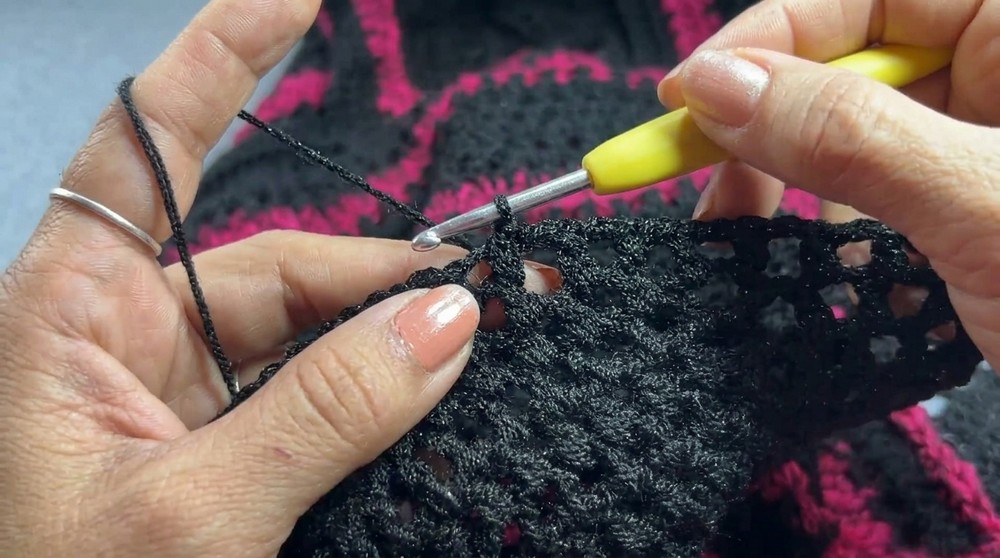
Finishing Touches
- Edge Around the Jacket:
- Attach pink yarn and work sc evenly around the edges of the jacket (include neckline, bottom edge, and front opening).
- Button Placement:
- Add a decorative button for closure.
- Create a small button loop with chains at the opening edge.
- Final Assembly:
- Weave in all loose ends and block the jacket if needed for a polished finish.

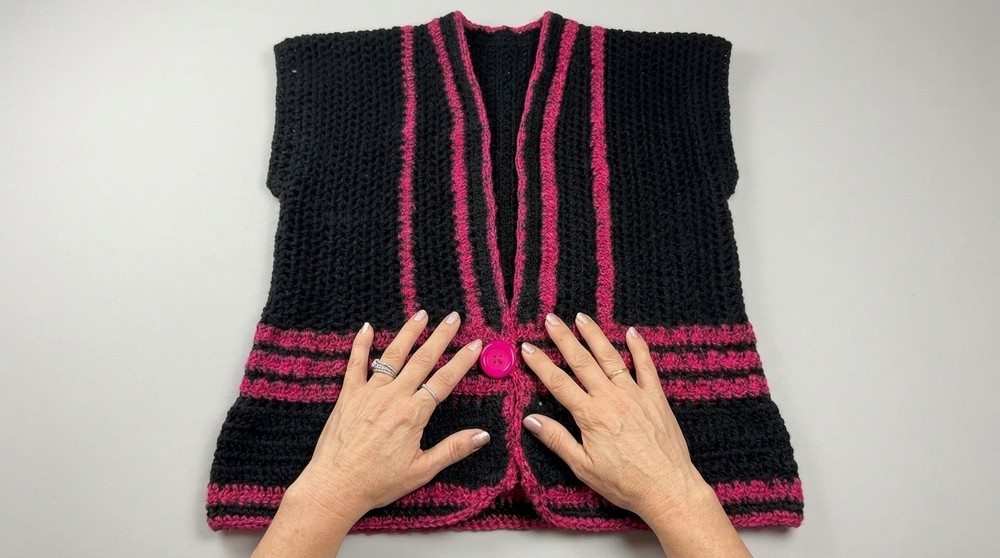
Conclusion
This crochet jacket pattern transforms basic stitches into an elegant and versatile piece. The project is customizable to suit your desired size, colors, and preferences, making it a satisfying addition to your handmade wardrobe.
Important Remarks
- Blocking Tip: Lightly block the jacket to shape it perfectly.
- Fit Test: Continuously measure the panels and waistband during assembly for an accurate fit.
Final Look
Your finished crochet jacket will boast alternating textured stripes, flexible panels, and an optional ruffled skirt. Ideal for casual outings or cozy wear, this lightweight jacket merges practicality with timeless elegance.
Leave a Reply