

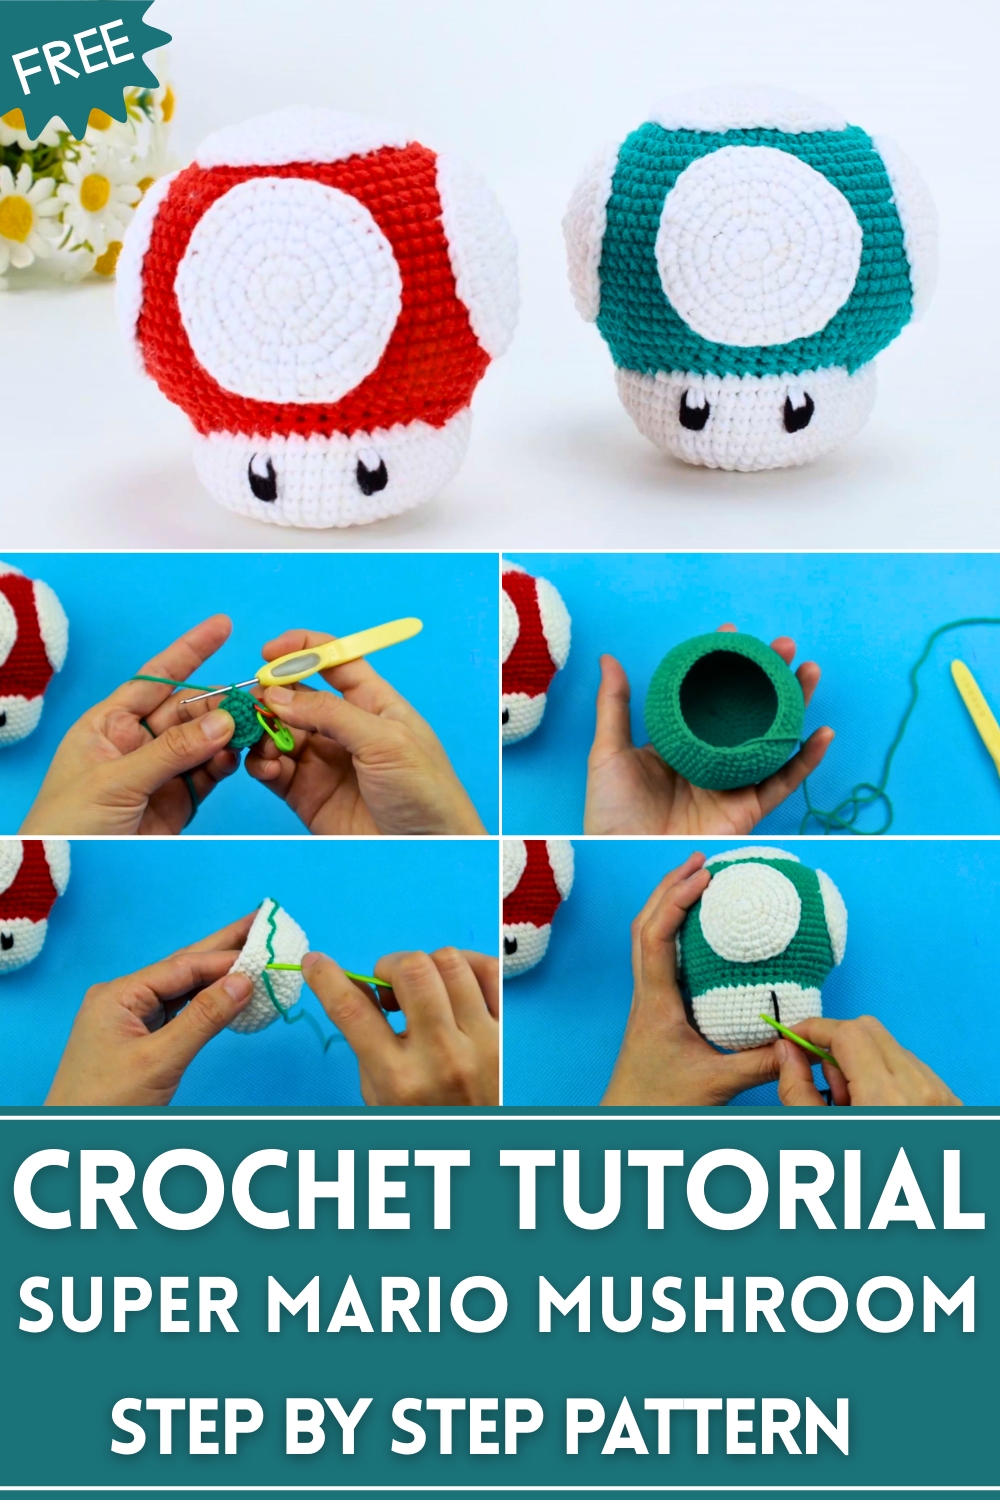
Power up your décor with the Free Crochet Super Mario Mushroom Pattern, offering a playful, colorful, and handcrafted collectible for fans and gamers alike
Games have long inspired fans to bring their favorite characters and items into the real world, turning virtual adventures into tangible keepsakes. The Free Crochet Super Mario Mushroom pattern brings one of gaming’s most iconic symbols to life, offering a playful, handcrafted addition to any collection. Its bright red cap and signature white spots capture the classic charm of the power-up mushroom, making it perfect for display on desks, shelves, or gaming corners, where it can serve as a cheerful reminder of adventures in the Mushroom Kingdom.
Playful Crochet Super Mario Mushroom Pattern with Bold Colors
Soft yet durable yarn ensures that each mushroom retains its shape while remaining lightweight and safe for handling. Enthusiasts and collectors appreciate its versatility: it can function as a decorative accent, a fun toy for children, or even a unique gift for fellow gamers. The compact size allows for easy placement in small spaces, while the bold colors make it a striking focal point that catches the eye.
Beyond decoration, the Free Crochet Super Mario Mushroom pattern encourages creativity and patience, allowing makers to enjoy the satisfaction of producing something both playful and functional. This handmade piece combines nostalgia, charm, and practicality, offering a delightful collectible that brightens spaces and brings a touch of gaming magic into everyday life.
Special Features
- Whimsical Design: The mushroom combines a rounded head with adorable spots and a sturdy pillar for stability and charm.
- Spiral Crochet Method: The project uses spiral crochet techniques to avoid unsightly seams, resulting in a smoother and seamless appearance.
- Detailed Assembly Instructions: The tutorial clearly explains the process of connecting the mushroom parts, adding fiberfill, and fixing decorative features like spots and embroidered eyes.
- Customizable Elements: The mushroom spots and facial features can be personalized to suit individual preferences (e.g., different colors or arrangement).
Level of Difficulty
The project is friendly for beginner to intermediate crocheters:
- Beginner Level: Crocheting basic shapes like the mushroom head and spots involves foundational skills such as the magic ring, single crochet, increases, and decreases.
- Intermediate Level: Skills like connecting parts, suturing, and detailing facial features using embroidery will require attention to detail and some practice.
Materials Needed
- Yarn:
- Milk Cotton Yarn (five strands):
- Brown for the mushroom column, white for the mushroom head, yellow/green for decorative loops, and black for the eyes.
- Milk Cotton Yarn (five strands):
- Crochet hook: Recommended size to match the yarn thickness.
- Polyester fiberfill: To give the mushroom a firm, sculpted shape.
- Needle: For sewing and embroidering parts.
- Stitch markers: To mark starting and ending points while working in spirals.
- Scissors: For cutting yarn ends.
Step-by-Step Instructions
Part 1: Crocheting the Mushroom Head
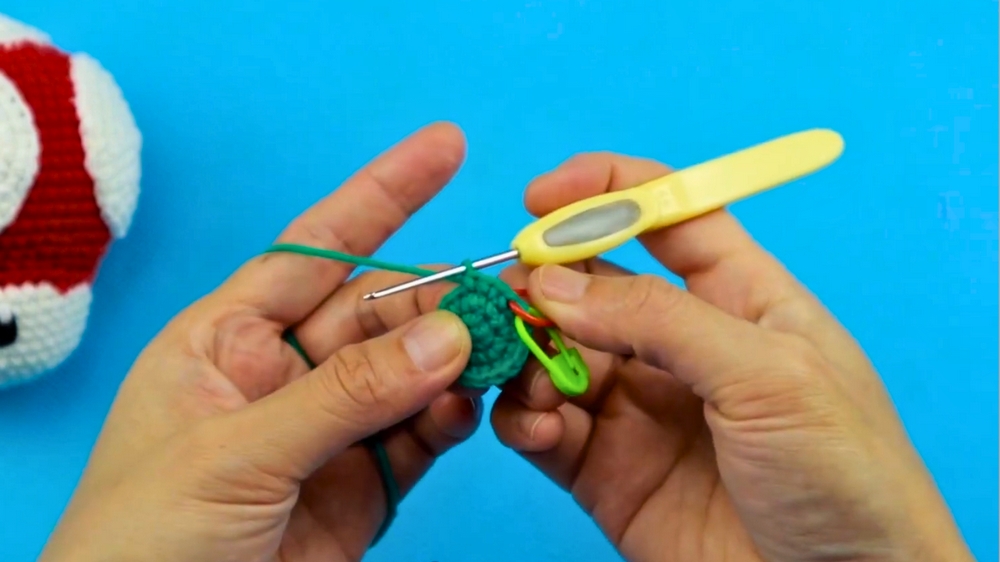
- Round 1 - Magic Ring:
- Create a magic ring with 6 single crochets (SC). Tighten the loop and mark the last stitch to track the round.
- Round 2 - Increases:
- Work 6 increases (represented by the symbol “V”), with 2 SCs in each stitch, bringing the total to 12 stitches.
- Round 3:
- Crochet 1 SC + 1 Increase as a group, repeat 6 times, for a total of 18 stitches.
- Round 4:
- Work 2 SC + 1 Increase as a group, repeat 6 times, for a total of 24 stitches.
- Round 5:
- Work 3 SC + 1 Increase as a group, repeat 6 times, for a total of 30 stitches.
- Rounds 6-20: Follow the provided spiral crochet diagram in the tutorial. This process continues increasing stitches until the head reaches its desired size and shape.
- Rounds 21-24: Reduce stitches by working 9 SC + 1 Decrease as a group, repeating the sequence for six rounds. Use the invisible decrease method by merging the front loops of two consecutive stitches. Follow the diagram to complete the mushroom head.
- Finalizing the Head:
- After finishing, stretch the yarn and leave a long tail for connecting to other parts later. Use a needle to "end-to-end connect" the edge to ensure an even appearance. Fill the mushroom head with fiberfill before fully closing.
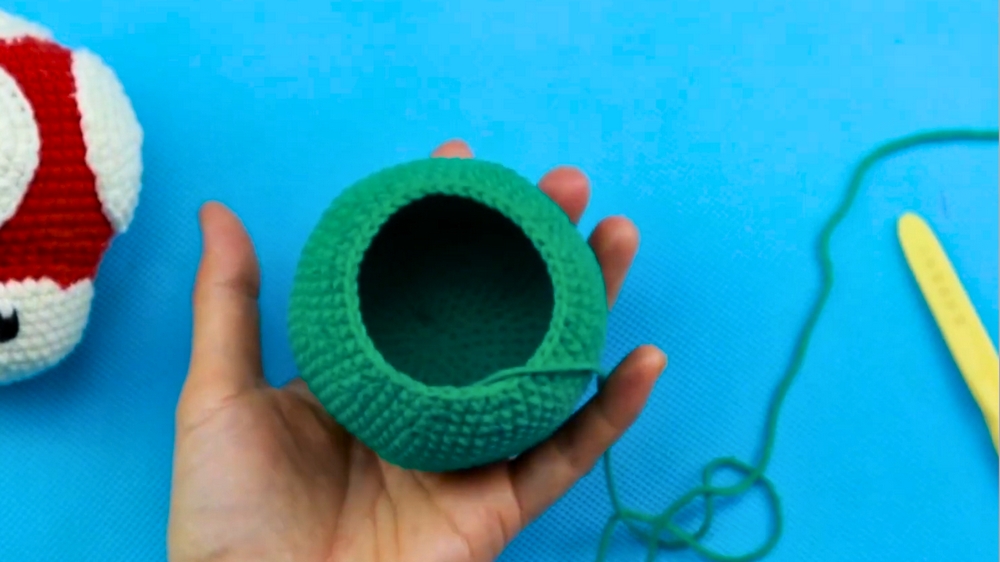
Part 2: Crocheting the Mushroom Column
- Crochet the column part using the same spiral crochet technique shown in the tutorial.
- Follow the diagram closely to shape the column, ensuring it evenly connects to the head.
Part 3: Crocheting Mushroom Spots
- Five Spots: Crochet five identical spots using the provided diagram instructions.
- These spots will later be attached evenly around the mushroom head as decoration.
Part 4: Assembly and Decoration
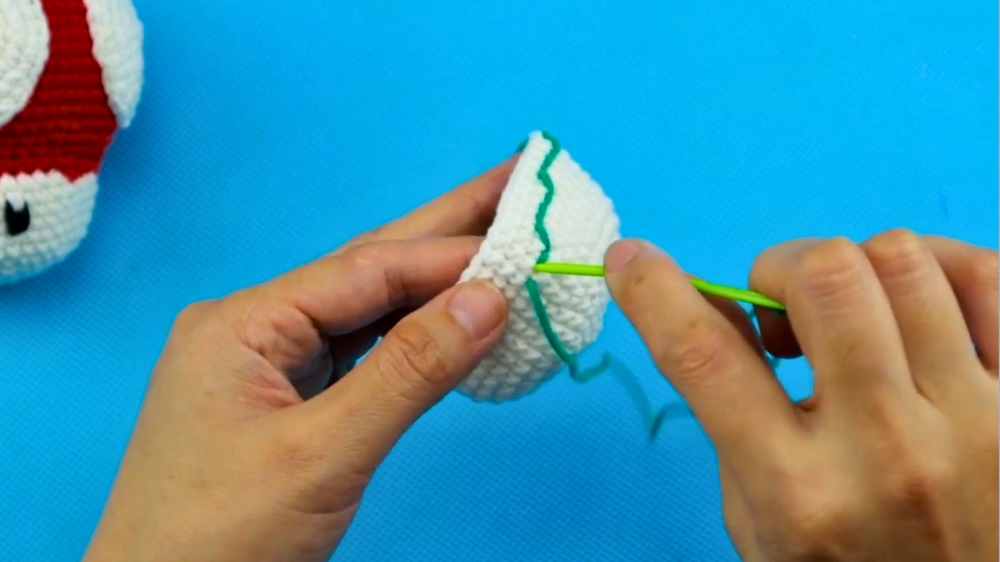
- Connecting the Head and Column:
- Use a green yarn loop to sew the mushroom column to the mushroom head.
- Mark positions on both parts (e.g., count 11 stitches on the head) to ensure alignment for stitching.
- Sew gently through each marked stitch using the needle and green yarn, allowing for slight flexibility to adjust shape if needed.
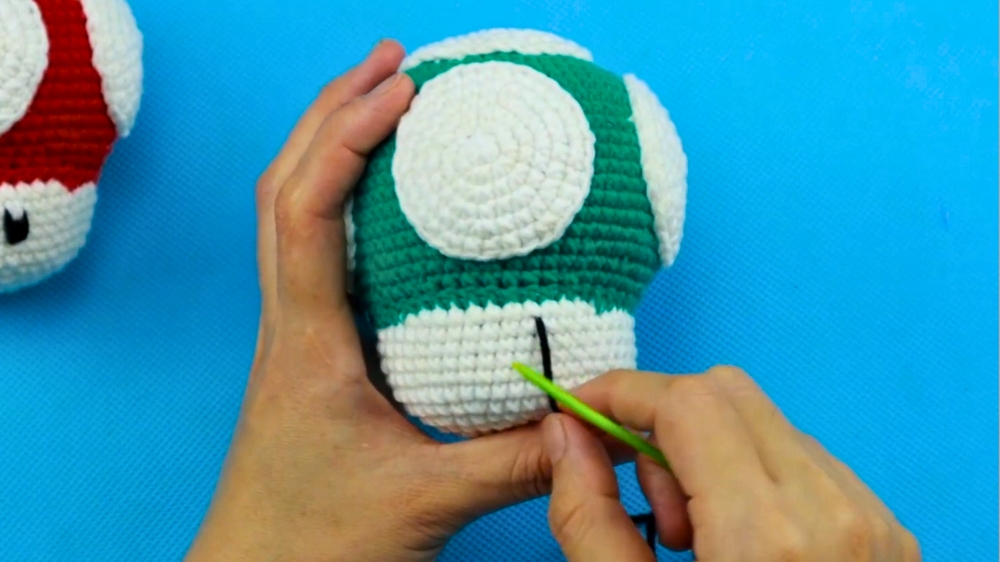
- Fixing Spots:
- Attach the five crocheted spots to the mushroom head using white yarn.
- Use sutures to ensure the spots are evenly arranged around the head (e.g., one at the top center, the rest spaced symmetrically).
- Adding Facial Features:
- Eyes: Use black yarn to embroider semi-loop eyes on the front of the mushroom column, with symmetrical placement.
- White Highlights: Add white yarn details over the black eyes, sketching semi-loops repeatedly for contrast.
- Final Touches:
- Add fiberfill to the column and head to ensure a robust shape.
- Sew edges cleanly to finish off any exposed yarn ends.
Tutor’s Suggestions
- Use Stitch Markers: Marking stitches is particularly important in spiral crochet to avoid mistakes and maintain symmetry.
- Refer to Diagrams: Follow the diagram instructions for rounds 6-20 consistently to avoid stitch miscount.
- Fill Gradually: Fiberfill should be used as parts are completed to avoid difficulty in stuffing smaller sections later.
- Sew with Care: Pay special attention to symmetry when attaching the mushroom spots and facial features for polished results.
Uses of the Mushroom Doll
- Home Décor: A whimsical addition to your shelves or tables.
- Gift: Perfect as a handmade present to friends or loved ones.
- Kids’ Toy: Safe, lightweight, and fun for imaginative play.
- Craft Projects: A great practice piece for beginner and intermediate crochet enthusiasts.
Tip
To create a seamless and polished mushroom doll, maintain consistent crochet tension and pay close attention to alignment during assembly. Double-knot sewn connections for durability, especially if the doll is intended for children.
Conclusion
The Mushroom of Life crochet tutorial is an enjoyable project that showcases foundational crochet techniques, spiral construction, and creative embroidery. Whether used as décor or given as a gift, this whimsical mushroom doll is bound to bring smiles.

Leave a Reply