

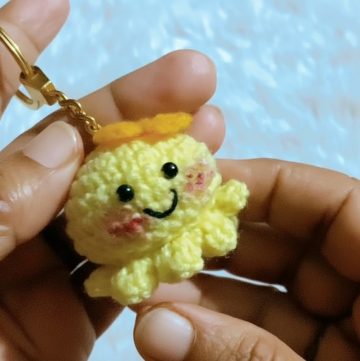
You’re searching for the perfect spooky touch to celebrate Halloween or just want to add a playful charm to your decorations. That's where a crochet ghost pattern comes in. This fun and creative design allows you to craft adorable mini ghosts that can be used in so many ways, hang them as garlands, turn them into keychains, or use them as gift toppers for a unique, handmade touch.
Free Crochet Ghost Pattern That’s for Your Spooky Season

These small projects are beginner-friendly and versatile, making them ideal for anyone who loves quick crochets. Pair them with pumpkins, witches, or bats for a complete Halloween vibe, or simply keep it quirky all year round! The best part? Crocheting these cute ghosts is relaxing, budget-friendly, and lets you personalize them with colors or expressions. A crochet ghost isn’t just decoration, it’s your handmade piece of charm.

Handmade Crochet Ghost Pattern
Finished Size
- Approximately 3.5 inches tall when using 5-ply milk cotton yarn and a 3mm crochet hook.
Gauge
Gauge is not crucial for this project. The size may vary slightly depending on yarn thickness and tension. If you crochet tightly, the ghost will turn out smaller; if loosely, it will be larger.
Materials
- Milk Cotton Yarn:
- White (for the ghost body and hands).
- Black (optional stripe for the hat).
- Pink or blush yarn (for cheeks).
- Purple yarn (for the hat).
- Hook Size: 3mm crochet hook.
- 3.5mm Safety Eyes: Two pieces.
- Scissors.
- Stitch Marker: For marking rounds, especially in continuous crochet.
- Two Darning Needles: For sewing and marking locations.
- Glue: Strong craft glue for securing accessories (optional for magnets/keychains).
- Optional Magnet: If creating a fridge magnet.
Special Techniques
- Magic Ring: Used to start the ghost's body and hat.
- Slip Stitch (sl st): For finishing rounds and shaping scallops.
- Increase: Working two single crochets (sc) into one stitch.
- Yarn Under: Recommended for tighter, neat stitches.
Pattern Instructions
Ghost Body
The ghost body is worked in rounds using white yarn.
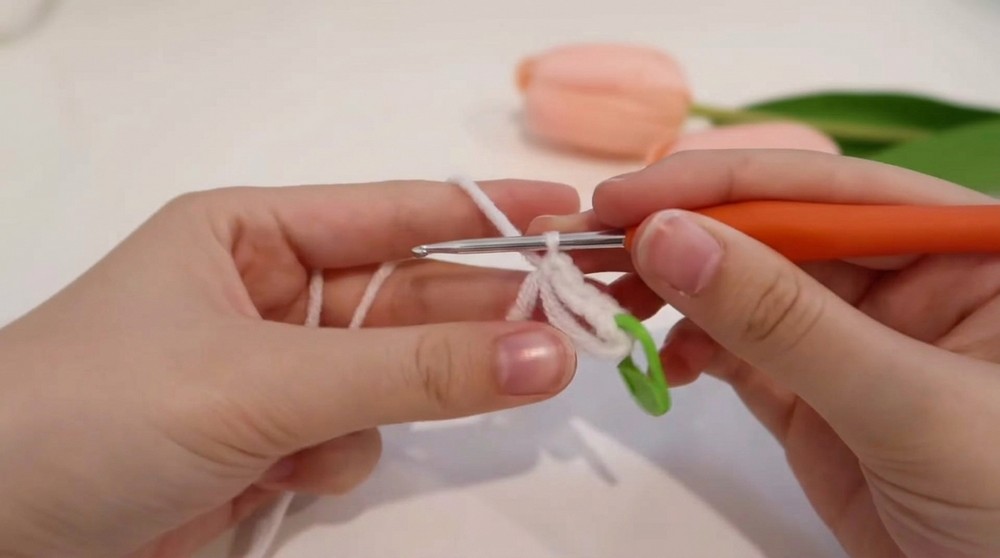
Round 1: Start with a Magic Ring
- Hold the yarn in your right hand and wrap it around two fingers from left hand twice.
- Create a parallel line at the top, hold the end with your thumb, and twist.
- Insert hook under the first loop and grab the second loop. Pull it through and twist clockwise.
- Yarn over to secure the loop and begin crocheting.
Steps for Round 1:
- Place 6 single crochet (sc) into the Magic Ring.
- Tighten the ring by pulling the yarn tail.
- Mark the first stitch of this round using a stitch marker.
Round 2: Increase in every stitch
- Place 2 sc in each stitch of the previous round (12 sts total).
Round 3: Alternating sequence
- Work 1 sc in the first stitch, followed by an increase (2 sc in the same stitch).
- Repeat the sequence (1sc, increase) until the round is complete (18 sts total).
Rounds 4-9: Work height
- Place 1 sc in each stitch for 6 more rounds. This creates the height of the ghost. Remember to flip the piece halfway so you’re working from the outside.

Round 10: Scalloped edging
- In the first stitch, place 3 sc.
- Slip stitch (sl st) into the next stitch.
- Repeat 3 sc, sl st all the way around to create the scalloped edge.
- End the round with a sl st and fasten off.
Eyes & Details
Mark the position of the eyes:
- Count 5 stitches apart, placing the eyes between Round 5 and Round 6. Create small holes using a darning needle for easier insertion.
- Insert safety eyes and secure.
Blush (Cheeks)
Using pink/blush yarn:
- Under each eye, stitch across 2 rows to form a smile-like blush. Be careful not to pull too tightly.

Ghost Hands
Each hand is worked separately.
- Create a slip knot and chain 2.
- Work 1 sc into the second chain from the hook.
- Fasten off, leaving long tails for sewing.
Placement
- Position the hands two rows above the scalloped edge and two stitches away from the eyes.
- Use darning needles to secure. For a neater result, add a dot of glue at the base of each hand.
Ghost's Hat
The hat is constructed using purple yarn. (Switch to black if desired for the hat body.)
Steps for the Hat
- Round 1: Begin with a magic ring and work 6 sc into the ring. Pull to tighten.
- Round 2: Work 1 sc per stitch (6 sts total).
- Round 3: Alternate 1 sc followed by an increase. Repeat (1 sc, inc) all around.
- Round 4: Work 1 sc in each stitch — this creates the cone shape (12 sts).
- Round 5: Form the brim by placing 2 sc into each stitch around.
- Finish the round with a slip stitch. Fasten off and weave in ends.

Optional Black Band
Use black yarn to add a decorative stripe around the brim. Secure it with light glue.
Attachment
Stuff the hat tails into its cavity. Apply glue to the brim and gently press onto the ghost’s head at a slight angle.
Tips and Customization
- Colors: Switch up the yarn colors! Make the ghost pastel for a whimsical look.
- Magnets: Attach a magnet for functional, charming fridge decor.
- Keychain: Place a keychain hook at the top using the yarn tail or glue.
- Accessories: Add bows, facial expressions, or tiny embroidery for more playful variations.
Important Remarks
- Tension: For uniform stitches, maintain consistent tension throughout.
- Adjustment: Count each round meticulously to avoid misalignments.
- Flip Work: Always flip your piece outward during round stitching for better shape.

Conclusion
Congratulations on completing your Halloween crochet ghost! With its charming scalloped edge and miniature hat, this cute ghost is versatile — whether you display it as decor or give it as a thoughtful handmade gift. Ensure your stitches are tight for a polished finish, and don't forget to experiment with colors and accessories for unique creations.


Leave a Reply