

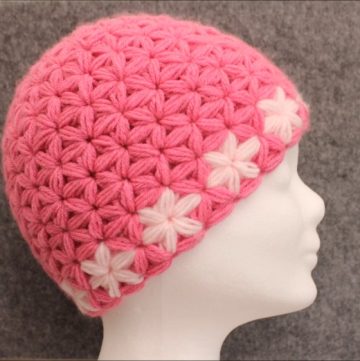
Let's piece together a cute and cozy beanie with the ripple stitch for an added touch of charm. This simple crochet pattern makes for an enjoyable project, turning out a playful and textured hat that stands out. Knitting this beanie, whether for yourself or as a heartfelt present, adds a sprinkle of personality to anyone's wardrobe.
Crochet Beanie

Materials Needed:
- Yarn
- Crochet hook (size compatible with the yarn)
- Scissors
Crochet Pattern:

Cast On
- Start by casting on an odd number of loops. For the example, cast on 15 chain loops.
Row 1 (Setup Row):
- Lift one air loop.
- Insert the hook into the second chain from the hook.
- Make a slip stitch (a connecting stitch).
- Continue making slip stitches in each chain across the row. You should have 15 slip stitches, matching the number of your initial chain loops.
- This will form the front side of the pattern.

Row 2 (Texture Row):
- Create one chain stitch to turn.
- Starting with the second chain from the hook, alternate between a slip stitch and a half double crochet:
Slip Stitch:
- Insert hook, pull up a loop, and complete the slip stitch.

Half Double Crochet:
- Yarn over, insert hook into the next stitch, yarn over and pull through all loops on the hook.
- Continue this pattern across the row, ending with a slip stitch.
After Row 3 (Repeat of Row 1):
- Make one chain stitch to turn.
- Work only slip stitches in each stitch across the row.
- This mirrors the first row and prepares the texture for the next row.

Row 4 (Repeat of Row 2):
- Repeat the sequence of Row 2 where you alternate between a slip stitch and a half double crochet across the row.
Repeat Steps 3-5:
- Continue repeating Rows 3 and 4 until you reach the desired height of your piece.
Finishing:
- Once you have achieved the desired length, cut the yarn and weave in all ends to tidy up your work.
- The resulting fabric will have a textured, mesh-like appearance with a bit of stretch, suitable for hats, scarves, or even snoods.
- The pattern is adaptable and you can use it for many different projects by adjusting the width and length as needed.

Leave a Reply