

Turn yarn into adorable whale keychain with this easy-to-follow crochet pattern that's for keys, bags, or thoughtful gifts packed with ocean-inspired charm.
Ever stopped to admire how small details can transform everyday accessories into something meaningful? A crochet whale keychain pattern is just that, a quirky way to add charm to your keyring, backpacks, or even gift wraps. This adorable sea creature isn't just cute; it’s lightweight, durable, and practical, offering a splash of personality to your belongings.
Quick Crochet Whale Keychain Pattern For Gift Idea
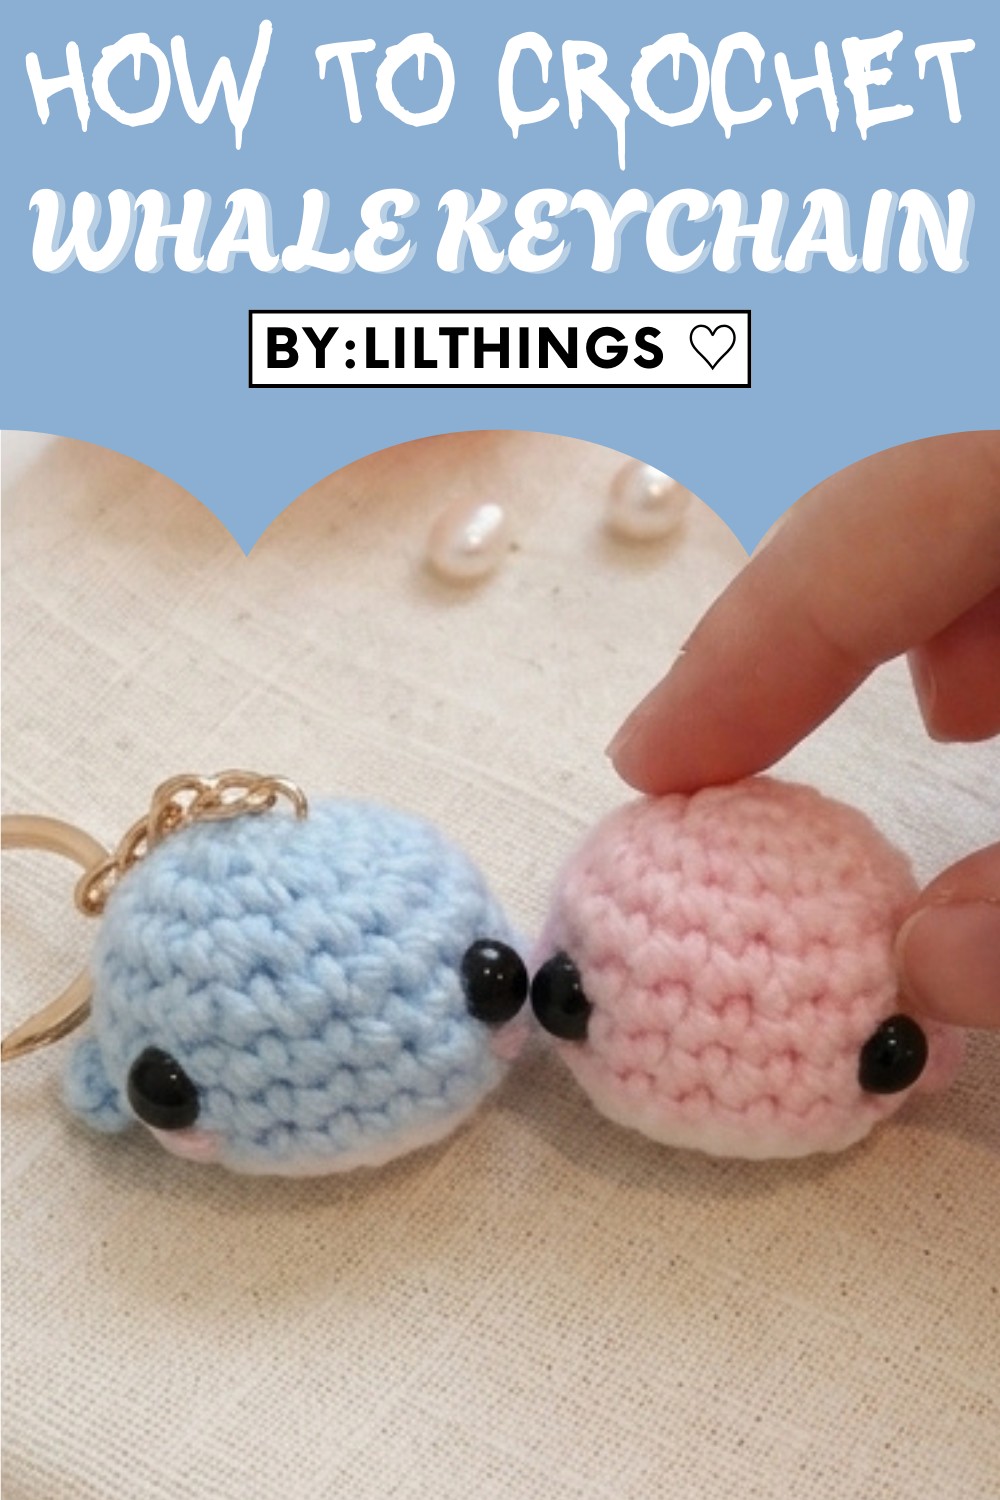
By using soft yarn and playful colors, you can create a unique design perfect for ocean lovers or anyone who enjoys fun, handcrafted items. It’s a great project for beginners since it involves simple stitches and minimal materials. Plus, they make thoughtful, budget-friendly gifts for birthdays or special occasions. Whether styled on beach bags or kids’ zippers, whale keychains deliver both functionality and a sense of creative individuality. Dive into this crochet mini-project and let the ocean-inspired vibes swing along with your keys.

Adorable Crochet Whale Keychain Pattern
Finished Size
- Each whale is approximately 3 inches wide and 2 inches tall when using 5-ply milk cotton yarn and a 3mm crochet hook.
Gauge
Gauge is not critical for this project, but a tight tension is recommended for a neat and stuffed look. Your result may vary slightly depending on yarn type and crochet tension.
Skill Level
Beginner-friendly!
This project includes simple shapes worked in rounds, basic stitches, and color changes. Precision and patience are required to attach stuffing and accessories neatly.
Materials
- Yarn:
- White, Pink, and Blue (5-ply milk cotton yarn).
- Hook: 3mm crochet hook.
- Stuffing: Polyester fiberfill for shaping and fluffing the whales.
- Safety Eyes: Two 6mm safety eyes per whale (total: 4).
- Magnets: Two 10mm wide / 5mm thick magnets (one per whale).
- Keychain Rings: Metal keychains for attachment.
- Pliers: For opening and closing keychain components securely.
- Darning Needle: For sewing and finishing touches.
- Glue: To secure magnets and thread ends.
- Scissors: For cutting yarn and thread.
Special Techniques
- Magic Ring: Used to start round shapes easily.
- Decreases: Combining two stitches into one to narrow the shape.
- Attaching Accessories: This includes safety eyes, magnets, blush embroidery, and keychain rings.
Pattern Instructions
Whale Body
Both whales are made in the same way, with differences in yarn color and magnet placement. Start with white yarn for the base and switch to the whale's body color (Pink/Blue) for the body.
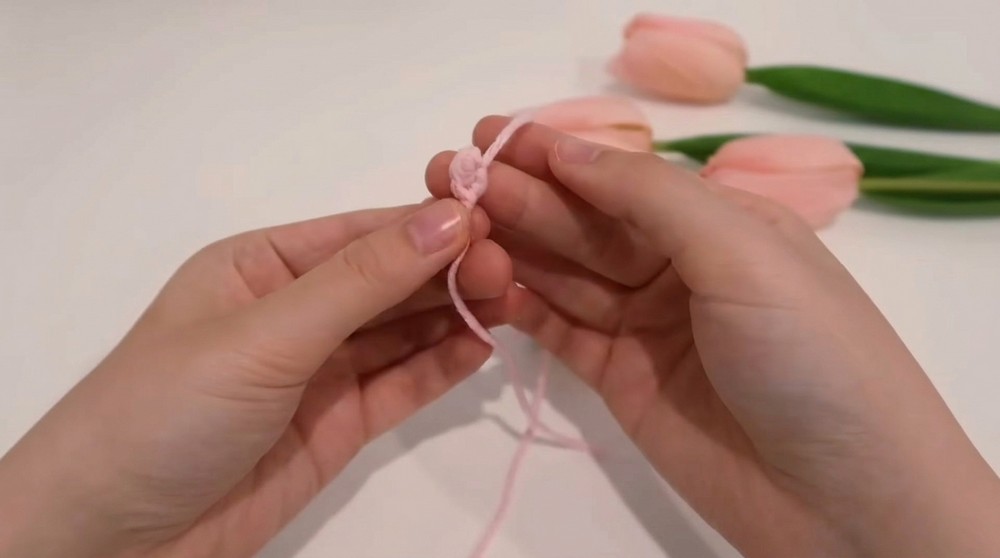
Step 1: Magic Ring & Round 1
- Create a magic ring: Wrap white yarn twice around two fingers and thread the hook under the first loop, pulling the second loop through the first.
- Chain 1 and work 6 single crochets (sc) into the ring.
- Pull the magic ring tail tightly to close the gap.
Round 2
Work 6 increases (2 sc per stitch) — 12 stitches total.

Round 3
Alternate: 1 sc + 1 increase (2 sc in one stitch). Repeat this sequence 6 times — 18 stitches total.
Switch to Whale Body Color (Round 4–8)
- Color change: Complete the last stitch of Round 3 but pull through with the whale’s body color (Pink/Blue yarn). Cut the white yarn tail and secure it.
- Round 4–8: Work 1 sc per stitch for each round without increases — this creates depth for the whale.
- Place stitch markers for each new round to keep track.

Eyes & Magnet Placement
- Insert Safety Eyes:
- Position the whale upside down (opening facing the table).
- Find the midpoint between the color change round and the front of the whale.
- Insert eyes 5 stitches apart, approximately 2 rounds higher than the color change line.
- Add Magnet Inside:
- Apply glue to one side of the magnet.
- Stick it inside the whale, between the eyes.
- Use the second magnet to align placement and let the glue dry.

Stuffing
- Lightly stuff the whale until it's firm but not overfilled.
- Ensure stuffing reaches under the eyes for a rounded shape and avoid excessive filling during closure rounds.
Rounding Off (Closing the Whale)
Round 9: Decreasing
- Alternate 1 sc + 1 decrease:
- Work decreases by inserting the hook into the front loops only of two consecutive stitches.
- Pull through the two loops together, then complete the stitch.
- Continue the decrease pattern until all stitches are used, closing the opening into a smaller circle.
Sealing the Top
- Pull a large loop using the leftover tail and cut the yarn.
- Thread the darning needle with the yarn tail and sew through the front loops of the stitches in the final round.
- Pull gently to close the circle completely, securing the hole.
- Tie and weave the yarn tail, ensuring smooth edges.

Make Fins & Tail
Side Fins
- Chain 2: Begin with a slip knot and chain 2.
- Place 1 sc into the second chain from Hook.
- Fasten off: Pull through with a longer tail for sewing.
Repeat for the second fin.
Tail
- Start with a magic ring.
- Place 2 sc + 1 double crochet (dc) into the ring.
- Pull the tail to close the circle.
- Fasten off with enough thread for sewing.
Repeat for the second tail.
Attach Fins and Tail
- Position the fins midway between the eyes and the tail area.
- Use a darning needle to sew each fin securely with invisible stitches.
- Attach the tail centered on the back of the whale, aligning between the color change row and whale midpoint.
- Add a dot of glue for added security and durability.
Customize with Blush
- Thread pink yarn and embroider blush marks beneath each eye by stitching across two stitches.
- Ensure gentle tension to create smooth, natural curves for blush detail.
Keychain Customization
- Attach Letters:
- Use a plier to open the top chain and slide in metal letters representing initials or names.
- Close the chain securely.
- Attach Keychain:
- Open the bottom chain.
- Insert it into the top center of the whale’s head to finalize the charm.
- Close the chain firmly using pliers.
Tips and Customization
- Colors: Personalize the whales with custom shades, such as pastel pink and mint green, or traditional blue and gray tones.
- Magnets: Ensure magnets are aligned correctly for the whales to “kiss” when brought together.
- Eyes: Use larger safety eyes or embroidery for more detailed expressions.
- Stuffing: Avoid overstuffing to ensure smooth stitching during closure rounds.
Conclusion
Congratulations! You’ve completed a lovely pair of crocheted kissing whales. These handmade charms are versatile — great as keychains, gifts, or decorative magnets. The magnet feature makes them interactive and even more adorable, allowing them to “kiss” when brought together.
Important Remarks
- Secure Accessories: Magnets, keychains, and blush embroidery should be attached firmly for a polished finish.
- Symmetry: Position fins and tails carefully to ensure the whales appear symmetrical and visually balanced.
- Experiment: Consider adding bows, embroidery, or unique expressions to make the whales even more special.


Leave a Reply