

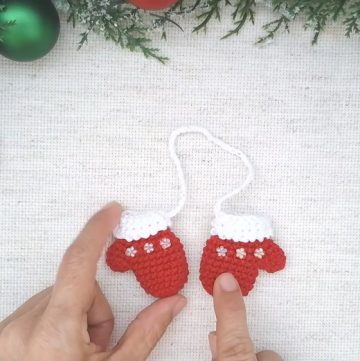
Wrap yourself in cozy style with the Free Crochet Scarf Pattern, adding a soft, handmade accessory perfect for warmth, fashion, and thoughtful gifts
As temperatures drop and crisp air settles in, scarves have long been cherished for their combination of warmth and style. The Free Crochet Scarf pattern offers a versatile, accessory that brings both comfort and personality to any wardrobe. Its soft yarn and cozy texture make it ideal for layering over coats, sweaters, or casual outfits, providing gentle warmth without sacrificing style.
Playful Crochet Scarf Pattern to Brighten Your Wardrobe

This scarf’s simple yet elegant stitches allow it to drape beautifully, making it suitable for both everyday wear and special occasions. Its flexibility in length and width means it can be tailored to personal preferences, whether wrapped snugly around the neck for extra warmth or loosely draped for a relaxed, chic look. Beyond its functional benefits, this pattern encourages mindfulness and focus, offering a satisfying project for those who enjoy hands-on creativity.
The Free Crochet Scarf pattern also doubles as a thoughtful handmade gift, perfect for friends, family, or coworkers, bringing a personal touch to winter wardrobes. Combining comfort, practicality, and charm, this scarf adds a subtle yet distinctive flair to any ensemble, offering warmth and style simultaneously. Its handcrafted quality ensures it remains a timeless accessory, ready to brighten cold days with both fashion and function.

Special Features
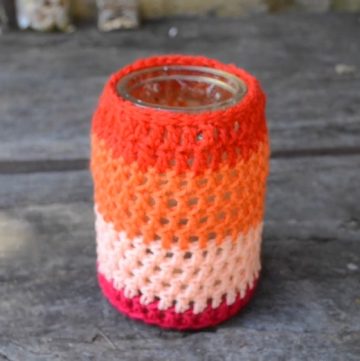
- Straightforward Pattern: The entire project is based on rows and rounds of double crochet stitches, which are easy to master.
- Customizable Size: You can make the cup taller or shorter by adjusting the number of rows in the body of the cup.
- Durable: The use of 100% acrylic yarn creates a sturdy and long-lasting cup.
- Versatility: Can be used for various purposes, including as a decorative piece, small storage, or as part of a crocheted gift set.
Level of Difficulty
This project is classified as beginner-friendly, with some elements that advanced beginners or intermediate crocheters will enjoy:
- Basic skills required include working in the round, creating a magic ring, and crocheting double crochets.
- Slightly more advanced elements include increasing stitches for shaping and assembling the parts together.
Materials Needed
- Yarn: 100% acrylic yarn (any color). The tutorial used “Jan 12 I” yarn.
- Crochet Hook: 3.5mm crochet hook, as recommended in the video.
- Scissors: To cut off yarn ends neatly.
- Yarn Needle: For weaving in ends.
Optional:
- Stitch Markers: To keep track of the rows and stitches.
Step-by-Step Details
Part 1: Creating the Base of the Cup (Bottom)
- Create the Foundation Chain:
- Begin with a chain of 11 stitches.
- Count and double-check to confirm you have exactly 11 chains.
- Work the First Row:
- Make a double crochet into the 3rd chain from the hook.
- Continue crocheting 1 double crochet into every chain across. This should result in 10 double crochets in total.
- Work the Second Row:
- Chain 3 (this counts as your first double crochet of the row).
- Continue by crocheting 1 double crochet in each stitch across, ensuring you again have 10 double crochets by the end.
- Repeat for 10 Rows Total:
- Continue this pattern (chaining 3 at the beginning and double crocheting across) for 10 rows.
- If you want your cup to be taller, you can add additional rows (e.g., 12-15 rows).


Part 2: Joining the Base Edges
- Slip Stitch to Join Edges:
- Once you’ve finished the base rows (10 or more rows, depending on your preference), fold the piece so the edges align.
- Use slip stitches to join both edges together, forming a flat cylinder.
- Ensure Tight and Neat Joins:
- Work slowly to ensure no gaps between stitches.
- Trim and weave any loose yarn ends.

Part 3: Shaping the Body of the Cup
- Start the Cup Body:
- After completing the base, chain 3 and turn your work.
- Crochet 3 double crochets into the same stitch at the start of the row.
- Increase the Stitches for Shaping:
- Crochet 2 double crochets into each stitch in the next few rows.
- Follow this pattern until the total stitch count increases to 24 for the row.
- Continue Building the Body:
- For the next rows, focus on maintaining a stitch count of 24 stitches, working one double crochet into each stitch.
- The steady count ensures the sides of the cup remain straight.

Part 4: Finishing Touches
- Creating the Rim:
- Work the last two rows in single crochet to create a more defined and tighter edge for the top of the cup.
- Chain 1 at the beginning of each finishing row before working single crochet stitches across.
- Optional Decorations:
- Add small embellishments to the cup, such as embroidered designs, crocheted flowers, or even a handle if desired.
- The instructor references other videos for creating flowers or additional decorations that could be used.
Tutor’s Suggestions
- Count Your Stitches: Always confirm your stitch count at the end of each row to avoid accidental increases or decreases.
- Work Loosely on Increases: When crocheting 2 or 3 double crochets into the same stitch, keep your stitches slightly loose for a smoother finish.
- Customize the Height: Modify the number of rows to make the cup taller, shorter, or even wider depending on your needs.
- Experiment with Colors: Use different yarn colors to create a striped or patterned cup.
Uses of the Crochet Cup
- Decorative Piece: Display the cup on tables or shelves as part of your home décor.
- Small Storage: Use it to store small items like keys, coins, or hair accessories.
- Pins or Craft Accessories: It can serve as a mini storage for sewing pins, buttons, or other small crafting supplies.
- Kids’ Play Set: Create a full set of crocheted cups for a fun play kitchen or tea party set for children.
Tip
For extra sturdiness and shape, use a smaller hook size than recommended for your yarn. This helps create tighter stitches and a firmer structure for the cup. Alternatively, you can lightly starch the finished piece for added rigidity.
Conclusion
This crochet cup project is a versatile, beginner-friendly pattern that allows you to practice foundational skills like double crochet stitches and shaping. The easy-to-follow pattern ensures a polished and functional finished product that can be used for decoration, storage, or gifting.
Leave a Reply