

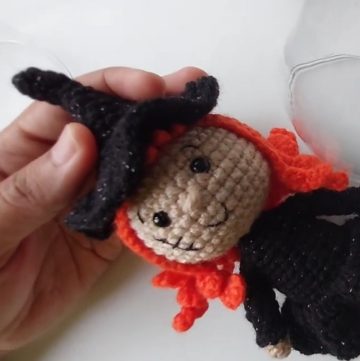
Zoom into Halloween fun with the Free Crochet Halloween Witch Hat Pattern, adding handmade charm and playful festive flair to décor and gifts.
Whoosh into Halloween fun with the Free Crochet Halloween Witch Hat pattern, turning yarn into whimsical décor, playful costume accents, or charming handmade gifts. Perfect for tabletops, mantel displays, or party décor, this project adds movement and festive flair to any space. Beyond decoration, it encourages focus and mindfulness, as each stitch promotes hand-eye coordination and fine motor skills while offering a satisfying creative outlet.
Playful Crochet Halloween Witch Hat Pattern for Table & Shelf Displays

Its versatile structure allows customization through color choices, sizing, or small embellishments, making every hat uniquely personal. Multiple hats can be grouped into centerpieces, garlands, or festive arrangements, enhancing visual impact and seasonal spirit. This project also makes a thoughtful, handmade gift, giving a personal touch that store-bought items cannot replicate.
Each completed hat transforms simple yarn into a delightful piece that celebrates creativity, handmade artistry, and the playful energy of Halloween. With its whimsical charm and functional appeal, the crochet witch hat brings warmth, character, and festive joy to homes, gatherings, and celebrations, making the spooky season even more memorable and engaging.

Special Features
- Festive and Fun Design:
- The hat’s Halloween-inspired aesthetic can be customized with various colors to match different themes, such as black, purple, or green.
- Multipurpose Use:
- The finished hat can become a decorative hairband, a stylish heel clip, or even a party favor for Halloween.
- Curly Accent Top:
- A distinctive curly “tail” on top adds personality to the hat, enhancing its charm.
- Customizable Materials and Colors:
- The design allows for personalization with different yarns, fabric, and embellishments.
- Beginner-Friendly Stitches:
- Even though it includes multiple steps, the project uses accessible stitches such as chains, single crochet (SC), and slip stitches.
Level of Difficulty
- Beginner-Friendly to Intermediate:
- While the project uses basic crochet stitches, it involves a few techniques like the magic circle and creating the curly accent. These are explained thoroughly in the tutorial, making it approachable for beginners with some experience.
Tutor’s Suggestions
- Measure Yarn in Advance:
- Begin by measuring 100 cm of yarn for the curly top at the start to avoid cutting mid-project.
- Use the Right Yarn:
- Coco recommends stiff acrylic yarn for better structure and durability of the hat.
- Stitch Marker Usage:
- For beginners, using a stitch marker is advised to keep track of rounds and avoid confusion.
- Hide Ends Neatly:
- Coco shares tips on how to hide loose ends using a yarn needle for a clean finish.
- Creative Attachments:
- Consider attaching the hat to different base materials, such as matching fabric or clips, for a tailored look.
Materials Needed
- Yarn:
- Acrylic yarn (4-ply or 5-ply) in Halloween-inspired colors like orange, black, purple, or green.
- Hook:
- A 2.5 mm crochet hook.
- Fabric:
- Felt fabric in a color that matches the hat.
- Stuffing:
- Optional stuffing material like polyester fill for structure.
- Accessories:
- Hairbands or heel clips to turn the hat into wearable items.
- Tools:
- Yarn needle, scissors, hot glue gun, and a ruler or any circular object to draw precise shapes.
Part 1: Creating the Main Body of the Hat
Step 1: Magic Circle Foundation
- Start by creating a magic circle with your yarn.
- Work 6 single crochets (SC) into the magic circle and pull it tight to close.
- Secure the round with a slip stitch and chain one to begin the next round.

Step 2: Building the Hat Body
- Continue working in rounds to expand the hat:
- Round 2: Single crochet (SC) into each stitch from the previous round (6 stitches in total).
- Round 3: Increase the size by working 2 single crochets (SC) into each stitch (12 total).
- Subsequent Rounds: Alternate between even rounds of SCs and increased rounds to shape the cone.
- As you complete rounds, the cone shape for the hat will gradually form.
Step 3: Creating the Brim
- To create the hat’s brim, work treble crochet (TR) stitches around the edge of the last round.
- Continue the TR stitches evenly to create a wide, flared brim.

Part 2: Adding the Curly Top and Assembling the Accessories
Step 4: Adding the Curly Top
- Use the 100 cm of yarn you set aside at the beginning.
- Insert your hook into any stitch at the top of the hat.
- Chain 15 stitches to start the curl.
- Go back and work one single crochet (SC) into each stitch, moving toward the start of the chain.
- Secure the curl by slip stitching into a nearby stitch at the top of the hat.
- Cut the yarn, pull the end through, and weave in loose ends.
- The curl will naturally twist into shape once finished.

Step 5: Preparing the Felt Base
- Using a soft ruler, draw a circular shape on felt fabric slightly smaller than the hat’s brim but larger than the hole at the base.
- Cut the circle from the fabric to use as a backing.
- If using a heel clip, fold the felt in half and cut a small slit to insert the clip.
Step 6: Stuffing the Hat (Optional)
- Fill the hat with stuffing material, such as polyester fill, to give it structure.

Step 7: Attaching the Hat to Accessories
- Attaching to Fabric:
- Use a hot glue gun to apply glue to the bottom of the hat’s brim.
- Press the felt circle onto the base, securing the hat and covering the hole.
- Attaching to Heel Clip:
- Insert the prepared heel clip through the slit in the felt before gluing it to the hat.
- Attaching to Hairbands:
- Glue the finished hat onto a hairband at the desired position.
Uses
- Halloween accessories for costumes, parties, or trick-or-treat outings.
- Party favors or decorations for Halloween-themed gatherings.
- Gifts for friends and family during the holiday season.
Tutor's Tip
To ensure a smooth and polished result, hide all loose ends by threading them through the stitches at the back of your work. If you forgot to hide them as you go, use a yarn needle to secure them neatly.
Conclusion
Coco Crochet’s Halloween Witch Hat tutorial provides a delightful and customizable way to add unique, handmade touches to your Halloween wardrobe. With clear instructions and room for creativity, this project is perfect for beginners and seasoned crocheters alike. Whether you choose to attach the hat to a hairband, heel clip, or other accessory, it’s a versatile piece that can match any spooky theme.

Leave a Reply