

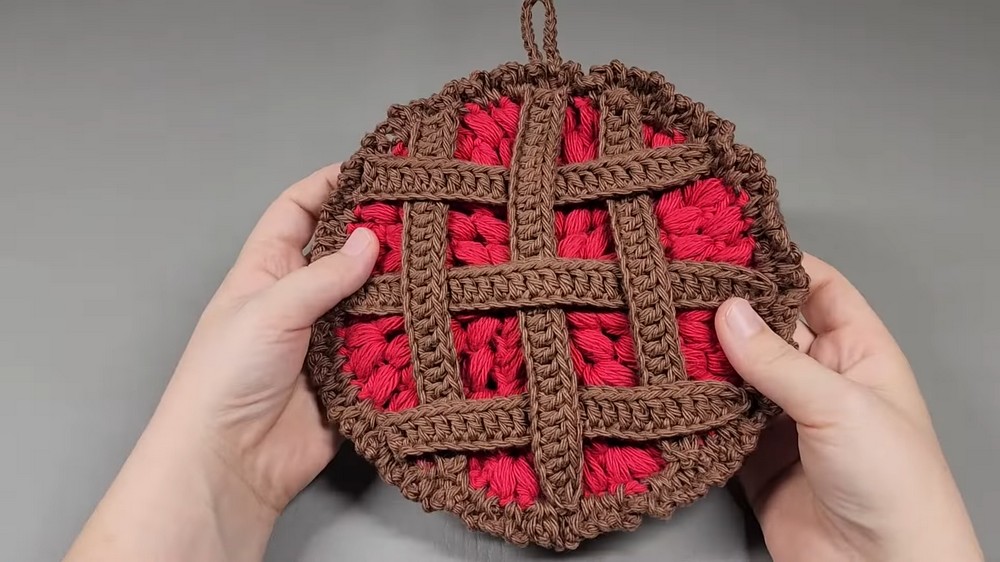
Protect surfaces with the Free Crochet Pie Hotpad Pattern, a charming and practical kitchen companion perfect for handling hot dishes safely.
In bustling kitchens where meals are shared and laughter fills the air, a small yet essential accessory often prevents burns and protects surfaces. The Free Crochet Pie Hotpad transforms simple yarn into a functional and charming kitchen companion, adding a touch of warmth and creativity to everyday cooking.
How This Crochet Pie Hotpad Pattern Keeps Surfaces Safe

The process begins with a sturdy base that ensures heat resistance while maintaining flexibility, allowing it to hold hot dishes securely. Carefully crafted stitches form a circular pie-like shape, giving it both visual appeal and practical grip. Midway through, attention to thickness and texture ensures durability while keeping the hotpad lightweight and easy to handle. The finishing rounds add subtle details, enhancing both function and charm, making it a standout piece on any countertop or dining table.
Beyond its practical use, this crochet hotpad brings a personal touch to the kitchen. It protects surfaces, assists in safely handling hot cookware, and even doubles as a decorative accent when not in use. The Free Crochet Pie Hotpad Pattern combines functionality with handmade artistry, making it perfect for gifting, holiday gatherings, or daily kitchen tasks. Its playful yet practical design ensures it remains both a useful tool and a delightful conversation starter, adding warmth and personality to every meal preparation.
Materials Needed
- Yarn Options:
- Acrylic Yarn (e.g., Red Heart Super Saver Buff for the crust and colored yarn for the "filling").
- Cotton Yarn (e.g., Village Yarn Craft Cotton). Both work for this project.
- Yarn Quantities: Approximately 115 yards for the crust color and less for the filling.
- Crochet Hooks:
- 6 mm hook for the pie filling.
- 5 mm hook for the lattice and crust.
- Additional Supplies:
- Yarn needle (for sewing lattice onto the hot pad).
- Scissors.
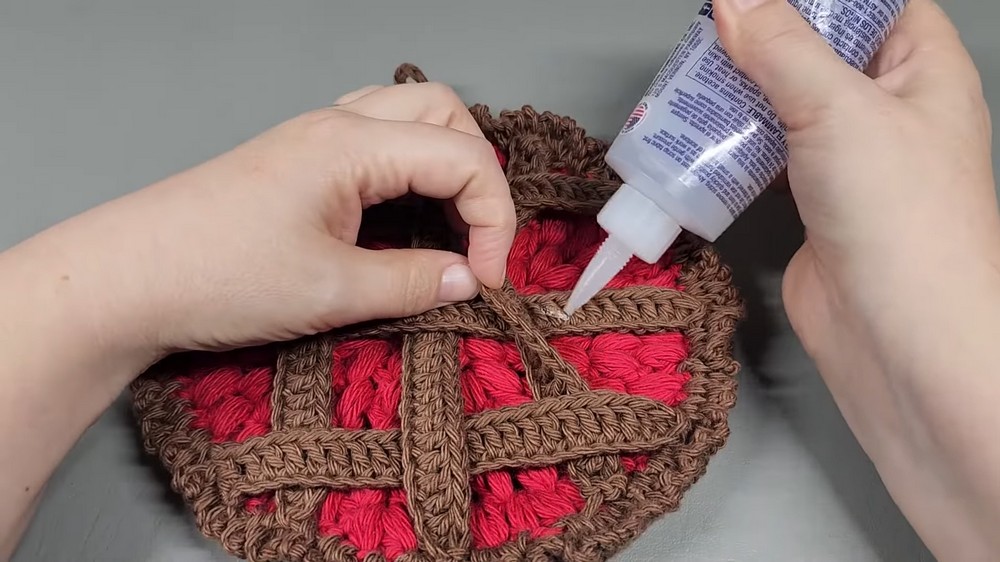
- Optional: Fabric glue to secure lattice intersections.
Special Features
- Charming Pie Design: The hot pads replicate pies with realistic lattice tops and puff-stitch fillings.
- Durability: Both acrylic and cotton yarns hold up well under hot pans as counter protectors.
- Customizable: Select different colors for various "pie fillings" (e.g., red for cherry, yellow for lemon).
- Thick Padding: Puff stitches create a dense texture, making the pad sturdy and heat-resistant.
Level of Difficulty
The project is beginner to intermediate-friendly. While the stitches used (puff stitch, double crochet, slip stitch, and chain stitch) are basic, assembling the lattice and pie crust requires attention to detail. Additionally, switching hooks for different parts of the project might challenge new crocheters.
Tutor’s Suggestions
- Material Choice: While both acrylic and cotton yarns work, the tutor emphasizes that these pads are meant to be trivets (for setting hot pans on a counter)—not for removing items from the oven.
- Color Matching: The tutor recommends finding a yarn color close to “buff” for a more realistic crust, as darker crusts may appear burnt.
- Even Stitching: Use consistent tension, especially when sewing the lattice to maintain symmetry.
- Ask for Help: The tutor encourages viewers to email her with questions if instructions seem unclear.
Step-by-Step Instructions
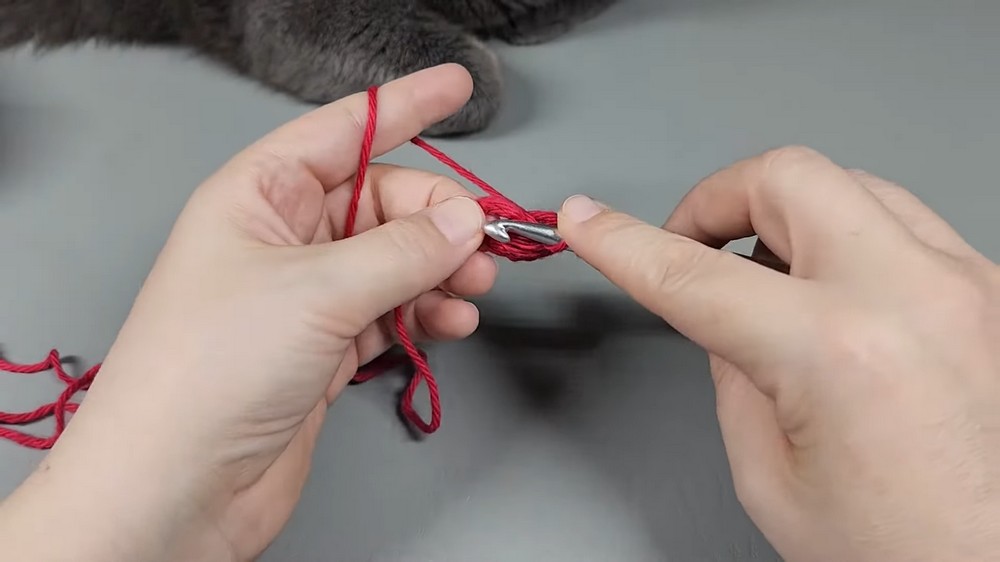
1. Crochet the Pie Filling (6 mm Hook)
Round 1: Foundation
- Create a slip knot and chain 5. Slip stitch into the first chain to form a ring.
- Work 4 puff stitches into the ring:
- Yarn over, insert the hook into the ring, pull up a loop (repeat 4 times).
- You should have 9 loops on the hook. Pull through all loops and chain 1 to complete.
- Slip stitch into the top of the first puff to close the round.
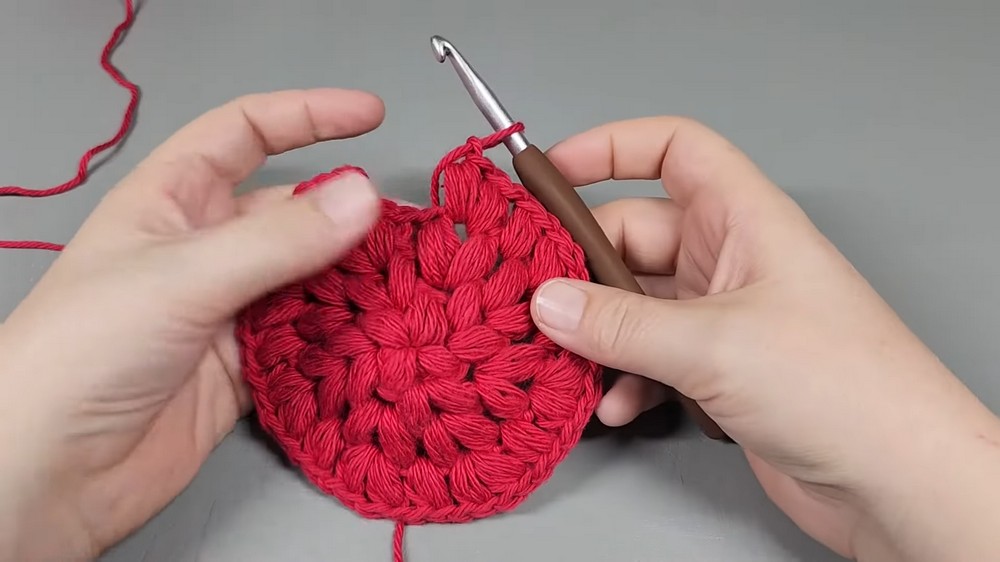
Rounds 2–6: Building the Filling
- Round 2: Work 2 puff stitches into each space between puffs from the previous round.
- Round 3–6: Gradually increase by placing 2 puff stitches in each space where an increase is needed, and 1 puff in-between increases as the circle grows.
- Slip stitch to close each round, ending with 43 puffs on the final round.
2. Crochet the Pie Crust Bottom (5 mm Hook)
Round 1: Foundation
- Chain 5, slip stitch into the first chain to form a ring, and work 12 double crochets into the ring.
- Slip stitch to the top of the first double crochet to close.
Rounds 2–7: Expanding the Circle
- Round 2: Work 2 double crochets in each stitch to double the stitch count (24 total stitches).
- For subsequent rounds, follow this pattern:
- Increase in the first stitch of each segment.
- Add 1 more double crochet in each segment per round (e.g., Round 3: 1 DC between increases, Round 4: 2 DC, etc.).
- End with a final round of back-loop double crochets to define the crust edge.
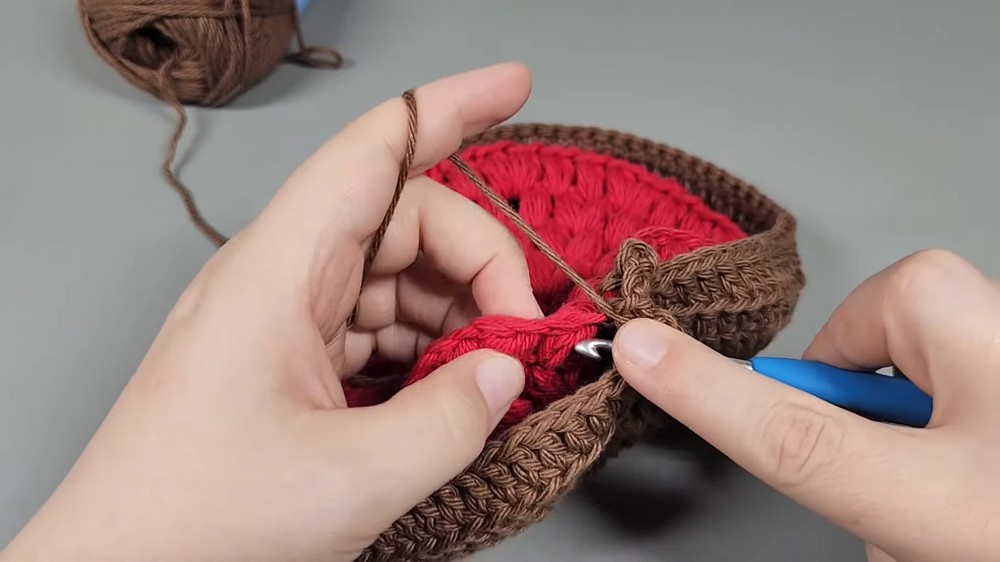
3. Assemble the Pieces
- Place the pie filling inside the pie crust with the right side up.
- Using the crust yarn, single-crochet around the edges, joining the filling and crust together. Add a hanger by chaining 16 and attaching it to the top of the pad.
4. Crochet the Lattice Strips (5 mm Hook)
Lattice Dimensions
- Make 4 strips of 25 chains each.
- Make 2 strips of 30 chains each.
- Double-crochet across each strip.
Attach the Lattice
- Position two long strips vertically and horizontally over the filling. Sew them securely into place.
- Weave the shorter strips under and over the long ones to create the lattice effect. Sew the ends of each strip to the pie crust edges, ensuring stability.
Uses
- Trivets: Place hot pans, dishes, or casseroles on these pads to protect your counters and tables.
- Decor: These make charming, decorative items, perfect for kitchens or as gifts.
- Gift Idea: A creative and personalized handmade present for friends or family.
Tip
For the lattice top, use a small dot of fabric glue at each intersection to ensure the strips remain in perfect alignment. This step is optional but helps maintain the symmetrical pie look.
Conclusion
Crochet pie hot pads are a clever and functional project that combines creativity with practicality. Whether you're crafting them as gifts or for your own kitchen, these pie trivets will surely brighten any counter or table with their quirky, vintage-inspired charm. With just a few materials, a couple of hooks, and creative flair, you can whip up a variety of “pies” in different flavors. Not only are they easy to care for, but they’re also a sweet reminder of handmade warmth and artistry.
Leave a Reply