

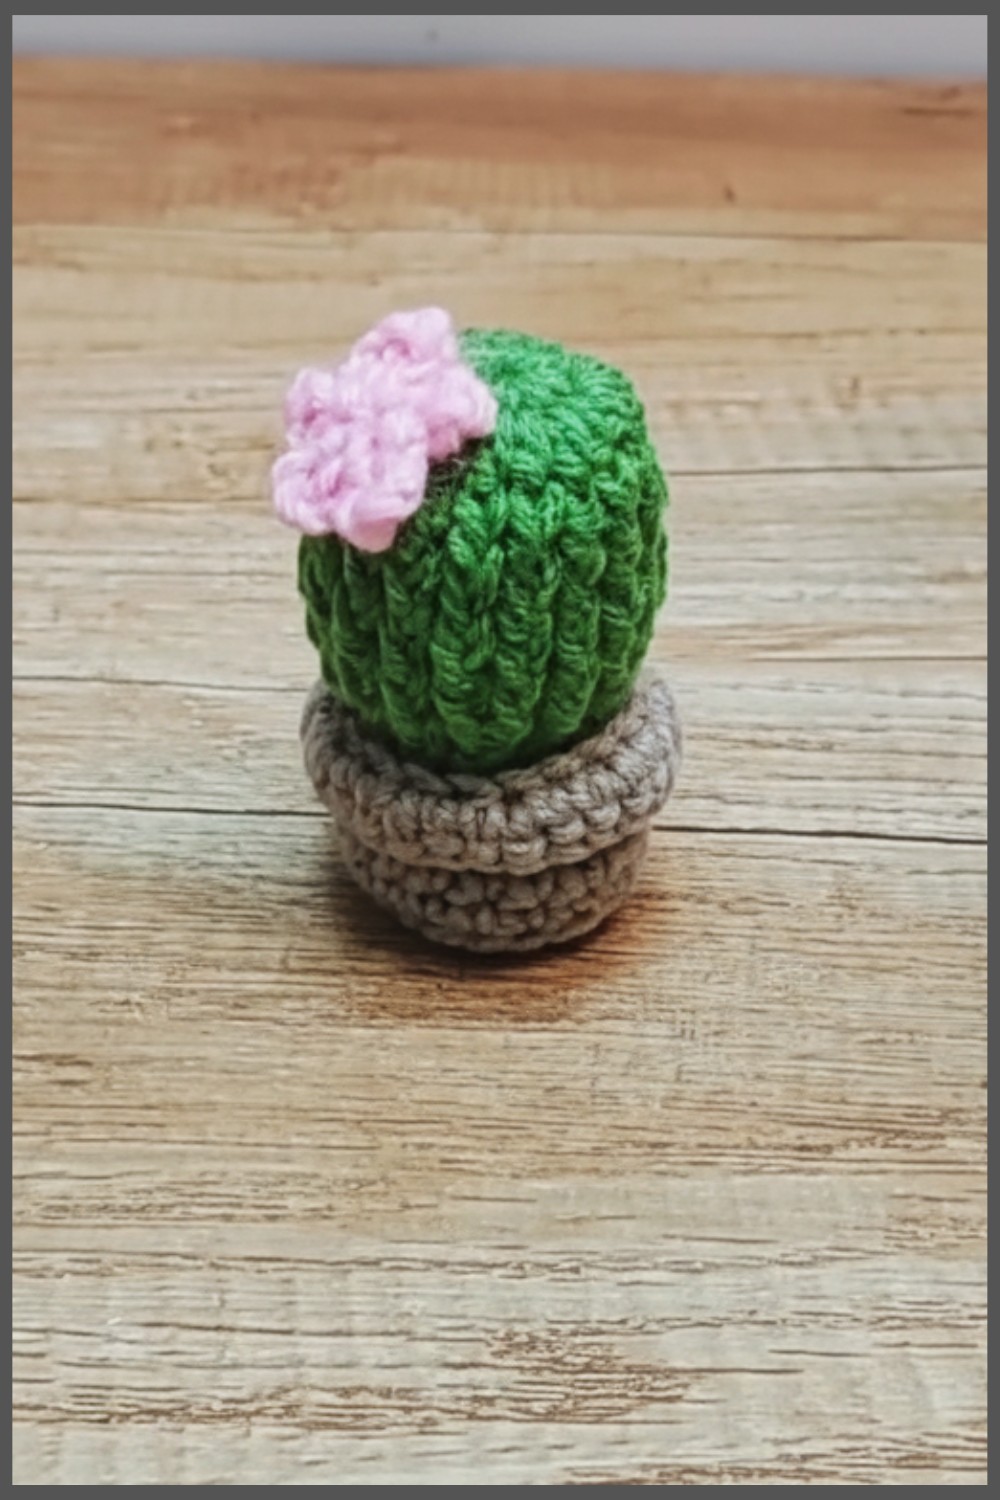
Fill your space with charm using Crochet Cactus Pot Pattern, perfect for decorating any room or desk with a touch of lasting green beauty.
Brighten up any room with a tiny touch of handmade charm that feels alive without any care. Perfect for a desk, windowsill, or cozy corner, this Crochet Cactus Pot Pattern brings happiness and color to any space. Soft yet sturdy it makes a wonderful gift for a friend, family member, or anyone who loves cute and unique décor. With a fun and playful look it can sit on a shelf or table and instantly lift the mood of a room.
Twisty Crochet Cactus Pot Pattern for Home or Office
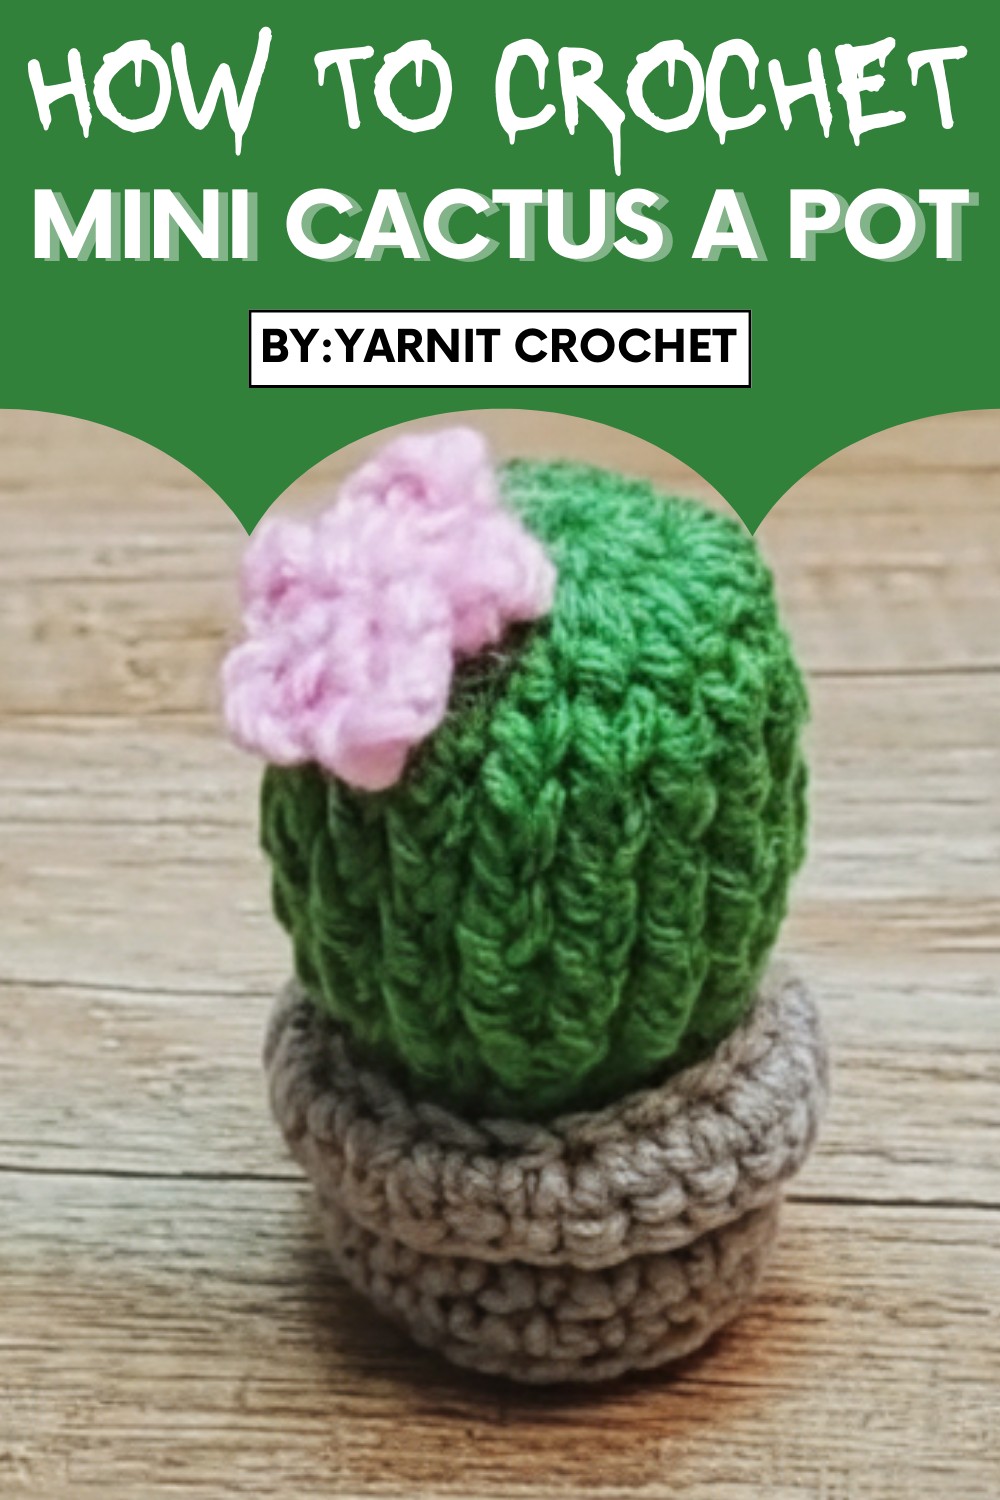
Using yarn and a few simple stitches you can make it in many colors and sizes, creating a piece that feels personal and cheerful. The Crochet Cactus Pot pattern shows step by step how to make this delightful pot bloom indoors forever. Whether you are a beginner or just want a relaxing project the process is soothing and rewarding. Every finished cactus is a little masterpiece that spreads warmth and charm wherever it goes.

Materials List
Yarn
- 3-ply yarn in three colors:
- Green: For the cactus.
- Brown (or any preference): For the pot.
- Any contrasting color (e.g., pink): For the flower.
Crochet Hook
- 3 mm hook
Other Tools
- Yarn Needle: For sewing and weaving in ends.
- Scissors: To cut yarn.
- Fiberfill or Stuffing: To fill the cactus and pot.
- Glue Gun (optional): For attaching the cactus, flower, or securing keychain attachments.
Key Abbreviations
- MR: Magic Ring
- ch: Chain
- sc: Single Crochet
- hdc: Half Double Crochet
- dc: Double Crochet
- sl st: Slip Stitch
- inc: Increase (2 stitches in the same stitch)
- fpdc: Front Post Double Crochet
- decrease: Combining two stitches into one.
Special Notes
- This pattern is structured in three distinct parts: cactus, pot, and flower, allowing for versatility and personalization.
- Keychain Version: You can attach a keychain ring using yarn or glue after completion.
- Height Customization: Add more cactus or pot rounds to make them taller.
- Use stitch markers to track the first stitch of each round, especially for beginners.
Step-by-Step Pattern
Part 1: Cactus (Green Yarn)
Round 1
- Begin with a Magic Ring (MR).
- Work 9 sc into the MR. Pull tight to close the ring.
- Join with a sl st to the first sc.
- Ch 1. (9 sts)
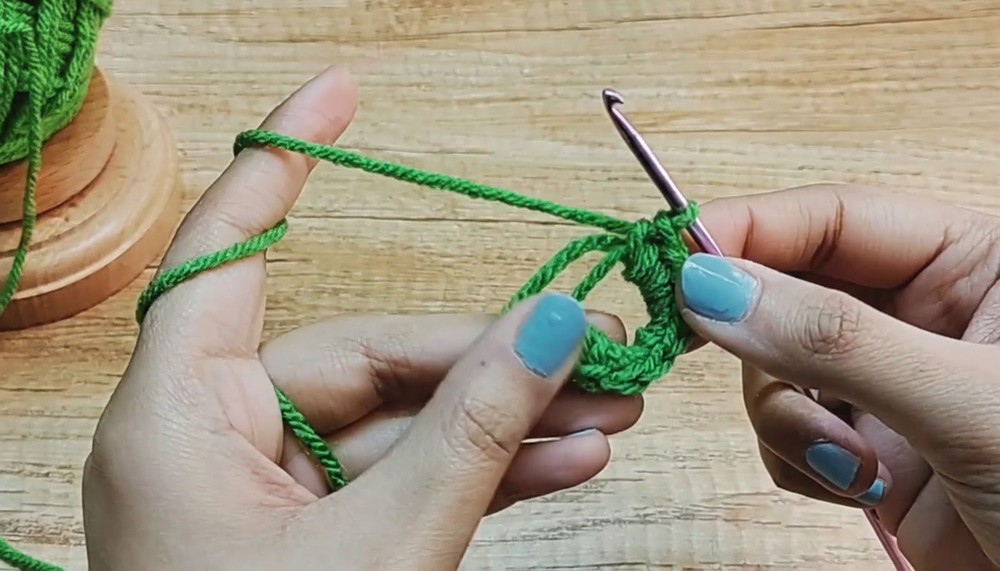
Round 2
- Work 2 dc in each stitch around (increase in each st).
- Join with a sl st to the first dc.
- Ch 1. (18 sts)
Rounds 3–6
- Work 1 fpdc around each post created in the previous round.
- Yarn over, insert the hook from the front to back around the post of each dc.
- Pull up a loop and complete a dc.
- Repeat for all posts. Join with a sl st at the end of each round.
- Ch 1 after every round. (18 sts per round)
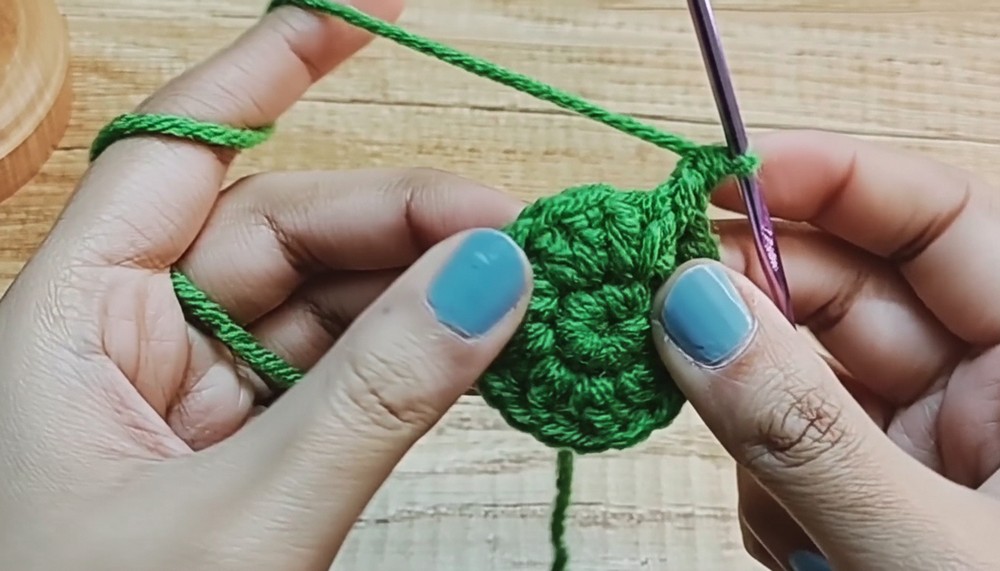
Round 7 (Decrease Round)
- Alternate 1 hdc around the first post and hdc decrease:
- For the decrease, yarn over, pick the post from two adjacent fpdc stitches, and pull up a loop.
- Complete the hdc.
- Repeat the pattern (hdc, hdc decrease) all around.
- Join with a sl st. Ch 1. (12 sts)

Round 8 (Final Round)
- Work 1 hdc around each post created in the previous round.
- Join with a sl st. Ch 1.
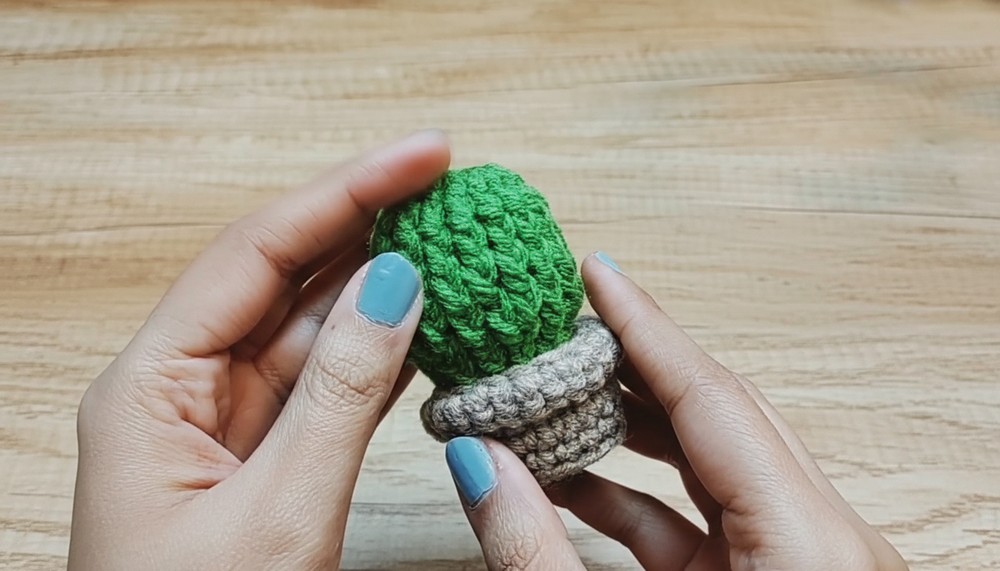
Finish:
- Cut yarn, leaving a long tail for sewing to the pot.
- Fasten off and tighten.
Part 2: Pot (Brown Yarn)
Round 1
- Start with a Magic Ring (MR).
- Work 6 sc into the MR. Pull tight to close the ring.
- Join with a sl st to the first sc.
- Ch 1. (6 sts)
Round 2
- Work 2 sc in each stitch around (increase in each st).
- Join with a sl st to the first sc.
- Ch 1. (12 sts)
Round 3
- Alternate 1 sc in the first st, 2 sc in the next st (inc).
- Repeat around. (18 sts)
- Join with a sl st. Ch 1.
Optional: Add more increase rounds for a larger pot. For example:
- Round 4: 2 sc, inc. (24 sts)
- Round 5: 3 sc, inc. (30 sts)
Round 4
- Work 1 sc in blo (back loops only) of each stitch around. (18 sts)
- Join with a sl st. Ch 1.
Rounds 5–7
- Work 1 sc through both loops of each stitch around to create the pot's height. (18 sts per round)
- Join with a sl st after each round.
Round 8 (Border)
- Work 1 sc in flo (front loops only) of each stitch for a decorative edge. Alternate:
- 1 sc, then 2 sc in the next stitch (optional frilled border).
- Use either a compact pattern or increase in every stitch for dramatic frills.
Finish:
- Cut yarn, leaving a tail for sewing. Fasten off.
Part 3: Mini Flower (Optional)
Magic Ring and Petals
- Start: Magic ring.
- Petals:
- Ch 5. Sl st into the MR. Repeat five times.
- After five petals, pull the ring tight to close the flower.
Finish
- Fasten off, leaving a tail for sewing.
- Attach the flower to the top or side of the cactus using the yarn needle or glue.
Part 4: Assembly
- Stuffing the Pot and Cactus:
- Fill both parts with fiberfill to secure their shape.
- Use a glue gun for a simpler attachment method (optional).
- Sewing the Cactus to the Pot:
- Use the long tail from the cactus to sew it securely to the pot.
- Pick stitches below the pot’s decorative border for cleaner placement.
- Final Detailing:
- Attach the mini flower to the cactus using a yarn needle or glue.
- Optionally, add safety eyes or embroidery for a cute face.
Conclusion
Congratulations! Your Mini Cactus with Pot is complete! This delightful project is versatile and perfect for keychains, desk decor, or gifts. With a customizable pot, cactus height, and detailing, each creation can be uniquely yours.
Pattern Corrections
- Ensure consistent tension throughout the fpdc rounds to avoid uneven texture.
- If stitch counts are incorrect, review increase rounds for possible mistakes.
Tips
- Beginner Friendly: Use a stitch marker to track the start of each round.
- Experiment with Colors: Vibrant flowers or pastel pots can add extra charm.
- Secure Glue: When using a glue gun, avoid overapplication.

Leave a Reply