

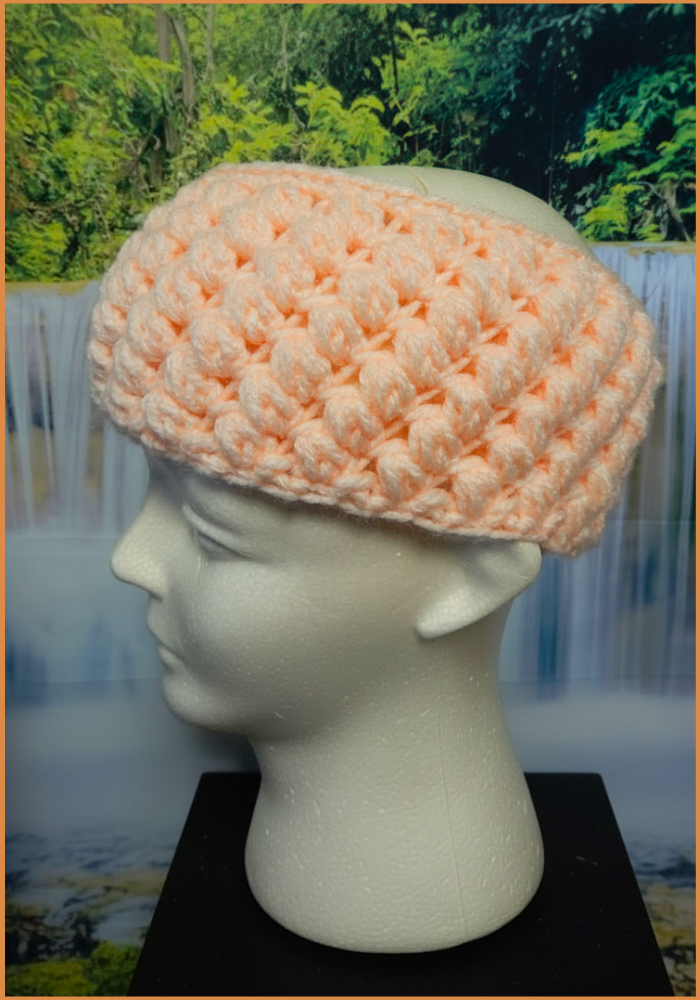
Effortlessly add style to your look with a cozy, free crochet headband pattern that's easy to make and perfect for every occasion.
A stylish, handmade accessory can elevate any outfit, and this free crochet headband pattern is no exception. Perfect for beginners and experienced crocheters alike, this pattern offers a simple yet elegant way to keep your ears warm and your hair in place. Made with soft, chunky yarn, the headband pattern provides both comfort and coziness, making it an ideal addition to your winter wardrobe. Beyond its practicality, it features a modern twist design that adds a touch of sophistication to any look.
Simple Steps to Crochet Headband Pattern for Beginners

Versatility is its strong suit – wear it during a morning jog, while running errands, or simply as a statement piece to complement your outfit. This pattern isn't just great for personal use; it also makes for a thoughtful, handmade gift. The quick and easy pattern means you can whip up several in a short amount of time, perfect for last-minute presents or charity donations.
With the right yarn and a standard crochet hook, the project comes together effortlessly, allowing you to experiment with colors and patterns. Whether you opt for a classic look or something more vibrant, this crochet pattern adds a charming touch to any ensemble while showcasing your crochet skills.
Materials Needed
To start this crochet pattern, you will need the following:
- Crochet Hook: 5.0 mm crochet hook (recommended for working with thick yarn).
- Yarn: Thick yarn (choose based on weather; thicker yarns are better for cold climates).
- Stitch Marker: Optional, but recommended to mark the start and end of rows for accuracy.
- Scissors for cutting yarn after completing the project.
Special Features
- Textured Puff Stitch: Creates a beautifully thick and warm fabric suitable for cold climates.
- Worked in Round or Flat: The stitch can be used in both methods, offering flexibility for different projects.
- Multi-purpose Design: This stitch isn’t limited to headbands; you can use it for infinity scarves, hats, bags, and more.
- Thicker Yarn Option: Perfect for winter accessories, ensuring warmth and coziness.
Step-by-Step Instructions
1. Foundation Chain
- Start by crocheting a foundation chain with an odd number of chains (e.g., 21).
- Alternatively, you can use a foundation single crochet chain for added durability.

2. Join the Round
- Create a circle by joining the last chain to the first chain using a slip stitch.
- Ensure the chain is not twisted before joining so the project maintains a clean and even shape.
3. Begin the Puff Stitch
- Skip the first stitch after joining. Move into the tail of the circle and insert your hook.
- Create the puff stitch as follows:
- Pull up a loop.
- Pass the yarn through the first loop on the hook.
- Repeat this process multiple times (twice for thick yarn, three times if using thinner yarn) until there are seven loops on your hook.
- Yarn over and pull through all seven loops.
- Chain one to secure the puff stitch.

4. Continue Puff Stitches Across the Row
- Skip one stitch, then move to the next and repeat the puff stitch process.
- Work in this pattern until the end of the row, forming a series of evenly spaced puff stitches.
- This stitch works quickly and produces a thick texture that’s perfect for winter accessories.

5. Finishing the Round
- At the end of the row:
- Skip the second-to-last stitch, and work a slip stitch in the last stitch to complete the round.
- Move to the first stitch to repeat the pattern in subsequent rows.
6. Repeat Subsequent Rounds
- Continue working puff stitches across rows, skipping one space between each puff stitch. Repeat until your project reaches the desired height.
7. Closing and Edging
- To finish, replace the puff stitch with simple single crochet stitches for a clean edge:
- Instead of skipping spaces, place one single crochet in each stitch.
- This creates a consistent and polished finish for your project.


Uses and Benefits
- Multi-functional: This versatile stitch is suitable for creating various items such as headbands, infinity scarves, hats, or bags.
- Warm and Cozy: The thick puff stitch makes the fabric ideal for cold winter climates.
- Personalized Design: Adapt the stitch to work flat or round for different styles and purposes.
- Beginner-Friendly: While the puff stitch requires practice, the step-by-step process is manageable for beginners.
Level of Difficulty
This pattern is beginner-friendly but does require attention to detail when pulling loops through the puff stitch. The tutor advises using a crochet hook slightly larger than the yarn recommendation to make pulling through loops easier for those struggling with puff stitches.
Tutor’s Suggestions
- Use Thick Yarn: For colder climates, thicker yarn is preferred as it enhances the warmth and texture of the design.
- Practice Puff Stitch: Familiarize yourself with pulling up loops smoothly to avoid frustration.
- Mark Your Rows: Beginners especially should use stitch markers to keep track of row starts and ends.
- Customize Puff Size: For larger or smaller puff stitches, adjust the number of loops pulled up (three for larger stitches, two for smaller stitches).
Crochet Tip
If pulling your hook through loops is difficult, use a crochet hook half a size larger than recommended for your yarn. This will make the process smoother and less frustrating.
Conclusion
This cozy puff stitch headband pattern is perfect for adding style and warmth to your winter accessories. With its versatile pattern, it can be adapted to crochet other items like scarves, hats, or bags, offering endless creative possibilities. The stitch’s thick and textured appearance makes it a standout choice for projects requiring both beauty and practicality. Beginners will find this pattern enjoyable to learn, while experienced crocheters may appreciate the quick and satisfying results. Give this stitch a try, and enjoy making fashionable and functional items for yourself or loved ones!
Leave a Reply