

Brighten your day with this lovable crochet puppy pattern that adds charm to your home and becomes a sweet gift for everyone you love.
A handmade puppy crafted from yarn is more than just a creation; it’s a heartwarming symbol of love and creativity that brings smiles to anyone who sees it. Whether it’s gifted to a child, placed on a cozy shelf, or given as a token of care to someone dear, its charm can light up spaces and make moments memorable. Using a crochet puppy pattern allows you to create a piece that is entirely your own, with each stitch telling a story of effort and affection.
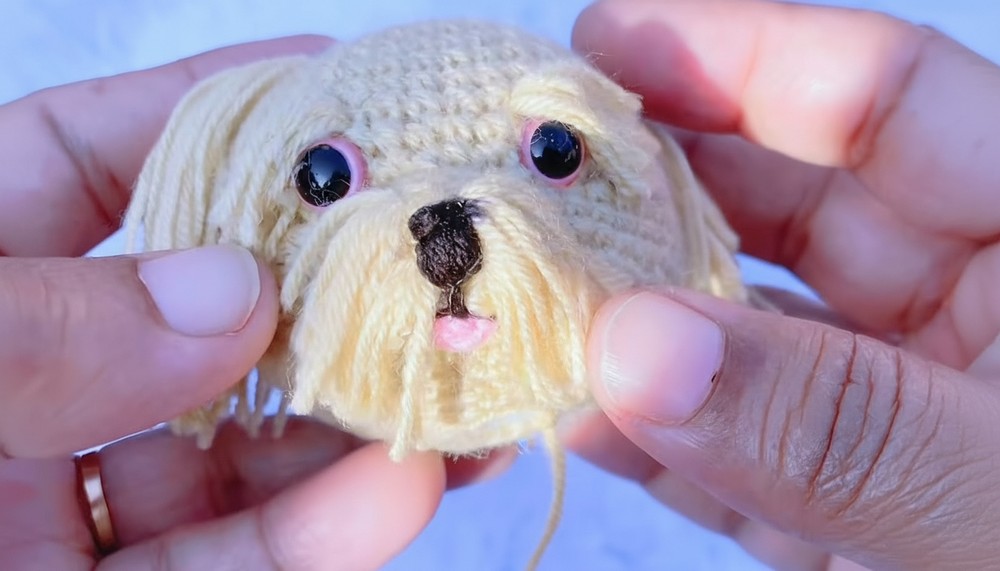
Soft Crochet Puppy Pattern Perfect for Snuggles and Display

Soft pastel tones can give it a gentle sweetness, while bold, vibrant colors can make it a playful and cheerful companion. Every step of crocheting this little puppy is filled with joy, turning simple yarn into something magical and meaningful. It becomes more than an item—it’s a treasured keepsake that brightens a home, a heart, and inspires smiles wherever it goes.
Materials List
- Yarn:
- 3-ply thread (three colors: pink, black, and white)
- Optional: Scrap yarn or embroidery thread for detailing
- Crochet Hook: 2.5 mm hook
- Safety Eyes: 5 mm size with locks
- Stuffing: Cotton or fiberfill
- Glue Gun: For attaching decorative threads
- Scissors: For cutting threads
- Optional Notions:
- Stitch markers to keep track of rounds
- Thin black thread for embroidery detailing (nose, lips, etc.)
Key Abbreviations
- ch: Chain
- sl st: Slip Stitch
- sc: Single Crochet
- inc: Increase (two single crochets in the same stitch)
- dec: Decrease (crochet two stitches together)
- MR: Magic Ring
Special Notes
- The pattern is worked in continuous rounds unless otherwise stated. Use a stitch marker to avoid losing your place.
- Gauge is not crucial for this pattern but ensure stitches are tight to prevent gaps for stuffing.
- The cup is made with multiple decorative elements (eyes, lips, threads) which require assembly after crocheting.
Crochet Pattern
BASE AND BODY
- Round 1 (Base):
- Start with a Magic Ring (MR).
- Work 6 sc into the ring.
- Pull the ring tight and join with a sl st to the first sc. (6 sts)
- Round 2:
- Ch 1. Work 2 sc in each st around.
- Join with a sl st to the first ch. (12 sts)
- Round 3:
- Ch 1. Alternate: 2 sc in first st, 1 sc in next st all the way around.
- Join with a sl st. (18 sts)
- Round 4:
- Ch 1. Alternate: 2 sc in the first st, 1 sc in next 2 sts all the way around.
- Join with a sl st. (24 sts)
- Round 5:
- Ch 1. Alternate: 2 sc in the first st, 1 sc in next 3 sts all the way around.
- Join with a sl st. (30 sts)
- Round 6:
- Ch 1. Alternate: 2 sc in the first st, 1 sc in next 4 sts all the way around.
- Join with a sl st. (36 sts)
- Round 7:
- Ch 1. Alternate: 2 sc in the first st, 1 sc in next 5 sts all the way around.
- Join with a sl st. (42 sts)
- Continue working 42 sc per round for 9 more rounds to build height. Use a stitch marker to keep track.


ADDING DECORATIONS AND DETAILS
Eyes
- Attach 5 mm safety eyes between rounds 6 and 7.
- Note: Ensure symmetry when positioning. Place locks underneath to secure the eyes.
Nose
- Start with a Magic Ring.
- Round 1: 6 sc in MR.
- Pull tight and join to the first sc with a sl st.
- Round 2: Ch 1, 2 sc in same st, 1 sc in next alternating. (9 sts)
- Round 3: Repeat Ch 1, 2 sc in same st, 1 sc in next 2 sts alternating. (12 sts)
- Round 4: Work 12 sc in the round for height.
- Using black thread, embroider nostrils by running the thread to the top of the nose in shape.
Lips
- Use black thread. Draw the lips by running the thread seven times through the same space.
- Repeat on the opposite side for symmetry.

CLOSING THE BODY
- Reduce stitch count with decreases:
- Round 1: Alternate sc 5, dec.
- Round 2: Alternate sc 4, dec, and continue reducing.
- Stuff with cotton or fiberfill while periodically stitching.
- Once the desired shape is achieved, seal the top with a sl st.
DECORATIVE THREADS
Threads around eyes
- Cut 4 inches of thread.
- Glue around the top of the eyes.
- Attach threads with a glue gun for precision.
Handle (Optional)
- Create a slip knot.
- Chain 10 inches of thread and fold it into shape.
- Attach the handle to both sides of the cup.
Conclusion
Congratulations! You've successfully crocheted a beautiful cup complete with decorations. Take time to ensure all decorative details are symmetrical and securely attached.
Pattern Correction
If a round count or stitch doesn't match perfectly, simply adjust your stitch counts. The integrity of the cup will not be affected if minor offsets occur.
Tip
- Assembly Focus: Spend extra care attaching decorative features like the eyes, lips, and handle, as these are vital to the final appearance.
- Stuffing: Ensure the cup is adequately stuffed without overfilling to preserve its shape.


Leave a Reply