

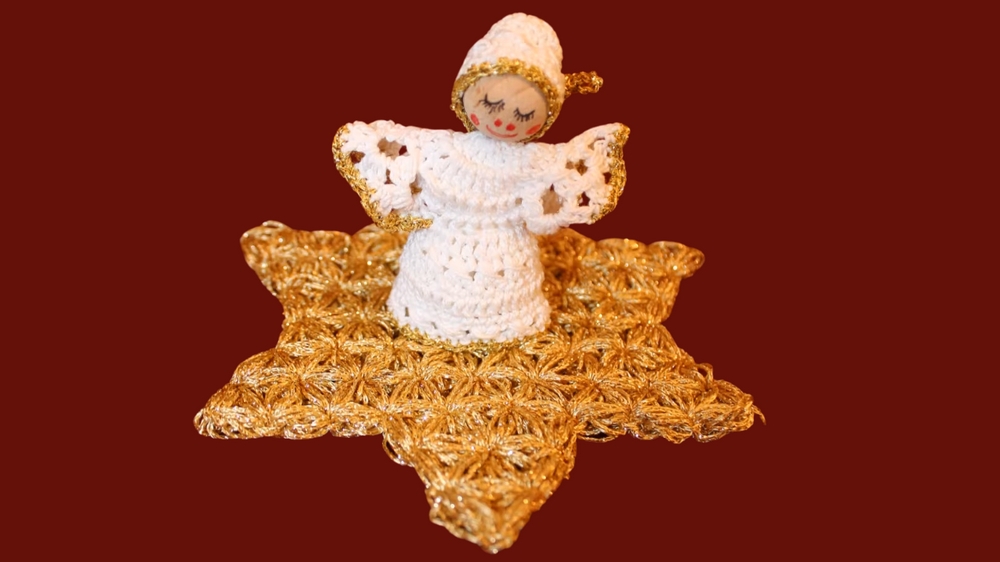
Capture heartfelt charm with the Free Crochet Little Angel Pattern, a lovely project perfect for gifts, festive décor, and lasting keepsakes.
In quiet moments during the holiday season, angels have long symbolized protection, peace, and gentle guidance, inspiring hearts with their serene presence. This delicate crochet project brings that comforting spirit to life, offering a charming figure that can brighten any home, adorn a Christmas tree, or serve as a thoughtful gift. Its soft, intricate form conveys warmth and care, making it both visually appealing and emotionally meaningful.
Whimsical Crochet Little Angel Pattern That Captures Hearts

The project begins with careful foundation rounds to form the body, gradually shaping a balanced, plush figure. Subtle increases and stitch placement develop the wings, arms, and head, giving the angel a graceful posture. Midway, attention to details like the halo, facial features, and wing edges enhances character and charm, while the final rounds complete the figure with symmetry and stability.
Beyond its aesthetic appeal, this little angel offers multiple benefits. It becomes a keepsake for special occasions, a comforting companion for children, or a gentle accent in home décor. Working on the project fosters focus, patience, and a sense of accomplishment, making the process as rewarding as the finished piece. The completed angel radiates serenity and care, serving as a symbol of protection, hope, and thoughtful craftsmanship.
Part 1: Crocheting the Angel’s Dress
Video Link: Watch Part 1
1. Starting with the Base
- Begin with Row 1: Start by chaining 3, then make 4 double crochets to form the dress base.
- Continue with Rows 2–4: Expand the base by doubling the number of stitches in every row (e.g., 5 stitches in Row 2, 9 in Row 3, etc.).

2. Building the Expansion
- Move on to Row 5: Chain 3 to begin, then make one double crochet into the first stitch, followed by two double crochets into the next five stitches to increase the total to 12 stitches.
- Carefully fold the work in half, ensuring the neat side is on the outside. The folding gives the dress its flared shape.
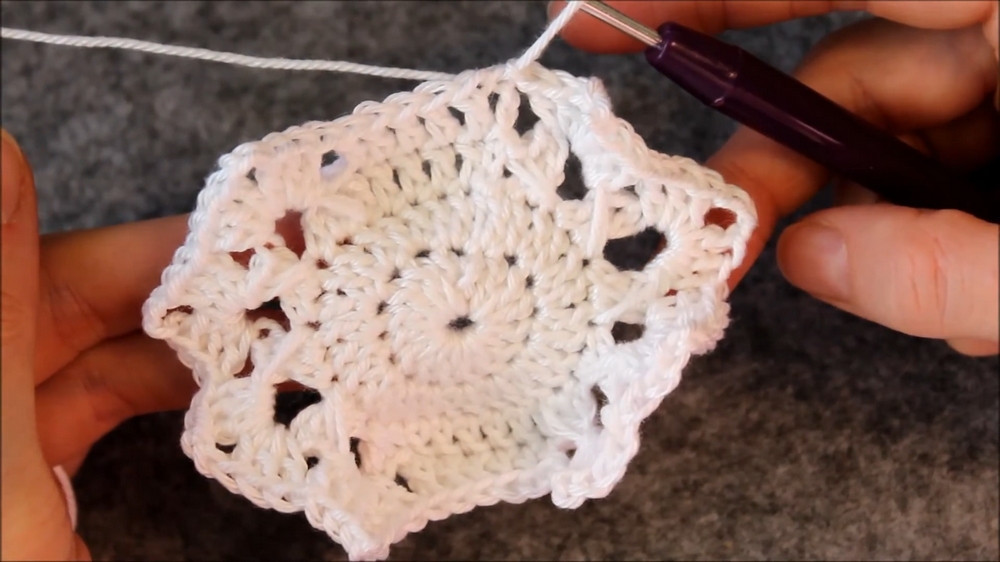
3. Adding Texture
- In the next rows, alternate double crochets with backstitches to add texture:
- Make two double crochets, then a single backstitch.
- Repeat this pattern until the end of the row.
- Backstitches add a visually appealing detail that elevates the look of the dress.
4. Finishing the Dress
- For the final rows, continue working even rows of double crochets, slip stitching to close each row.
- In the last round, switch to half double crochets to taper the flare slightly.

Part 2: Crocheting the Angel’s Hat and Final Assembly
Video Link: Watch Part 2
1. Creating the Hat
- Start with a magic ring: Chain 3 and crochet 15 double crochets into the magic ring. Close the ring with a slip stitch to form a complete round.
- For Row 2, chain 3 at the start and crochet one double crochet into each stitch around.
- In the next row, after chaining 3, alternate one double crochet with a backstitch, continuing this pattern to the end of the round.
2. Completing the Hat
- For subsequent rows, work even double crochets for a round to shape and stabilize the hat. Use slip stitches to close each row.
- Optional: If desired, you can use a metallic or golden yarn to trim the edges of the hat for added elegance.

3. Adding Details to the Dress and Hat
- Work along the edges of the dress and hat to add borders:
- Use a single crochet stitch around the edges. If you encounter chain gaps, crochet two or three single crochets into the chain to make the border uniform.
- This edging step gives the final piece a neat, polished appearance.
4. Assembling and Final Touches
- If you intend to use the angel as a Christmas ornament, attach a golden thread or yarn loop to the top of the hat. Alternatively, crochet a chain to create a hanging loop.
- Optional: Attach a wooden bead with a face drawn on it to form the angel's head. Glue or secure it in place for a finished look.
Special Features of the Project
- Elegant Detailing: Incorporating backstitches into the dress and hat gives the angel a textured and unique appearance.
- Customizable Design: You can decorate the edges with golden yarn or add small embellishments like beads or sequins.
- Seasonal Versatility: Ideal as a handmade ornament for Christmas, but also suitable as year-round decoration or a thoughtful gift.
Materials Needed
- Yarn (main color for the angel; gold or metallic yarn for optional trim)
- Crochet hook (recommended size: 3.5mm or 4mm)
- Scissors
- Yarn needle (for weaving in ends and final assembly)
- Wooden bead (optional, for the angel’s face)
- Stitch marker (optional, but useful for marking start of rounds)
- Glue (if attaching the bead head)
Difficulty Level
Beginner to Intermediate: The basic stitches such as double crochet and half double crochet are beginner-friendly. However, the project includes backstitches, magic rings, and careful assembly, making it a little more challenging. Attention to detail is required to ensure symmetry and a neat finish.
Tutor's Suggestions
- Use Contrast Edging: Metallic or golden yarn for the edging emphasizes the design and makes the ornament stand out.
- Be Patient with the Magic Ring: Take your time to master the magic ring technique for a snug and professional look.
- Adjust the Size: If you'd like a larger or smaller angel, simply increase or decrease the number of stitches in the rows.
- Keep the "Neat Side" on the Outside: Fold and check your work regularly to ensure the more polished side is visible in the final product.
Tip
When working on the hat and dress edges, use smaller, consistent stitches for the border to achieve a cleaner and more professional look. If you find the wooden bead difficult to attach, try embroidering a simple face onto a circle of fabric or crocheting a small sphere as an alternative.
Short Conclusion
By the end of this delightful two-part tutorial, you’ll have a charming crocheted angel ready to spread beauty and joy. Its timeless design makes it suitable for a variety of uses, from decorating a Christmas tree to gifting it as a keepsake to loved ones.

Leave a Reply